Die-cut design software helps convert creative ideas into precise digital templates for cutting machines. It’s used in industries like packaging, automotive, and medical to create accurate, production-ready designs. Here’s what you need to know:
- Key Benefits: Precision, reduced material waste, smoother workflows, and real-time production insights.
- Features: Tools for creating dielines, 3D previews for accuracy, and layout optimizations to save time and resources.
- Applications: Packaging, marketing materials, automotive parts, and more.
- Getting Started: Set up your software with CMYK color mode, 300 DPI resolution, and proper bleed areas. Use industry-standard guidelines for cut, fold, and safety lines.
- File Export: Export in PDF/X formats with 300 DPI resolution and CMYK color mode to ensure compatibility with printers.
This software streamlines production, minimizes errors, and ensures high-quality results for various materials and designs.
How to Create Die Cut Lines for Packaging & Stickers in Illustrator (Print-Ready Setup)
Main Software Features
Modern die-cut software offers a range of tools that help create precise, production-ready designs.
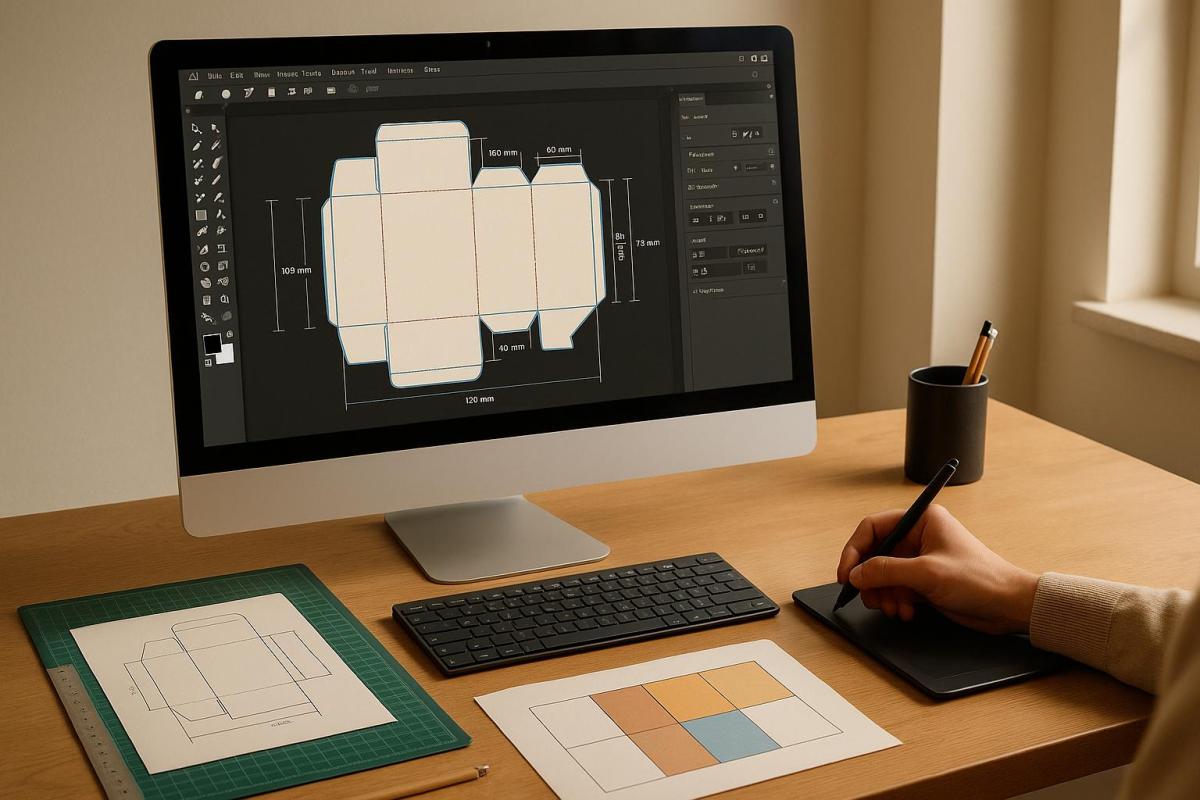
Dieline Tools
Die-cut design software is equipped to generate templates that guide cuts, folds, and adhesive placements. These templates include essential dieline components:
| Line Type | Purpose | Standard Specification |
|---|---|---|
| Cut Lines | Define where material will be cut | Solid lines, typically in magenta |
| Fold Lines | Mark where material bends | Dashed lines, usually blue |
| Glue Tabs | Indicate adhesive areas | Dotted lines with shading |
| Safety Lines | Prevent text/logo cutoff | 1/8 inch (3mm) from cut edge |
| Bleed Lines | Ensure full coverage | 1/8 inch (3mm) extension |
Professional software ensures these specifications are automatically maintained while allowing intuitive adjustments as needed.
3D Preview Tools
Advanced 3D visualization tools bring flat designs to life, offering interactive previews that enhance design accuracy. These tools provide:
- 8K texture mapping (7680×4320 resolution) for detailed previews
- Micron-level precision (within 0.001mm) for exact measurements
- 360-degree exploration of models for a thorough review
"3D models also let teams inject more detail, thus helping everyone stay on the same page from idea to production." – Autodesk Fusion
These features ensure that teams can visualize and refine their designs before production begins.
Layout Tools
Once the design is visualized in 3D, layout tools help refine it for efficient production. For example, GNS North America utilized advanced layout optimization software in their facilities in Canton and San Jose Iturbide. Their simulation suite allowed rapid iterations of pad and binder placements, resulting in 2D blank profiles that met strict customer tolerances.
By using die-cut software effectively, businesses can see benefits like a 30-50% boost in efficiency, faster development cycles, and reduced material waste. Key features include:
- Automated nesting patterns to maximize material usage
- Dynamic alignment guides for precise positioning
- Real-time waste analysis for better resource management
- Smart distribution of design elements to streamline production
These tools not only improve efficiency but also help minimize errors and waste during the manufacturing process.
Getting Started Guide
Software Setup
To begin setting up your die-cut design software, start by checking your system meets the necessary requirements. Once installed, configure your workspace carefully. Switch the color mode to CMYK, create separate layers for dielines and artwork, and mark the dieline layer as non-printing. Don’t forget to establish default bleed areas – set these to 0.125 inches for precision. With these settings in place, you’re ready to dive into creating your first dieline.
Making Your First Dieline
Building your first dieline is a straightforward process with two key steps:
-
Set Up Your Document
Start by creating a document with the correct dimensions and settings. Stick to the standards: CMYK color mode, 300 DPI resolution, a 0.125-inch bleed, and a vector format. These foundational settings ensure your design is print-ready. -
Add Guidelines
Incorporate industry-standard guidelines for cut lines, fold lines, safety zones, and bleed areas. These guidelines help maintain accuracy and ensure your design aligns with professional printing requirements.
"When you’re ready to send your design file off to a professional printer… it’s important to make sure that it’s prepared correctly. By following these best practices, you can ensure that your print job comes out looking exactly the way you want it to." – Printing Image
Once your dieline meets all specifications, it’s time to export the file for printing.
File Export Guide
After finalizing your dieline, export your file with the following settings to ensure the best results:
| Setting Type | Specification | Purpose |
|---|---|---|
| File Format | PDF/X-1a or PDF/X-4 | Ensures compatibility with printers |
| Resolution | 300 DPI minimum | Guarantees high-quality prints |
| Color Mode | CMYK | Maintains accurate color output |
| Bleed Setting | 0.125 inches | Allows for clean edge printing |
| Font Treatment | Outlined | Prevents font-related printing issues |
For vector-based designs, keep these tips in mind:
- Package all linked files and fonts together.
- Remove color profiles to keep output consistent.
- Use spot colors specifically for die-cut lines.
- Account for a possible manufacturing variance of 1–2 mm.
- Convert all text into outlines to avoid any font conflicts.
When exporting PDFs, make sure to enable the "Use Document Bleed Settings" option and avoid applying security restrictions that could disrupt the production process. If your file size is large, opt for secure file transfer services to maintain quality without compression.
sbb-itb-ce53437
Beginner Tips
Using Ready-Made Templates
Speed up your die-cut design process by using pre-made templates. When creating your own templates, ensure the dieline is clearly marked with a 1pt pink stroke for easy identification.
Keep your artwork and technical elements organized by separating them into distinct layers:
| Layer Type | Purpose |
|---|---|
| Dieline Layer | Non-printing, marked with a 1pt pink stroke |
| Artwork Layer | Contains visual elements within safe margins |
| Fold Lines | Dashed lines to indicate folds clearly |
| Bleed Area | Extends artwork beyond the trim for coverage |
Once your template is set, think about how your choice of materials will influence the final design.
Material Guidelines
Different materials react uniquely to cutting and folding, so it’s crucial to understand their behavior. Here are a couple of key points to keep in mind:
- Paper Selection: Choose a paper thickness that suits your project’s needs. Keep notes on which options work well for future reference.
- Material Behavior: Adjust your machine settings to match the material you’re working with. Avoid forcing materials through the machine – if you encounter resistance, reverse the plates and check for any obstructions. To prevent warping, rotate your plates regularly [30, 33].
After selecting the right materials and refining your templates, it’s time to test your design.
Making Test Samples
Testing is an essential step before moving to full production. Break the process into these phases:
| Testing Phase | Action Items |
|---|---|
| Digital Review | Ensure all elements are positioned correctly |
| Print Test | Confirm that colors meet your specifications |
| Assembly Test | Check for smooth and accurate assembly |
| Production Review | Verify all technical requirements are met |
Start by printing a smaller version of your design. Check the alignment, folds, and overall structure by assembling a mock-up. Test its durability and note any adjustments you need to make.
When experimenting with different materials, keep detailed records of the combinations and machine settings that work best. These notes will help you develop dependable workflows for future projects.
Miro Printing & Graphics Inc. Die-Cut Services
Miro Printing & Graphics Inc. brings your designs to life with expert die-cut services, ensuring precision and quality in every project.
Die-Cut Options Offered
Whether you need die-cutting for rigid boxes, folding cartons, or labels, Miro Printing & Graphics Inc. delivers with accuracy. They also provide hot stamping to give your packaging a polished, standout look.
File Setup Guidelines
To ensure smooth production, submit dieline files in vector formats such as .ai, PDF, or EPS. Be sure to include exact color specifications using Pantone codes or CMYK values.
Design Support Process
Their design team works closely with you during consultations, reviewing your files for structural accuracy and production readiness. This proactive approach helps resolve potential issues early in the process.
Summary
Die-cut design software plays a crucial role in crafting precise and professional packaging that adheres to exact specifications. Its core features – such as dieline tools, 3D previews, layout capabilities, and vector accuracy – allow designers to create production-ready formats like PDF or AI files.
"In the packaging and printing industry, the term ‘dieline’ refers to a template needed to ensure the correct layout of a final physical package." – Brandon Malz, Author, GlobalVision
By focusing on accurate dielines, designers can significantly reduce production errors, saving both time and resources. Essential elements like proper bleeds, safety margins, and full-scale mockups are critical to ensuring that the final packaging meets production standards.
Miro Printing & Graphics Inc. specializes in delivering high-quality die-cut services. Their process includes strict vector file requirements and collaborative design reviews, ensuring the creation of packaging that not only meets production needs but also makes a strong visual impact.
FAQs
What should I keep in mind when setting up die-cut design software for the first time?
When you’re setting up die-cut design software for the first time, it’s crucial to get familiar with the tools and interface. Start by ensuring your document is properly configured – this means setting the right dimensions, adding bleed areas, and defining accurate dielines. These elements are key to achieving precise die-cutting results. To keep things organized, use layers and assign distinct colors to different elements, like solid lines for cuts and dashed lines for folds or creases. This simple step can prevent mix-ups during production.
If you’re new to this, pre-made templates offered by the software can be a lifesaver. They simplify the process and help minimize mistakes. Take a moment to double-check any specific setup requirements for your project. A bit of preparation can make all the difference in creating polished, professional designs!
How do 3D preview tools improve the design process for die-cut projects?
3D preview tools are a game-changer for designing die-cut projects, offering a lifelike view of how the final product will look before it goes into production. This early visualization helps designers catch issues like misalignment or sizing mistakes, reducing the risk of expensive errors during manufacturing.
These tools also make collaboration smoother between designers and clients. By presenting a clear, interactive model of the design, clients can provide more accurate feedback and approve designs more quickly. In the end, 3D previews simplify the process, save time, and help ensure the final product aligns with expectations while minimizing the need for revisions.
How can I make sure my die-cut design is print-ready and works with professional printers?
To make sure your die-cut design is ready for printing and works seamlessly with professional printers, here’s what you need to do:
- Create precise dielines: Use design tools like Adobe Illustrator to craft accurate dielines. Keep your cut, fold, and bleed lines on separate layers, and assign unique spot colors to each for clarity.
- Save the file properly: Export your design as a high-resolution PDF (300 DPI) in CMYK color mode. Don’t forget to include a bleed area of at least 0.125 inches to avoid unwanted white edges after cutting.
- Review your design thoroughly: Check that all elements stay within the safe zones. If you can, do a test print to spot any issues before sending the file to the printer.
Following these steps will help minimize errors and ensure your final product looks polished and professional.
Related posts
- How to Create Die-Cut Templates for Printing
- How to Prepare Files for Die-Cutting and Laser Cutting
- How Digital Die-Cutting Works for Packaging
- Latest Trends in Automated Die-Cut Packaging Production
https://app.seobotai.com/banner/banner.js?id=68300e2cd3b96619817e0b5b
