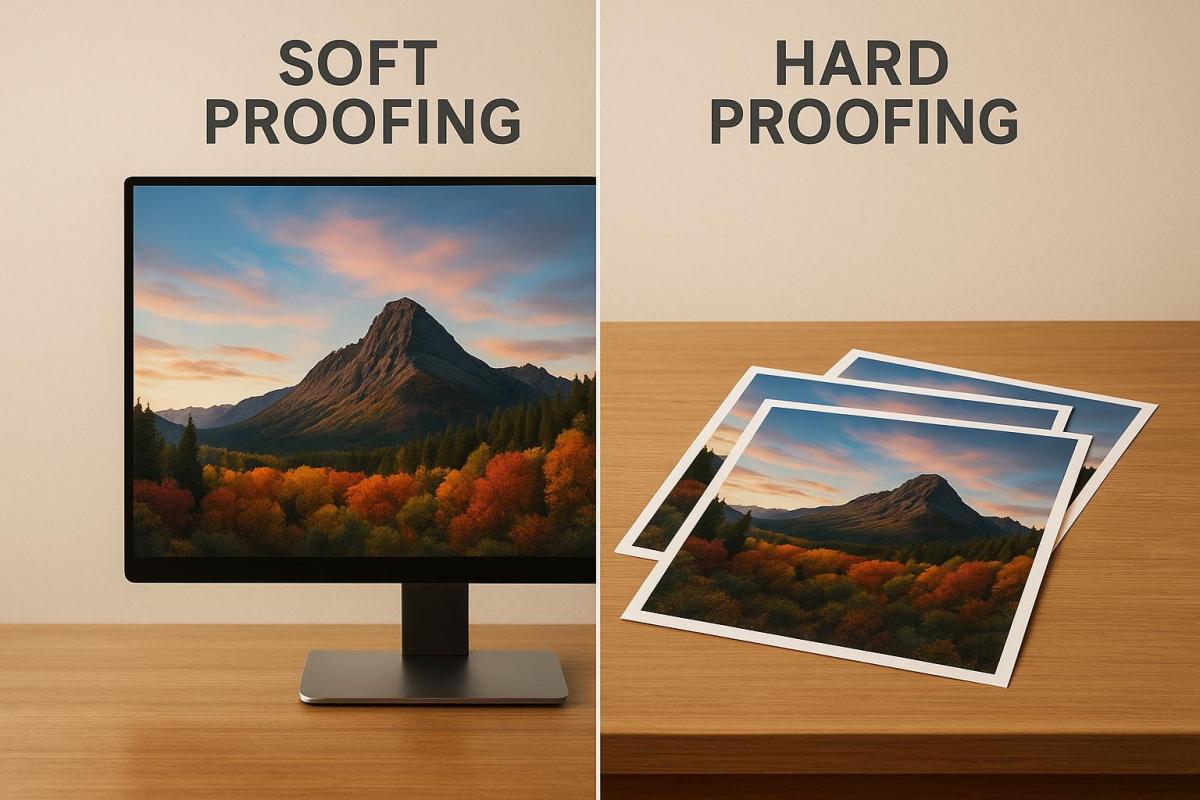
Soft proofing and hard proofing are two methods used in the printing process to ensure your final product meets expectations. Here’s a quick breakdown:
- Soft Proofing: A digital preview of your design, typically viewed on a calibrated monitor. It’s fast, cost-effective, and works well for simple projects like flyers or business cards. However, it can’t replicate physical details like paper texture or finishes.
- Hard Proofing: A physical sample created with actual materials and printing techniques. It provides accurate color representation and allows you to evaluate elements like texture, folds, and finishes. This method is ideal for high-stakes projects but is more expensive and time-consuming.
Quick Overview:
- Soft proofing is great for speed and budget but lacks physical detail.
- Hard proofing ensures precision for complex projects but takes longer and costs more.
Choosing the right method depends on your project’s complexity, budget, and need for accuracy.
Soft Proof, Hard Proof, and Press Test Proof
What is Soft Proofing?
Soft proofing is a digital method to preview how your design will look when printed, using a calibrated monitor or device. Instead of creating a physical sample, the design is typically reviewed as a PDF. This process relies on specialized software and ICC color profiles – digital standards that ensure colors appear consistently across devices – to give you a close approximation of the final printed result.
The main advantage of soft proofing is its speed and convenience. You can receive, review, and revise digital proofs almost instantly, cutting down on both time and costs. This makes it an ideal choice for simpler projects like business cards, flyers, or postcards. However, the accuracy of soft proofing depends heavily on using a properly calibrated monitor to ensure the colors on screen match the printed version as closely as possible.
How Soft Proofing Works
Soft proofing works by displaying your print-ready file on a calibrated monitor, using ICC color profiles to simulate factors like printer dot gain (how ink spreads on paper) and the color of the paper itself. To get the best results, it’s essential to review the design under neutral lighting conditions – around 5,000 Kelvin is recommended – to maintain consistency in color perception.
During the review, you can check for issues with layout, text, or color accuracy and make necessary adjustments before giving final approval. By skipping the need for physical proofs, soft proofing not only speeds up the process but also reduces waste, making it a more eco-friendly option.
Common Tools for Soft Proofing
Popular tools for soft proofing include Adobe Acrobat, Adobe Photoshop, and EyeC. These programs support ICC-based digital proofing and are effective for checking color accuracy. However, they cannot replicate physical elements like the texture of the paper or the finish of the ink. To ensure reliable results, it’s crucial to use a monitor that is regularly calibrated for color accuracy.
Next, we’ll dive into hard proofing to see how it differs from this digital-first approach.
What is Hard Proofing?
Hard proofing provides a physical print sample, allowing you to evaluate the final product’s color, texture, and construction in a tangible way. Unlike soft proofing, which offers a digital preview, hard proofing uses production-matched inks, paper, and finishes to create an accurate representation of the final print.
This method ensures you can assess details that a screen simply can’t convey, like how the paper interacts with finishes or how colors appear under different lighting. Once approved, the hard proof becomes a contract proof, confirming that everyone agrees on the standards for the final print.
Key Features of Hard Proofing
What sets hard proofing apart is its physical format. You can feel the paper’s texture and weight, whether it’s glossy, matte, or enhanced with finishes like spot UV or varnish. It also shows how ink behaves on the actual material, offering true-to-life color accuracy that digital screens can’t replicate.
Key physical elements like embossing, die cuts, perforations, and binding are clearly visible, allowing you to check details like fold alignment, page order, and registration. Calibrated printers with standardized profiles ensure the proof mimics production conditions, so what you see is as close as possible to the final product. This process bridges the gap between design and production, setting clear expectations for quality.
When Hard Proofing is Used
Hard proofing is a must for projects where precision is non-negotiable. It’s crucial for color-critical work, such as brand materials, product photography, or fine art prints, where exact color reproduction is essential. It’s also standard for complex projects like multi-page brochures, books requiring precise margin and binding checks, or luxury packaging where the tactile feel of the paper plays a key role.
Packaging projects with intricate elements – like die-cut sections, metallic inks, or special varnishes – benefit significantly from hard proofing. A physical review ensures everything aligns with expectations, from the tactile experience to the visual details. By catching issues early in the proofing stage, you can avoid costly reprints, reduce waste, and prevent misunderstandings, saving both time and money.
Soft Proofing vs. Hard Proofing: Side-by-Side Comparison
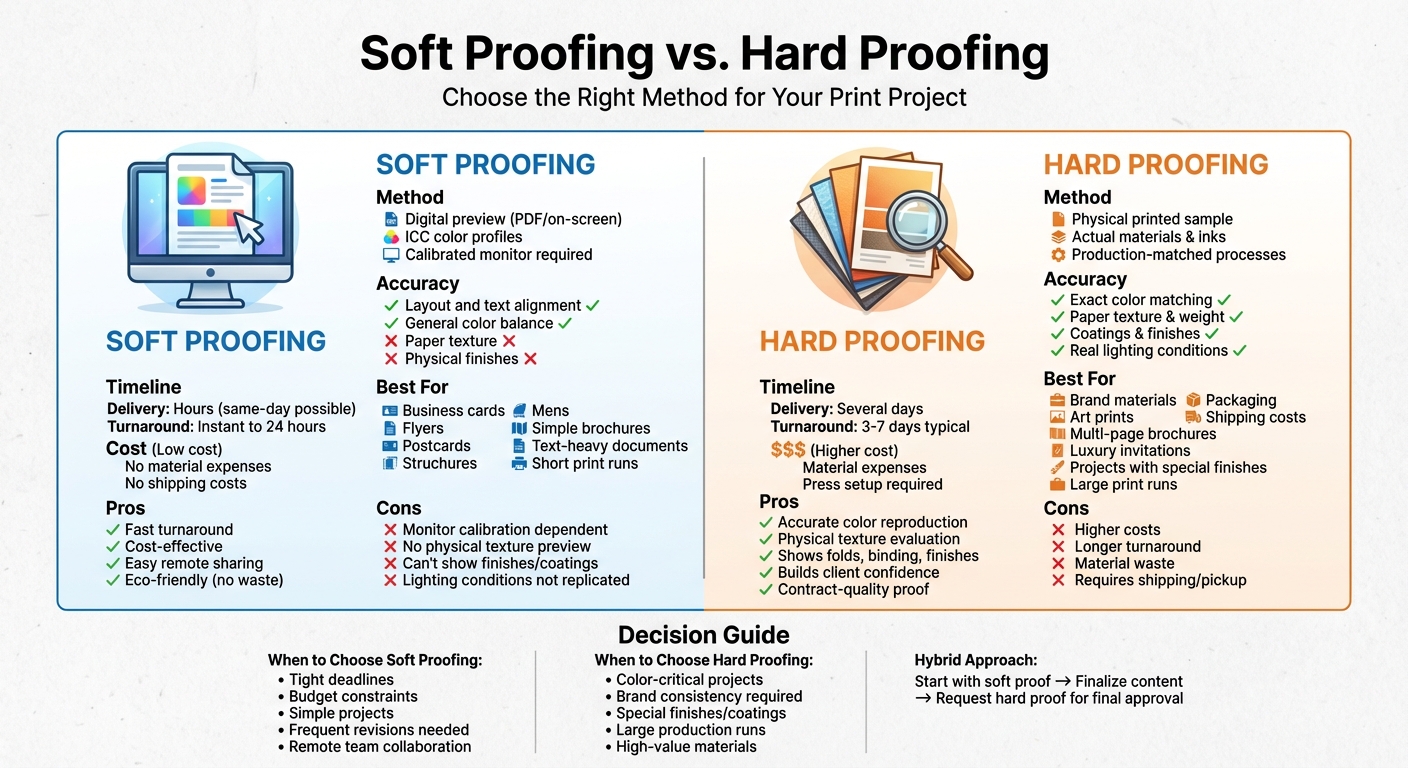
Soft Proofing vs Hard Proofing Comparison Chart
Differences in Method and Accuracy
Soft proofing uses digital tools, like PDFs or on-screen previews, to simulate how your design will look when printed. By applying ICC profiles, it gives an approximate idea of how colors will appear on specific paper types and under press conditions. This approach focuses on checking layout, text alignment, bleed areas, and general color balance. Under ideal conditions, soft proofs can provide a reliable preview of these elements.
Hard proofing, on the other hand, delivers a physical sample that closely matches the final product. It uses the actual materials and printing processes, allowing you to evaluate color accuracy, paper texture, coatings, and finishing touches. This method provides a tangible preview, making it especially useful when even small details, like texture and finish, are critical.
These two methods not only differ in their technical processes but also in cost and time requirements.
Cost and Time Considerations
Soft proofing is cost-effective and quick. You can typically receive a digital proof within hours, making it ideal for projects with tight deadlines that require same-day or next-day production.
Hard proofing, however, comes with higher costs due to the need for press setup, materials, and finishing. It also takes longer – usually several days – since it requires scheduling a proof run, printing the sample, applying finishes, and either shipping it or arranging a pickup. While this process is more time-intensive and expensive, it can be invaluable for large-scale or high-value projects by helping to catch potential issues early. This can save money in the long run by preventing waste, reprints, or dissatisfied customers.
Pros and Cons of Soft Proofing
Understanding the strengths and weaknesses of soft proofing helps in comparing it effectively with hard proofing.
Advantages of Soft Proofing
Soft proofing offers instant digital previews, which can significantly cut down turnaround times. This makes it a great option for meeting tight deadlines, as decisions can often be made on the same day.
It’s also a cost-effective solution. Since it doesn’t require paper or ink, material expenses are eliminated. This makes it especially suitable for straightforward projects like business cards, flyers, and postcards.
Another big plus? It’s more environmentally friendly. By reducing waste and avoiding shipping delays, clients can review designs remotely on calibrated monitors, which saves time and resources.
While these advantages are appealing, there are some important limitations to consider.
Disadvantages of Soft Proofing
One major downside is its dependence on properly calibrated monitors. Without regular calibration, the colors you see on the screen may not match the final printed version.
Additionally, soft proofs can’t replicate physical attributes like paper texture, weight, finish, or how ink will look under different lighting conditions. This limitation becomes critical for more complex projects that involve folding, binding, or special coatings. For instance, a customer at Miro Printing & Graphics Inc., Judy W., approved a digital proof for business cards but later discovered an error in the final print.
| Aspect | Advantages | Disadvantages |
|---|---|---|
| Speed | Instant digital review and easy sharing via email | N/A |
| Cost | Eliminates material expenses, lowering project costs | N/A |
| Accuracy | Effective for layout and color checks on calibrated screens | Relies on monitor calibration; doesn’t account for texture, finish, or lighting |
| Best For | Simple projects like flyers, business cards, postcards | Not ideal for projects needing evaluation of physical details like coatings or folds |
These highlights provide a quick overview of why soft proofing works well for some projects but might fall short for others.
sbb-itb-ce53437
Pros and Cons of Hard Proofing
Hard proofing involves creating a physical sample that closely mirrors the final product. While it offers undeniable advantages, it also comes with some trade-offs.
Advantages of Hard Proofing
One of the biggest perks of hard proofing is accurate color representation. By using production-grade materials, inks, and techniques, it ensures colors appear just as they would in the final product. Plus, you can view these colors under real lighting conditions and on actual paper textures – something no digital screen can fully replicate.
Another advantage is the ability to physically evaluate the details. You can feel the paper’s weight, texture, and finish, and assess coatings, varnishes, folding, and binding. For projects like brochures or books, this hands-on review helps confirm margins, construction quality, and even how the finished piece feels when held.
Hard proofing also boosts client confidence. A physical sample serves as a tangible "seal of approval" for all stakeholders to review together. This collaborative approach minimizes miscommunication and ensures everyone is on the same page before moving to full production.
However, these benefits come at a cost.
Disadvantages of Hard Proofing
The most obvious downside is higher costs. Producing a physical sample involves actual materials and equipment, making it far more expensive than simply sending a digital proof. For simpler projects, like business cards, this added expense might not make sense.
Another drawback is longer turnaround times. Printing, cutting, folding, binding, and shipping the sample for review takes time, which can delay approval processes – especially problematic for tight deadlines.
Lastly, hard proofing can lead to material waste. Each sample uses paper, ink, and other resources, making it less eco-friendly than digital alternatives. While the process helps prevent waste during large-scale production, multiple revision rounds can still add up.
Here’s a quick comparison of the pros and cons:
| Aspect | Advantages | Disadvantages |
|---|---|---|
| Precision | Exact color matching with production methods; accurate under real lighting | N/A |
| Physical Review | Hands-on assessment of weight, texture, finish, folding, and binding | Generates material waste; less eco-friendly |
| Collaboration | Builds client confidence; reduces errors before production | Higher costs; longer production timelines |
| Best For | Complex projects with special finishes, folds, or embossing | Not ideal for simple, low-stakes print jobs |
Despite its challenges, hard proofing is invaluable for projects where precision and physical quality can’t be compromised. It’s a resource-heavy process, but for high-stakes work, the benefits often outweigh the drawbacks.
How to Choose Between Soft and Hard Proofing
Selecting the right proofing method depends on factors like budget, timeline, the importance of accurate color and material reproduction, the complexity of the project, and the size of the print run. Soft proofs are cost-effective and deliver quick digital previews, while hard proofs involve actual materials, press setup, and shipping, leading to higher costs and longer turnaround times – but they provide a more accurate preview of the final product.
Each method has its own strengths and limitations, and your decision should align with the project’s needs. For projects where precise color and material reproduction are critical – such as branded marketing materials, packaging, or art prints – hard proofs are invaluable. They show how ink behaves on specific materials and how finishes will appear. On the other hand, for projects where minor color variations won’t impact the final result, such as office documents or simple flyers, soft proofs are often sufficient.
The scale and value of the project also play a role. For large print runs or premium pieces with significant costs, investing in a hard proof can save money in the long run by catching errors before mass production. For smaller runs or less critical materials, the cost of a hard proof may not be worth it. Below are guidelines to help you determine when to use each method.
When to Choose Soft Proofing
Soft proofing is ideal for straightforward, text-heavy, or non–color-sensitive projects where speed and cost are priorities. Examples include office documents, internal training materials, basic flyers, postcards, and simple brochures – especially when printed on standard paper and finishes. With soft proofs, you can review and approve a PDF within hours, making them perfect for tight deadlines, frequent updates, or projects requiring several design revisions.
This method is also practical for teams spread across different locations, as digital proofs can be easily shared for quick feedback and approval. For short digital print runs or projects with low stakes, the time and cost required to produce a physical proof often outweigh the benefits.
When to Choose Hard Proofing
Hard proofing is the better choice for projects where color accuracy, branding, or material quality is paramount. This includes packaging, photo-heavy catalogs, art prints, luxury brochures, and any project that demands flawless color reproduction. Hard proofs are also essential for pieces where paper texture, weight, coatings, or finishing details significantly affect the final look – such as luxury invitations, product sheets with special coatings, or intricate folded and bound designs.
For multi-page documents, hard proofs help ensure details like spine width, margins, and page order are correct. They’re also a smart choice when working with a new printer, unfamiliar paper, or an untested process, as they let you confirm how your design translates on specific equipment before committing to a full production run.
A hybrid approach often works well for many U.S. clients. Start with a soft proof to finalize the content and initial color adjustments, then request a single hard proof for final approval on high-value or flagship materials. This strategy helps reduce costly changes late in the process while still providing the assurance of a physical sample for quality-critical projects.
Proofing Workflows at Miro Printing & Graphics Inc.
At Miro Printing & Graphics Inc. in Hackensack, NJ, the proofing process kicks off with an emailed soft proof. This initial step helps clients quickly review the layout, text, and colors, making it easier to spot and fix any issues early on. It’s a cost-effective way to speed up approvals, especially for projects requiring copy edits or tweaks to the design. Once the client gives the green light – or after a few rounds of revisions – the team decides on the next steps based on the project’s complexity and color requirements. For jobs with more demanding specifications, the process moves to a hard proof.
When it comes to color-critical or intricate projects, Miro creates a calibrated hard proof using their in-house digital or offset printing equipment. This proof is produced on either the final paper stock or a very close match. Julia I., a satisfied customer, shared her experience:
I received a video of my print sample (a mini booklet) for approval before they proceeded with the rest.
This thoughtful approach ensures that both the colors and physical details – like folds, binding, and finishes – are spot-on before full production begins.
Miro’s in-house bindery takes proofing a step further. For projects such as multi-page booklets, brochures, or custom designs, they can create a fully assembled prototype. This includes printing, cutting, folding, and binding a single sample, so clients can check details like spine width and panel alignment. These full mockups are invaluable for catching problems – such as text too close to trim edges or misaligned panels – that a soft proof might miss. By offering this hands-on solution, Miro enhances the proofing process and minimizes the risk of errors.
This workflow highlights Miro’s focus on delivering efficiency, affordability, and quality. Their team carefully advises clients on the best proofing method based on their budget and timeline. For simpler projects like office documents or basic flyers, a soft proof is usually enough. However, for branded materials, packaging, or large offset runs where color consistency is key, they recommend including a hard proof to avoid costly mistakes. By combining soft proofs for speed with hard proofs for precision, Miro ensures high-quality results across digital, offset, and large-format projects.
Conclusion
Deciding between soft and hard proofing depends on the specific needs of your project. Soft proofing offers a quick and budget-friendly digital preview, making it ideal for simpler tasks. On the other hand, hard proofing provides a physical sample to ensure precise colors, textures, and details, making it better suited for more intricate, brand-sensitive work.
Soft proofs are faster and more economical but rely heavily on accurate monitor calibration and don’t provide the tactile details that some projects demand. Hard proofs, while more time-consuming and costly, deliver a real-world representation of the final product. Often, combining both approaches – using soft proofing for initial adjustments and hard proofing for final approval – can strike the perfect balance between efficiency and accuracy.
At Miro Printing & Graphics Inc. in Hackensack, NJ, our team works closely with you to tailor the proofing process to your project’s unique needs. Whether you’re looking for a quick digital review or a detailed physical sample, we’ve got you covered. By sharing your questions, brand guidelines, or reference materials, you’ll ensure a smooth proofing process. With our in-house digital and offset printing, bindery, and design services, you can approve your work with confidence before moving into full production.
FAQs
What steps can I take to ensure accurate colors during soft proofing?
To get accurate colors during soft proofing, the first step is using a calibrated monitor paired with the correct ICC color profiles for your specific project. This ensures your screen shows colors that closely match what you can expect from the final printed piece.
It’s also important to mimic the print environment by tweaking your software settings to align with the paper type, ink, and printer details. For the most reliable results, compare your soft proof against a hard proof under proper lighting – natural daylight or standardized light boxes work well for this.
Consistently calibrating your monitor and sticking to reliable color management practices play a big role in achieving dependable and accurate soft proofing results.
What types of projects benefit most from hard proofing?
Hard proofing works best for projects that demand accurate color and fine details. This is especially true for branding materials, packaging designs, and premium marketing pieces. A physical proof lets you check the final product’s quality and ensure it aligns with your expectations before large-scale production begins, helping to avoid expensive mistakes.
Can I use both soft proofing and hard proofing together for better accuracy?
Combining soft proofing and hard proofing is a smart way to improve accuracy and minimize mistakes. Soft proofing gives you a digital preview of your design, helping you see how it might look on-screen. On the other hand, hard proofing provides a physical sample, allowing you to check details like colors, alignment, and overall quality before committing to full production.
By using both approaches, you can identify potential problems early and ensure your printed materials turn out exactly as planned.
Related Blog Posts
- Proofing Process: From Screen to Print
- Soft Proofing Techniques for Accurate Colors
- How to Ensure Color Accuracy in Proofing
- Checklist for Reviewing Hard Copy Proofs
https://app.seobotai.com/banner/banner.js?id=693f5895df12e5e3fea8b68e
