When it comes to creating banners for events or trade shows, size matters. A poorly sized banner can either get lost among displays or overwhelm your booth. To get it right:
- Follow venue rules: Check height limits, fire codes, and placement restrictions to avoid delays.
- Measure your booth: Match banner size to booth type (e.g., 33"x81" for 10’x10′, 4’x8′ for larger spaces).
- Plan for viewing distance: Use 1 inch of text height for every 10 feet of viewing distance.
- Choose the right banner type: Backdrops, retractables, hanging signs, or tabletop banners – each serves a specific purpose.
- Check print specs: Ensure proper resolution (150–300 dpi), safe margins, and finishing details like grommets or pole pockets.
The key is preparation. By aligning your banner dimensions with booth size, venue regulations, and print standards, you’ll create a polished display that stands out. Partnering with a professional printer ensures everything runs smoothly.
Step 1: Check Venue and Event Requirements
Review Venue Restrictions
Start by requesting the exhibitor manual from your venue or show organizer. This document outlines key restrictions, including height limits for displays. Most U.S. trade show venues enforce height caps – typically 8 to 12 feet for inline booths, while island or peninsula spaces might allow taller structures. Overhead signs are usually reserved for island booths, and banner height for inline booths is often strictly regulated.
Pay close attention to fire codes and aisle clearance rules. Materials must typically meet flame-retardant standards, such as NFPA 701 compliance, and displays must stay clear of marked aisles and fire equipment. Larger convention centers may permit taller structures but often require additional rigging approvals. On the other hand, smaller venues like hotels tend to have stricter height limits and may prohibit ceiling rigging due to weight restrictions or evacuation concerns. To ensure compliance, consider working with a professional printer like Miro Printing & Graphics Inc., which can provide materials that meet these venue standards.
Once you’ve reviewed the restrictions, measure your booth space to see how these rules apply to your specific setup.
Measure Your Booth Space
Start with your booth’s official dimensions, such as 10’×10′, 10’×20′, or 20’×20′, and identify its type (inline, corner, peninsula, or island). This will determine where and how you can position banners. Measure the depth, width, and usable height based on the venue’s floor plan.
For a 10’×10′ booth, compact vertical banners work best. In a 10’×20′ space, you can opt for medium-sized floor-standing banners or backdrops, typically between 3’×6′ and 4’×8′. Larger spaces, like a 20’×20′ island booth, can accommodate bigger banners such as 48"×92" or multi-panel backwalls, as long as they don’t extend into aisle areas. Sketch out your banner layout to ensure it fits within the boundaries and complies with the rules.
Finally, confirm the specific technical requirements set by the event organizer.
Check Organizer Requirements
Once you’ve mapped out your booth dimensions, review the organizer’s guidelines for bleed and safe margins – usually 1 to 2 inches – to avoid unwanted white borders after trimming. Confirm which banner styles are allowed, such as retractable, pop-up, hanging, or backwall graphics. Some events may restrict certain hardware or require approved contractors for tasks like rigging overhead banners.
Be mindful of the "line-of-sight" rule for inline booths. This rule typically limits the height of displays in the front section of your booth (often the first 3 to 5 feet from the aisle) to ensure visibility for neighboring exhibitors. Taller banners should be positioned toward the back of the booth. Additionally, check if your booth includes pipe-and-drape, hard walls, or is fully open, as this will influence whether you need retractable floor banners or wall-mounted graphics.
Step 2: Determine Your Goals and Viewing Distance
Identify Your Banner’s Purpose
Start by defining the purpose of your banner. If it’s for branding – like showcasing your logo and tagline – opt for large, high-contrast graphics that can grab attention from across the aisle. These banners often measure around 48"×96". On the other hand, banners aimed at lead generation or product promotion should include space for a clear headline, feature bullet points, and a call-to-action. A 36"×60" banner typically works well for these needs.
For wayfinding, prioritize larger text and directional arrows to ensure clarity at intersections, even from 20 to 30 feet away. If you’re creating a photo backdrop, go for wider or square formats, such as a 96"×96" (8’×8′) design. This size frames groups nicely while keeping your logo visible in social media photos. The key is balancing content density with readability – a simple logo banner can adapt to various sizes, but banners with detailed messaging need extra space to stay legible.
Once you’ve nailed down the purpose, consider the viewing distance to decide on text size and graphic elements.
Calculate Viewing Distance
Measure how far viewers will be from the banner’s location to determine the appropriate text size. A good rule of thumb is 1 inch of letter height per 10 feet of viewing distance. For example, in a 10’×10′ booth with a 10-foot viewing distance, your headline should be at least 1 inch tall. If the banner will be viewed from 20 feet away, scale the letter height to roughly 2 inches.
| Viewing Distance | Minimum Letter Height | Typical Banner Size | Booth Type |
|---|---|---|---|
| 10 ft | 1" | 24"×72" or 33"×81" | Small booths, close aisle traffic |
| 15–20 ft | 1.5"–2" | 36"×60" | Standard trade show aisles |
| 30–40 ft | 3"–4" | 60"×96" or larger | Large backdrops, overhead signs |
For a 10’×10′ booth, vertical retractable banners around 33"×81" are ideal for visibility within 10 to 15 feet. Medium-sized 10’×20′ booths can accommodate banners closer to 36"×92", while larger 20’×20′ island booths work well with 48"×96" banners or multi-panel backwalls. Always plan for the farthest realistic viewing distance and simplify secondary text so it remains easy to read, even from afar.
An Easy Guide to Choosing the Right Vinyl Banner Material and Banner Size
sbb-itb-ce53437
Step 3: Select Dimensions by Banner Type
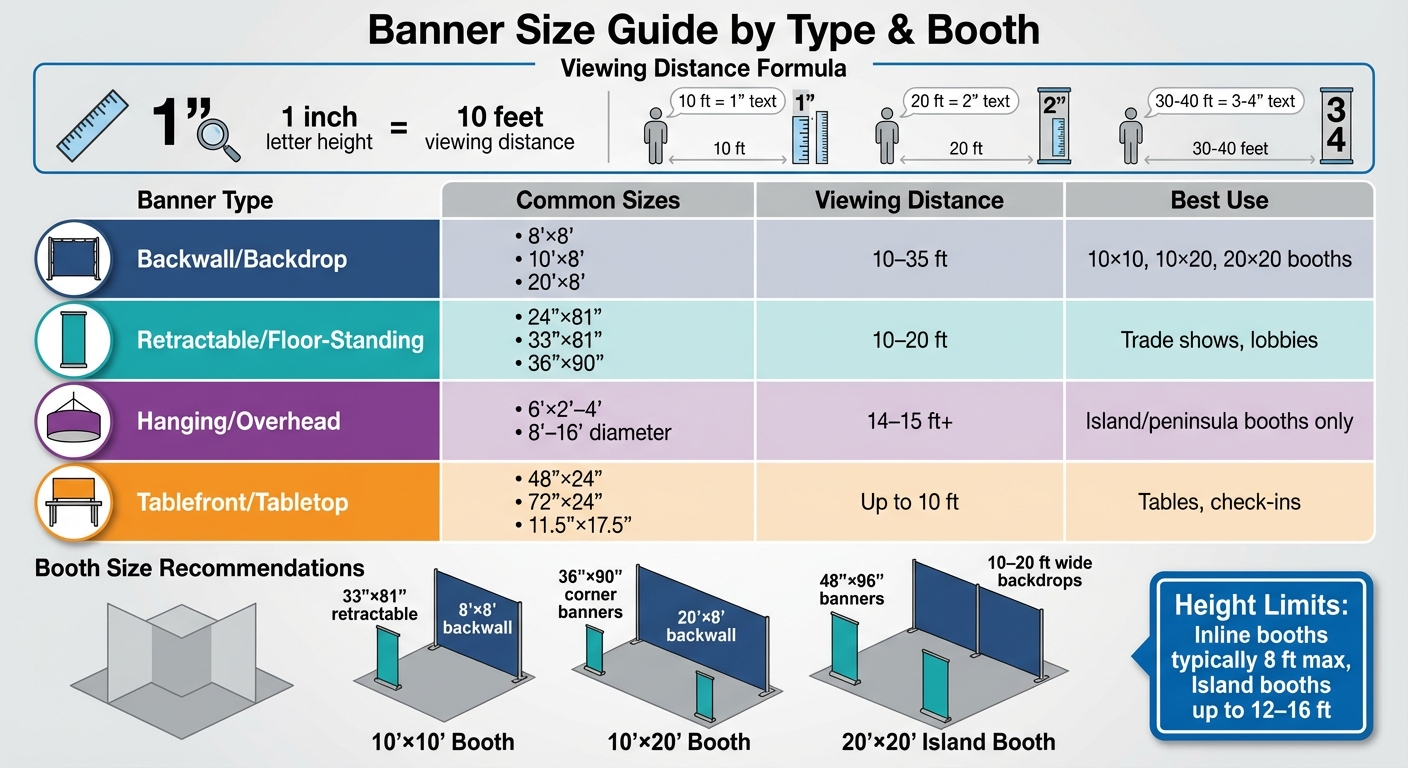
Trade Show Banner Size Guide by Booth Type and Viewing Distance
Picking the right banner type and size is key to making your display stand out. Each style serves a specific purpose, depending on your booth setup and how far away attendees will be viewing it.
Backwall and Large Backdrop Banners
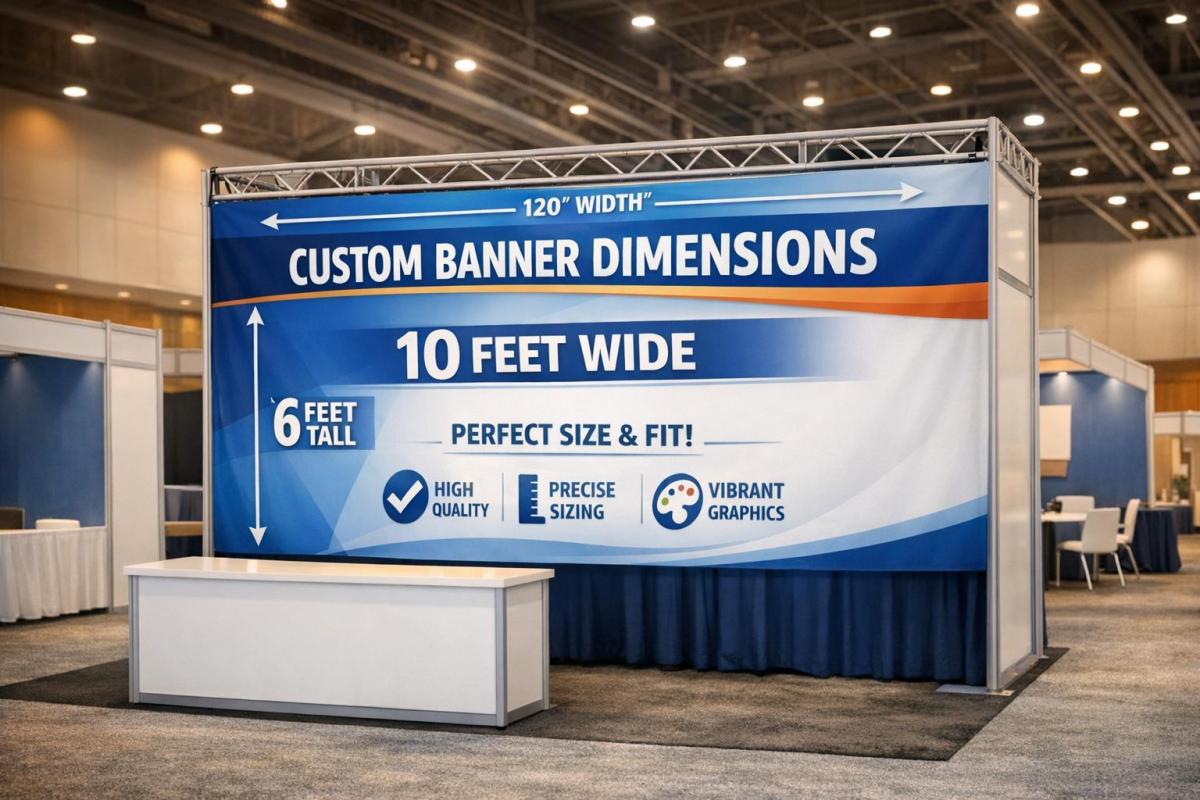
For a 10’×10′ booth, the most common backwall sizes are 8’×8′ (96"×96") or 10’×8′ (120"×96"), depending on height restrictions at the venue. If your event enforces an 8-foot height limit for inline booths – a rule many U.S. trade shows follow to avoid blocking neighboring booths – stick with the 8’×8′ size. However, if the venue allows, a 10’×8′ banner can provide full wall coverage.
In a 10’×20′ booth, a single 20’×8′ (240"×96") banner creates a seamless and professional backdrop. For larger 20’×20′ island booths, you can go even bigger – banners between 10–20 feet wide and 10–12 feet high work well. Always double-check with event organizers about height restrictions, as inline booths often max out at 8 feet, but island or peninsula booths may allow heights up to 12–16 feet.
To ensure your message is clear, keep all important text, logos, and contact details at least 2 inches from the edges. Frames or pole pockets can hide 1–3 inches of the outer edges, so plan for this when designing. Position key branding between 5–7 feet high for maximum visibility.
Next, let’s look at retractable and floor-standing banners, which are great for adding flexibility to your booth design.
Retractable and Floor-Standing Banners
Retractable banners are a versatile option for trade shows. Popular sizes include 33"×81" and 33.5"×79", which fit well in smaller spaces. For even tighter areas, a 24"×81" banner works, while a 36"×90" banner makes a bigger impact in larger booths.
In a 10’×10′ booth, one or two banners sized 24"×81" or 33"×81" can provide clear branding without overwhelming the space. For 10’×20′ booths, consider placing 36"×90" banners at the corners to frame the booth, leaving the center open for demonstrations or conversations. In 20’×20′ island booths, you can use multiple floor-standing banners, between 36–48 inches wide, to create semi-walls or define specific zones.
Be mindful of placement – banners near the aisle must stay within your booth’s footprint and not intrude into walkway spaces. Retractable banners also require extra material for the base and top rail, which can hide 0.5–1 inch of your design. Keep critical elements away from the very top and bottom edges.
For even greater visibility, consider hanging or overhead banners for larger booth setups.
Hanging and Overhead Banners
Hanging banners are typically allowed only in island or peninsula booths at U.S. venues, with maximum heights ranging from 14–16 feet above the floor. Inline booths are usually restricted to 8 feet and prohibited from using overhead signage, so always confirm the rules for your booth type and event.
For a 10’×10′ island or peninsula booth, hanging signs might measure 6–10 feet wide and 2–4 feet high for rectangular shapes, or 8–12 feet in diameter for circular designs. In 20’×20′ booths, popular options include circular banners between 10–16 feet in diameter and 3–4 feet high, suspended to stay clear of ground structures while adhering to height limits.
Make sure the outer edges of your hanging banner stay within your booth’s footprint. Provide your printer with the final dimensions, including any seams or frames, and confirm how much of the graphic might be obscured by attachment hardware to ensure your branding remains visible from all angles.
Tablefront and Tabletop Banners
Standard trade show tables in the U.S. are typically 4 feet, 6 feet, or 8 feet long, about 30 inches high, and 24–30 inches deep. Match your tablefront banner size to the table width: for a 4-foot table, use a 48"×24" (4’×2′) banner; for a 6-foot table, go with 72"×24" (6’×2′); and for an 8-foot table, choose 96"×24" (8’×2′).
Keep tablefront banners between 24–30 inches high to avoid dragging on the floor while keeping text readable for attendees walking by. If you’re using a full table throw, the printed front panel is usually slightly taller – around 30 inches high – to cover the front completely.
For tabletop banners, smaller sizes like 11.5"×17.5" are common for mini retractables or rigid signs. Keep tabletop displays between 18–36 inches above the table surface to avoid blocking eye contact or conversations. Position taller pieces to one side rather than directly in front of staff, and rely on larger backwalls or floor-standing banners for long-distance visibility while tabletop banners handle close-up details like pricing or QR codes.
| Banner Type | Common Sizes | Viewing Distance | Best Use |
|---|---|---|---|
| Backwall/Backdrop | 8’×8′, 10’×8′, 20’×8′ | 10–35 ft | 10×10, 10×20, 20×20 booths |
| Retractable/Floor-Standing | 24"×81", 33"×81", 36"×90" | 10–20 ft | Trade shows, lobbies |
| Hanging/Overhead | 6’×2’–4′, 8’–16′ diameter | 14–15 ft+ | Island/peninsula booths |
| Tablefront/Tabletop | 48"×24", 72"×24", 11.5"×17.5" | Up to 10 ft | Tables, check-ins |
Step 4: Verify Print Specifications and Final Dimensions
Once you’ve chosen your banner type and size, the next step is to ensure your design meets print standards. This helps you avoid costly reprints and ensures the final product matches your expectations. With your banner details finalized, it’s time to prepare your design for the printing process.
Check Design Scale and Resolution
When it comes to large-format banners, resolution at the final print size is crucial. If your banner will be viewed from less than 10 feet away – such as a tabletop or retractable banner – aim for a resolution of 300 dpi at full size. For larger banners or backdrops intended to be seen from 10–20+ feet, a resolution of 150–200 dpi is usually sufficient. For oversized designs, create your artwork at 25–50% scale with 300 dpi and make sure to communicate the scale to your printer.
To ensure your layout looks as expected, print a small section at full scale as a test. Always use inches and feet for U.S.-based projects, and make sure logos and text are in vector format. This ensures they stay sharp and clear, even when scaled up. These steps help maintain your branding’s appearance and quality from screen to print.
Add Safety Margins and Finishing Details
Large-format printing requires specific adjustments, like a 0.5-inch bleed on all sides. Keep critical elements – logos, headlines, and contact details – at least 1–2 inches inside the trim edge. This is especially important for large backdrops that may include hems or stitching. Finishing options such as grommets (spaced every 24–36 inches), pole pockets (requiring an additional 3–4 inches of material), and hems (typically 1–2 inches) can obscure parts of your design. To avoid issues, ask for a finishing diagram that shows grommet positions and pocket depths, and refrain from placing text or small graphics near corners where material may be folded or reinforced.
Export your design as a print-ready PDF in CMYK mode, with fonts either embedded or outlined. Add bleed and crop marks only if your printer specifically requests them – many large-format printers prefer full-bleed artwork without marks. Before submitting your file, preflight it to confirm the dimensions with bleed, ensure all images meet the required resolution (150–300 dpi), embed the fonts, and check that all important content stays within the safe area.
Work with a Professional Printer
Collaborating with an experienced print provider, such as Miro Printing & Graphics Inc. in Hackensack, NJ, can make a big difference. They specialize in large-format printing and offer computer layout & design services to help transform your concept into a production-ready file. Their team ensures your banner’s dimensions, materials, and finishing details are thoroughly checked before printing. They also provide file reviews to identify potential problems, such as resolution, scaling, bleed, and color issues, early in the process.
"I even received a video of my print sample… for approval before they proceeded with the rest." – Julia I.
Conclusion
To create an effective banner, start by selecting dimensions that fit the venue’s regulations, your booth size, and the intended viewing distance. Double-check your booth measurements to ensure the banner fits well without obstructing walkways. Match the banner type and size to your goals – whether it’s a compact display for tight spaces or a larger one for greater visibility. Keep in mind the simple guideline: 1 inch of text height for every 10 feet of viewing distance. This approach ensures your design is both functional and visually impactful.
Once you’ve nailed down the size, focus on the design details. Follow print standards like resolution, bleed, safety margins, and finishing to avoid expensive reprints. Collaborating with an experienced printer, such as Miro Printing & Graphics Inc. in Hackensack, NJ, can make all the difference. They specialize in large-format printing, in-house design, and custom projects, offering services like file reviews and proofs to catch any issues before printing. This attention to detail ensures a flawless final product.
"Attention to detail is what makes the difference!" – Mike B.
A well-sized and expertly crafted banner boosts visibility, strengthens your brand presence, and helps you shine at any event or trade show.
FAQs
What are the typical banner sizes for different booth setups?
When selecting banner sizes for your booth, it’s helpful to consider these popular dimensions based on your setup:
- Tabletop displays: 24" x 36" or 36" x 24"
- Standard trade show banners: 33" x 80" or 36" x 92"
- Large backdrops: 10′ x 8′ or 20′ x 8′
- Double-sided banners: 48" x 96" or larger
These dimensions are commonly used at events and trade shows, making it easier to design a display that grabs attention while looking polished. Always measure your booth space and check for any size limitations before placing your order to ensure everything fits just right.
How can I make sure my custom banner complies with venue rules and fire safety standards?
To make sure your custom banner aligns with venue regulations and fire safety standards, begin by verifying the venue’s specific guidelines for size, materials, and installation. It’s also crucial to review local fire safety codes to confirm that your banner materials meet fire-retardant requirements, which are typically necessary for public events.
If you’re unsure about anything, reach out to the venue directly and inquire about any required permits. Opting for fire-resistant materials and adhering to proper installation practices can save you from unexpected complications during your event.
What are the ideal resolution and design guidelines for printing a high-quality custom banner?
When designing a custom banner, aim for a resolution between 150-300 DPI (dots per inch) at the final print size. This ensures your banner will look crisp and clear. For the best results, use vector-based graphics to maintain sharp lines and details, and make sure any images included are high-resolution to prevent them from appearing pixelated.
Design your banner in CMYK color mode to ensure the colors print as intended. If your design requires a bleed, add at least 0.125 inches on all sides. This extra space helps avoid unwanted white edges during the trimming process. By following these steps, your banner will have a polished and professional finish.
Related Blog Posts
- Standard Print Sizes Explained
- Indoor vs Outdoor Banners: Key Differences
- How to Choose Durable Banner Materials for Outdoors
- Ultimate Guide to Banner Scaling and Resolution
https://app.seobotai.com/banner/banner.js?id=69449ccc12e0ddc125e56c50
