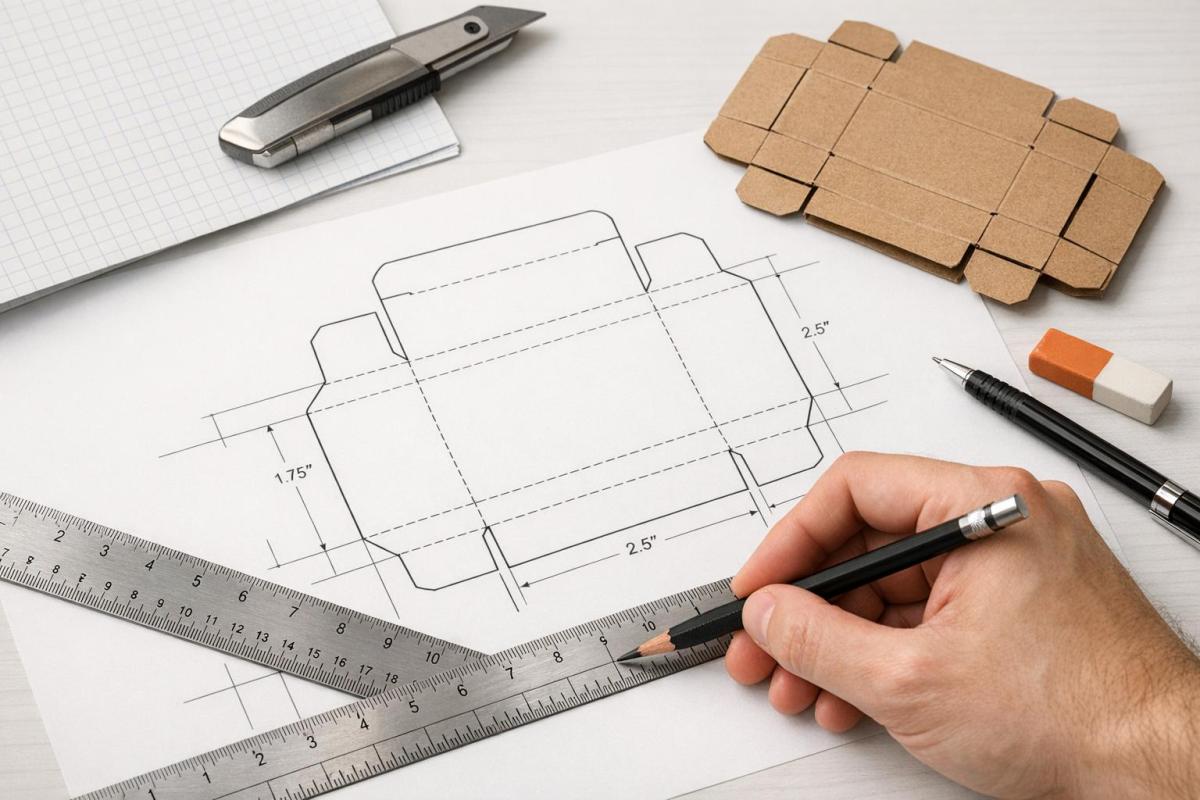
Dielines are the blueprint for turning flat materials into functional packaging. They outline where to cut, fold, and add bleed or safety zones, ensuring your design translates perfectly from screen to production. Here’s what you need to know:
- What They Are: Dielines are 2D templates used by die-cutting machines to guide cuts, folds, and assembly.
- Why They Matter: Proper dielines prevent production errors like misaligned artwork or faulty closures. They also reduce waste and maintain consistent branding.
- Key Elements:
- Cut Lines: Solid lines that define the shape.
- Fold Lines: Dashed lines indicating folds.
- Bleed Zones: Extend artwork 1/8 inch beyond cut lines.
- Safe Zones: Keep critical elements away from edges.
- Tools to Use: Adobe Illustrator or similar vector-based software is essential for precision.
- Steps to Create:
- Measure product dimensions (length, width, depth).
- Include bleed and safety margins.
- Choose materials based on product weight and packaging type.
- Use manufacturer templates to avoid scaling issues.
- Double-check measurements, colors, and line weights.
Pro Tip: Always print and assemble a physical prototype to catch any issues before production. A well-prepared dieline ensures your packaging looks great and functions properly.
Packaging Design in Adobe Illustrator | How To Create Die Cut Lines, Creasing Lines, Bleed Area

sbb-itb-ce53437
What to Consider Before Creating a Dieline
Before diving into your dieline design, make sure you have all the essential details, like product dimensions and material specifications, at your fingertips.
Measuring Packaging Dimensions and Product Requirements
Start by measuring your product’s length, width, and depth as accurately as possible. These measurements are the backbone of your dieline. By designing packaging to match your product’s exact size, you can reduce material waste and ensure it aligns with standard printing sheet sizes.
The weight of your product plays a big role in determining the packaging structure. Heavier items will need sturdier materials to provide adequate protection. Shanon Dunlap, Director of Digital & Content Marketing at PakFactory, explains:
"Heavier products may require thicker stock like corrugated cardboard to hold and protect products adequately, which affects the type of dieline you require."
Don’t forget to include bleed and safety margins in your design. These small adjustments account for manufacturing tolerances and help ensure the final product looks polished and professional.
Once you’ve nailed down the dimensions and structural requirements, the next step is selecting the right materials.
Choosing the Right Materials
The materials you choose will significantly influence your dieline design. For example, thicker materials like corrugated cardboard require more space for folds compared to lighter options like folding cartons. This added thickness affects the box’s final external dimensions once assembled.
Corrugated cardboard, commonly used for e-commerce packaging, often includes extra structural features like flaps, tabs, and gussets to protect products during transit. In contrast, retail packaging typically uses thinner folding cartons with simpler designs. Each type of packaging has its own requirements:
- E-commerce packaging: Uses corrugated stock with reinforced elements for shipping durability.
- Retail packaging: Relies on lighter materials with a focus on visual appeal.
- Pouches: Require gussets and zippers for functionality.
- Rigid boxes: Need complex, multi-part templates for assembly.
- Bags: Must account for handle reinforcements.
Tailor your dieline to fit the specific needs of your product and its packaging type to ensure both form and function align perfectly.
Parts of a Professional Dieline
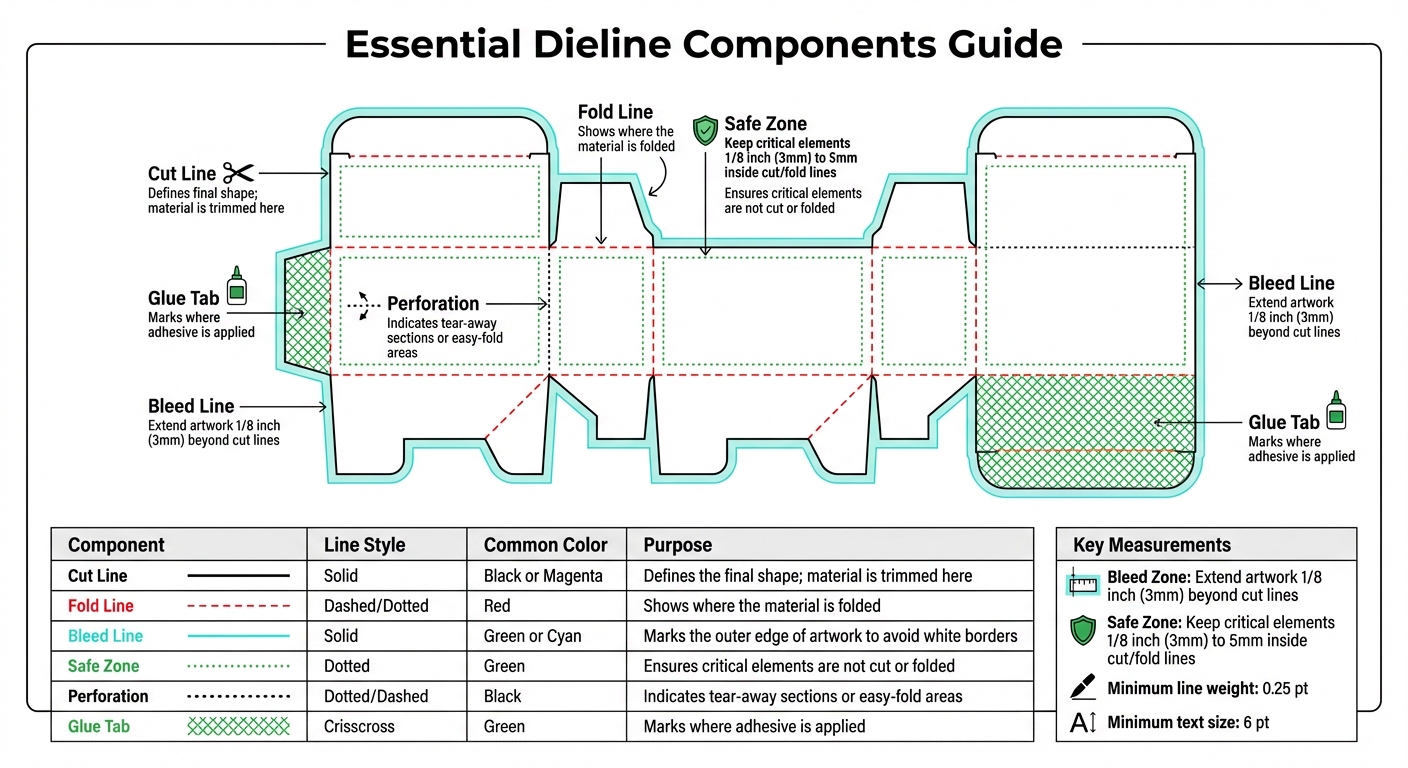
Dieline Components Guide: Cut Lines, Fold Lines, Bleed Zones and Safe Areas
A professional dieline includes several key components that ensure accurate manufacturing. Building on the earlier discussion of measurements and material choices, these elements finalize the blueprint for your packaging design.
Lines and Zones: Cut, Crease, Bleed, and Safe Areas
Dielines use various line styles to convey specific instructions to manufacturers. Cut lines are solid lines, typically in magenta or black, that define the final shape of your packaging and show where the material will be trimmed. Crease lines, often dashed or dotted in red, indicate where the material should be folded to create a three-dimensional structure.
To avoid visible white edges, extend your artwork about 1/8 inch (3 mm) beyond the cut lines. The safe zone serves as a protective margin, generally 1/8 inch (3 mm) to 5 mm inside the cut and fold lines, ensuring critical elements like logos, text, and barcodes remain intact and undisturbed.
| Component | Line Style | Common Color | Purpose |
|---|---|---|---|
| Cut Line | Solid | Black or Magenta | Defines the final shape; material is trimmed here. |
| Fold Line | Dashed/Dotted | Red | Shows where the material is folded. |
| Bleed Line | Solid | Green or Cyan | Marks the outer edge of artwork to avoid white borders. |
| Safe Zone | Dotted | Green | Ensures critical elements are not cut or folded. |
| Perforation | Dotted/Dashed | Black | Indicates tear-away sections or easy-fold areas. |
| Glue Tab | Crisscross | Green | Marks where adhesive is applied. |
Next, you’ll need to focus on glue tabs and assembly markers to complete your dieline’s design.
Glue Tabs and Assembly Indicators
Glue tabs are essential for turning a flat dieline into a functional, three-dimensional package. These areas, often marked with a green crisscross pattern, show where adhesive should go during assembly. To ensure durability, design glue tabs with the right width – too narrow, and the bond may fail; too wide, and you risk wasting material.
Keep glue tab areas free from ink or artwork to preserve adhesive strength. For complex designs, use icons like arrows, circles, or crosses as assembly markers to guide production teams. These markers, placed on hidden layers, help ensure panels interlock correctly and slots align as intended.
Adding Manufacturing Notes
Manufacturing notes are critical for avoiding production errors. These annotations should include details such as material specifications, fold directions (e.g., mountain vs. valley folds), coating instructions, and any special finishes like embossing or foil stamping. Place these notes on a hidden layer so they assist the production team without appearing on the final product.
For clarity, use text no smaller than 6 pt and lines at least 0.25 pt thick. When it comes to black text, QR codes, and barcodes, use 100% K (black ink only) instead of rich black to ensure sharpness and readability. If your design involves materials like corrugated cardboard, include notes on the grain direction, as this impacts folding quality and the overall strength of the packaging.
Before sending your dieline to production, create a full-scale prototype by printing and cutting it out. This hands-on mockup helps catch issues like overlapping tabs or misaligned folds that might not be obvious in the digital file. It’s a simple step that can save time and resources during manufacturing.
How to Create Dielines Step by Step
Once you’ve nailed down your design requirements and material choices, it’s time to dive into creating dielines. Here’s how to do it effectively.
Using Manufacturer Templates
Starting with a manufacturer’s template can save you a lot of hassle and avoid costly mistakes. These templates are pre-designed to work seamlessly with the die-cutting machinery your printer uses. They come ready-made for popular box styles like Straight Tuck End, Reverse Tuck, and pillow boxes. Plus, they include all the technical details – cuts, folds, bleeds, and safety zones – neatly color-coded and positioned for accuracy.
"Using their templates ensures your packaging structure aligns with their equipment and specifications, minimizing risks like misaligned folds or cuts." – PackCCP
Manufacturer templates also account for material-specific tolerances. For example, corrugated cardboard folds differently than thin paperboard, and these templates are designed to accommodate those variations, ensuring your packaging closes properly. Your job? Focus on placing your artwork within the designated safe zones.
One critical rule: never resize or scale a manufacturer template. Stretching or shrinking the file will throw off the measurements, leading to packaging that doesn’t fit your product. Always keep the template at 100% scale. If you need a different size, ask the manufacturer for a new template instead of attempting to modify the existing one.
Designing in Adobe Illustrator and Other Software
Adobe Illustrator is the go-to software for dieline creation because it uses vector paths, which provide the precision needed for CNC cutting machines. Other vector-based programs like CorelDRAW and Inkscape can work too, but steer clear of raster-based tools like Photoshop.
When setting up your Illustrator document, use CMYK color mode at 300 DPI. Organize your work with separate, clearly labeled layers for "Cut", "Fold", "Bleed", and "Artwork." This makes it easier for the prepress team to process each element correctly. To avoid accidental changes, lock the dieline layer once it’s set.
"Dieline template components should be on a separate layer from your artwork so they are visible to Prepress for set up." – Packlane
Use Illustrator’s Pen Tool and Shape Tools for precise panel and flap designs. The Offset Path function is perfect for creating bleed and safety margins – set it to 0.125 inches (1/8 inch) for standard bleed areas. For more intricate shapes, the Pathfinder tool’s Unite function can merge multiple vectors into one clean outline. Be sure to convert your text to outlines (Shift+Ctrl+O) and embed any linked images before exporting the file.
Preventing Scaling Errors and Maintaining Accuracy
Accuracy is key when creating dielines. Always design at full scale. If your box is 8 inches tall, your dieline should measure exactly 8 inches in your design software. Stick to a 1:1 scale from start to finish to avoid any scaling issues.
Double-check all measurements before exporting your file. Use Illustrator’s ruler and measurement tools to confirm that cut lines, fold lines, and panel dimensions align with your specifications. Technical lines should have a minimum weight of 0.25 pt to ensure they’re visible to cutting equipment. For text, use a minimum size of 6 pt to make sure it’s legible in the final product.
Assign distinct spot colors to technical lines – for example, magenta for cuts and red for folds – so the printer can easily differentiate them from the artwork. Enable Overprint Stroke in the Attributes panel to keep these lines visible without interfering with your design. Before giving final approval, print a full-scale prototype on paper, cut it out, and assemble it by hand. This step can reveal potential issues, like misaligned tabs or overlapping panels, that might not show up on screen. Taking the time to create a physical mockup helps catch errors early and ensures a smoother production process.
Prepress Checklist and Common Mistakes to Avoid
A thorough prepress check is essential to avoid costly reprints and delays while ensuring dielines are accurate and ready for production.
Prepress Verification Steps
Start by confirming your file is in CMYK color mode, and all images have a resolution of at least 300 DPI. Save your dieline as an editable vector file, such as AI or PDF formats. Make sure the bleed extends 1/8 inch (3 mm) beyond the cut line, and keep all critical design elements within the safety zone – this means staying at least 1/8 inch (5 mm) inside the cut line.
For barcodes and QR codes, use 100% K (black) to ensure they scan properly. Line weights should be a minimum of 0.25 pt so they’re easily picked up by cutting equipment. To catch potential errors, create a physical mock-up by printing the dieline at full scale, cutting it out, and assembling it by hand. This hands-on step can reveal alignment problems or structural issues that might not be obvious on a screen.
Once these checks are complete, it’s time to address common errors that could derail your project.
Common Mistakes and How to Prevent Them
Even with careful verification, some errors can slip through the cracks. Avoid these frequent mistakes to keep your dieline accurate and production-ready.
Typos are a costly oversight. As Dilco emphasizes:
"Proof-read everything… It’s one of the most expensive, yet easiest-to-avoid mistakes we see. Dilco isn’t responsible for misspelled words, typos, or words used incorrectly".
Always double-check your text for both spelling and alignment within the design.
Never resize manufacturer templates. If you need a different size, request a new template instead. Keep glue tabs free of any design elements or coatings, as these can interfere with proper adhesive bonding.
Other common issues include missing bleed areas, which can result in unwanted white borders, and misaligned fold lines, which make assembly difficult. Avoid using non-vector software like Photoshop for dieline creation. Stick to programs like Adobe Illustrator or CorelDRAW for precise results. Use spot colors to clearly differentiate between key elements: solid black for cut lines, dashed red for fold lines, and dotted lines for perforations.
Conclusion
Dielines are the backbone of effective packaging. They act as the blueprint guiding every step of the production process.
"A well-prepared dieline is the foundation of successful packaging that not only protects your product but also enhances its visual appeal".
Following established practices is critical for seamless results. Use vector-based software like Adobe Illustrator to design your dieline, and always create a physical mockup before moving to production. These steps help avoid common pitfalls like misaligned designs, structural issues, or expensive reprints.
A dieline is more than just a cutting guide – it’s a communication tool. It ensures that everyone involved, from designers to manufacturers, is aligned on the final product’s vision. Thoughtful preparation not only reduces errors but also helps make the best use of materials. It’s the bridge that connects creative design with practical manufacturing.
Investing time in crafting a precise dieline can save thousands in reprints and ensure your packaging stands out for all the right reasons. Double-check every element, and the result will showcase your attention to detail.
FAQs
What mistakes should I avoid when creating dielines for packaging?
When designing dielines, steering clear of common errors can save you a lot of headaches – not to mention time and money. Make sure to include bleed, safety, and trim lines. Bleed, usually about 1/8 inch beyond the cut line, ensures that your design fully covers the finished piece after trimming. Meanwhile, safety margins inside the cut line help protect important elements from being accidentally trimmed off.
Choose the right file type and mark line types clearly. Always create dielines using vector-based files for precision. Differentiate lines for cuts, folds, and perforations with distinct colors or line weights, and label them clearly. This avoids confusion during printing and cutting, ensuring everything comes out as intended.
Lastly, verify dimensions, scale, and tab placement. Even minor mistakes in size or misaligned tabs can lead to problems like boxes that don’t fold correctly. Stick to your printer’s specifications to make sure your dieline matches the material and production needs, keeping your project running smoothly.
How can I select the best materials for my packaging dieline?
When deciding on materials for your packaging dieline, it’s important to think about your product’s weight, shape, fragility, and budget. For lighter items, materials like thin plastic might be ideal due to their flexibility. On the other hand, sturdier options like corrugated cardboard are better suited for heavier or more delicate products. If you’re aiming for more environmentally friendly choices, consider options like recycled paperboard or biodegradable plastics.
Need expert advice? Miro Printing & Graphics Inc. specializes in helping you find the right balance between durability, cost, and design, ensuring your packaging is both functional and visually appealing.
Why should you create a physical prototype of your dieline?
Creating a physical prototype of your dieline is a crucial step in ensuring your design functions as intended in the real world. By putting the prototype together, you can verify that the folds, cuts, and dimensions align perfectly.
This hands-on approach helps you spot design issues early, like graphics that don’t line up or structural weaknesses. Catching these problems before moving to large-scale production can save you time, materials, and money, while also guaranteeing a polished, professional final product.
Related Blog Posts
- How to Set Up Files for Die-Cutting
- How to Create Die-Cut Templates for Printing
- How to Prepare Files for Die-Cutting and Laser Cutting
- Ultimate Guide to Die-Cut Design Software
https://app.seobotai.com/banner/banner.js?id=6966e50312e0ddc1252f13b4
