Large format printing requires different resolution standards than standard printing. While smaller prints like business cards need 300 DPI for sharp detail, larger prints such as banners or billboards can use lower resolutions like 100 DPI or even 10 DPI for effective results. This is because viewing distance plays a critical role – closer prints need higher resolution, while distant prints appear clear even with fewer details. Using the right resolution not only ensures quality but also reduces file sizes, speeds up production, and saves costs. Always consider viewing distance, file format (vector is ideal for scalability), and proper printer calibration for the best outcomes.
Large Format Printing Resolution Guide by Viewing Distance and Print Size
Resolution Standards for Large Format Printing
DPI Guidelines for Different Large Format Projects
When it comes to large-format printing, a resolution of 100 DPI is generally sufficient. Unlike smaller prints like business cards or brochures, which typically require 300 DPI for sharp detail, large-format prints are designed to be viewed from farther away. This means they don’t need the same pixel density.
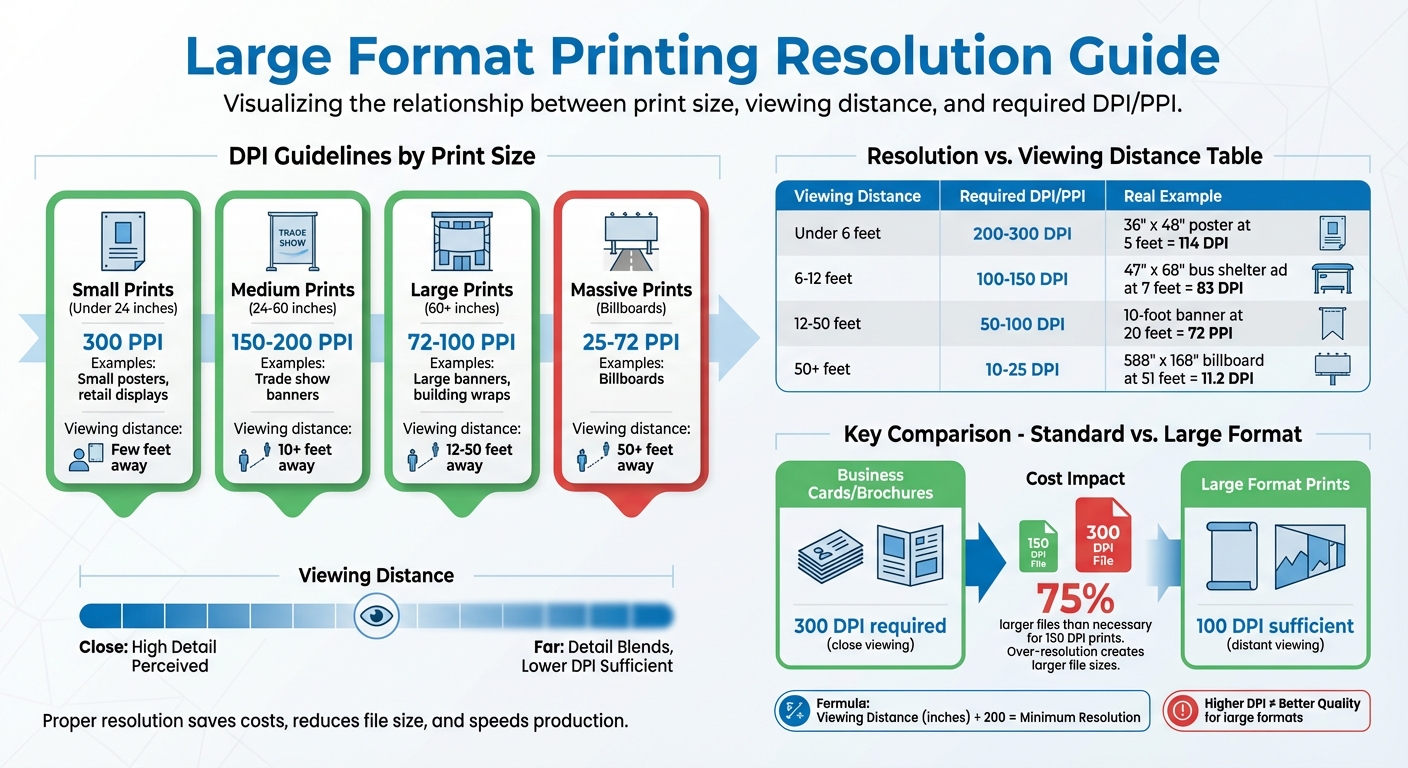
For smaller projects under 24 inches – think small posters or retail displays – 300 PPI is ideal to ensure sharpness for viewers standing just a few feet away. Medium-sized prints, ranging from 24 to 60 inches, achieve excellent results at 150 to 200 PPI. For trade show banners or similar pieces viewed from 10 feet or more, 72 to 100 PPI is sufficient. And for massive prints like billboards, where the audience is typically 50 feet or more away, the resolution can drop to 25 to 72 PPI. These adjustments balance clarity with file size, ensuring efficient production without compromising visual quality.
"The best large format printing resolution is a minimum of 100 dpi. However, larger files don’t need a resolution this high because of the large file sizes." – HP
Choosing the right resolution also streamlines the workflow. For example, a 48×72 inch banner designed at 300 PPI can create a file that’s 75% larger than necessary if 150 PPI would suffice for the intended viewing distance. Oversized files can slow down design software, increase upload times, and require more storage space – all without enhancing what the viewer perceives.
How Resolution Affects Print Quality and Cost
Understanding how resolution impacts quality and cost is just as important as getting the numbers right. Higher resolution doesn’t always translate to better results in large-format printing. In fact, overusing DPI can make large graphics appear non-uniform, as colors may not blend naturally when viewed from a distance. The human eye needs a bit of separation between dots to create smooth, cohesive tones.
"There’s no reason to spend extra money on ink to print more dots if they won’t be useful or if they’ll make your event graphic lower quality." – Tree Towns Digital Decor
Excessive DPI also drives up ink usage and production costs. For instance, printing a large outdoor banner at 300 DPI instead of 100 DPI could significantly increase ink expenses, even though viewers standing 20 feet away won’t notice the added detail. To avoid wasting materials and money, it’s a good idea to print a small 8×10 inch section at full size. This allows you to confirm sharpness and color accuracy before committing to a full production run.
Viewing Distance and Resolution Requirements
DPI Requirements Based on Viewing Distance
When thinking about resolution standards, it’s also important to factor in viewing distance. Why? Because the distance from which something is viewed determines how much detail the human eye can actually pick up, which in turn influences the resolution required for a clear and sharp image.
For prints viewed up close – say, within 6 feet, like gallery prints, indoor posters, or retail displays – 200 to 300 DPI is generally needed to keep text crisp and details sharp. Move a little farther back, say 6 to 12 feet (common for trade show banners or bus shelter ads), and you’ll only need 100 to 150 DPI. For larger outdoor banners or building wraps, viewed from 12 to 50 feet away, 50 to 100 DPI will do the job. And for billboards or massive graphics that people see from more than 50 feet away, 10 to 25 DPI is entirely sufficient.
"As we view things from farther away, our ability to resolve detail diminishes." – Hemlock Display Solutions
Here’s a handy rule of thumb: divide the viewing distance (in inches) by 200 to calculate the minimum resolution you’ll need. This simple formula highlights how resolution requirements drop as viewing distance increases.
Resolution vs. Viewing Distance Comparison
The table below breaks down how viewing distance affects the recommended resolution for different types of prints:
| Viewing Distance | Recommended DPI/PPI | Example |
|---|---|---|
| Under 6 feet | 200–300 | A 36″ x 48″ poster viewed at 5 feet needs 114 DPI |
| 6–12 feet | 100–150 | A 47″ x 68″ bus shelter ad viewed at 7 feet needs 83 DPI |
| Beyond 12 feet | 50–100 | A 10‑foot banner viewed at 20 feet needs 72 PPI |
| 50+ feet | 10–25 | A 588″ x 168″ billboard viewed at 51 feet needs 11.2 DPI |
Viewing Distance and Resolution for Large Format Graphics
sbb-itb-ce53437
Other Factors That Affect Large Format Print Quality
When it comes to large format printing, resolution isn’t the only thing that matters. File type and printer calibration also play a big role in striking the right balance between file efficiency and print clarity.
Why Vector Graphics Work Best for Large Scale Prints
The type of file you choose can make or break the sharpness of your print. Vector graphics, which are defined by mathematical paths, can scale to any size without losing quality. That’s why they’re the go-to choice for logos, text, icons, and illustrations that need to stay crisp no matter how large they’re printed.
On the other hand, raster images are made up of a fixed grid of pixels. When you stretch these images beyond their original size, the pixels get enlarged, leading to pixelation, graininess, and blurred edges. For example, a 12MP photo taken on a smartphone works well for prints up to 20×30 inches, but anything larger and the quality starts to degrade. For clean, professional branding elements, stick to vector formats like AI, EPS, or vector-based PDFs. Also, make sure to outline your fonts before sending files to the printer – this prevents any font substitution issues.
Best File Formats for High-Quality Outputs
Picking the right file format is key to a successful large format print. PDF is often the industry favorite because it preserves fonts, images, and vector elements while managing compression effectively. For projects where every detail matters, TIFF files are a solid choice since they’re lossless and maintain all the textures and gradients. However, keep in mind that TIFF files can get quite large – a 36×24-inch print at 300 PPI saved as a 16-bit TIFF can exceed 600MB.
For logos and text, AI and EPS formats are ideal since they offer infinite scalability without any quality loss.
"I maintain a tiered system: RAW originals, 16-bit TIFF editing masters, and high-quality JPEGs for delivery to print services without advanced color management." – Rebecca Chen, Commercial Photographer
Steer clear of JPEG or PNG for high-end work. Compression artifacts and limited color conversion can compromise the final quality. If you’re working on complex layouts in InDesign, use the "Package" feature to bundle all linked images, vector files, and fonts into one folder for your printer.
Beyond file formats, proper printer calibration and color management are just as crucial for getting consistent, high-quality results.
How Printer Calibration and Color Management Affect Results
Without proper printer calibration, even the best designs can fall flat. Accurate color management ensures that the colors you see on your screen closely match the final print. Always design in CMYK color mode instead of RGB, as converting RGB to CMYK for printing can cause noticeable color shifts. For richer blacks, professional printers recommend using a "Rich Black" setting of 50% Cyan, 50% Magenta, 50% Yellow, and 100% Black (50C, 50M, 50Y, 100K) rather than relying on 100% Black alone.
"Without color calibration, you’re essentially printing blindfolded." – Jennifer Kim, Fine Art Printmaker
Even the environment can impact print quality. Digital printers operate best at around 68°F (20°C) with humidity levels between 50–60%. Low humidity (below 30%) can lead to issues like banding and static, which can ruin your prints. Regular maintenance, such as cleaning printheads and using soft proofing tools to preview your design on specific paper types, can help you catch problems early – saving time, money, and frustration.
Conclusion
Creating large format prints involves finding the right balance between resolution, viewing distance, and proper file preparation. The main point to remember is that bigger prints don’t always require a higher resolution. For instance, a 100 DPI image can appear just as sharp as a 300 DPI one when viewed from the appropriate distance. This relationship between print size and resolution not only maintains professional quality but also keeps file sizes manageable.
To calculate pixel dimensions, simply multiply the print dimensions by the target PPI. For example, a 24×36 inch poster at 150 PPI would need dimensions of 3,600×5,400 pixels. Using vector graphics for elements like logos and text, saving files in formats like TIFF or PDF, working within the CMYK color space, and ensuring proper printer calibration all contribute to a polished final product. These steps are essential for efficient file preparation and cost-effective printing.
How to Choose the Right Resolution for Your Project
The resolution you choose depends on where your print will be displayed and how far away viewers will stand. For example, a trade show banner viewed from about 6 feet away only needs 75–100 PPI, while a fine art print designed for close inspection requires 300+ PPI. Before sending your file for production, always review it at 100% scale in your editing software. If it looks soft or pixelated on-screen, these flaws will be even more noticeable in the final print.
AI-powered tools can upscale resolution by 400–600% while retaining detail. When preparing files, don’t forget to include a bleed margin of 1/8" to 1/4" to avoid white edges after trimming. Additionally, apply the “10% rule” for photos: reduce saturation or contrast by about 10% compared to on-screen levels, as printed colors often appear differently.
By following these tips, you can ensure your large format prints meet professional standards.
How Miro Printing & Graphics Inc. Can Help
Navigating the complexities of large format printing requires expertise, and that’s where Miro Printing & Graphics Inc. shines. Based in Hackensack, NJ, and with over 30 years of experience since 1994, Miro brings the technical know-how to guide you through every step of the process. Their team can assist with file formats, resolution settings, and color management to ensure your designs are accurately translated into stunning physical prints.
From banners and posters to wall wraps and custom projects, Miro offers a wide range of services, including digital and offset printing, in-house bindery, and professional design support. Customers frequently commend their "terrific" quality and the "warm and helpful" staff, making them a trusted partner for projects of any size. To explore how Miro can help with your large format printing needs, visit bergencountyprinters.com and get personalized guidance tailored to your project.
FAQs
Why is a lower DPI acceptable for large-format prints that are viewed from far away?
When it comes to large-format prints, a lower DPI (dots per inch) works perfectly fine. Why? Because these prints are usually meant to be seen from a distance. From far away, your eyes naturally merge the details, making the image look sharp even with a lower resolution.
This approach not only reduces the number of dots needed to create a clean and attractive image but also helps save on production time and costs – all without sacrificing the quality of the final print.
Why are vector graphics ideal for large format printing?
Vector graphics are built using mathematical paths instead of fixed pixels, which means they can be scaled to any size without losing clarity. This makes them ideal for large-format prints like banners, billboards, or wall graphics. No matter how much you enlarge the design, the lines, text, and shapes remain sharp and precise. Unlike raster images that can appear pixelated or blurry when stretched, vector graphics keep their detail and accuracy, even at massive sizes.
Another advantage is that vector file formats such as AI, EPS, or PDF are resolution-independent. This allows them to produce high-quality prints at any scale without ballooning into huge file sizes. As a result, they’re easier to manage during the printing process, cutting down on upload times and streamlining production. When you supply vector-based artwork to Miro Printing & Graphics Inc., their large-format printing equipment can create vibrant, high-definition visuals for signage, trade show displays, and outdoor graphics – ensuring your designs look impressive whether viewed up close or from afar.
How can I ensure accurate color reproduction in large format printing?
To get accurate color reproduction in large format printing, the first step is setting up a color management workflow. Start by calibrating your monitor to a standard white point of about 6500 K and a gamma setting of 2.2. This ensures that the colors you see on your screen closely align with the final printed output. When working on your designs, use the CMYK color space or convert your RGB designs using the printer’s ICC profile. Embedding the correct ICC profile in your file allows the printer to translate digital colors into precise ink densities. Before committing to a full print run, always print a small proof on the actual material to confirm the colors match your expectations.
The environment where printing takes place is equally important. Keep the space stable at around 68°F with a relative humidity of 50–60%. This helps ensure consistent ink drying and proper absorption by the substrate. Also, make sure your printer is placed on a level surface to maintain sharpness and color consistency.
Choosing the right substrate is another key factor. Select materials with the right texture, absorbency, and reflectivity for your specific ink type. Smooth surfaces can help prevent uneven color application. Regular maintenance, such as cleaning printer rollers and checking alignment, also plays a big role in producing consistent results. At Miro Printing & Graphics Inc., we follow these steps to ensure every large format print is vibrant and of the highest quality.
Related Blog Posts
- Large Format Printing: DPI vs. PPI Explained
- Image Resolution Standards for Offset Printing
- How to Adjust DPI for Large Format Prints
- Standard DPI for Commercial Printing
https://app.seobotai.com/banner/banner.js?id=69670aa212e0ddc1252f2bc6
