Print quality issues can waste time, materials, and hurt your professional image. The good news? Most problems are easy to diagnose and fix. From streaks and smudges to blurry text and faded colors, here’s a quick breakdown of the 10 most common print quality problems and their solutions:
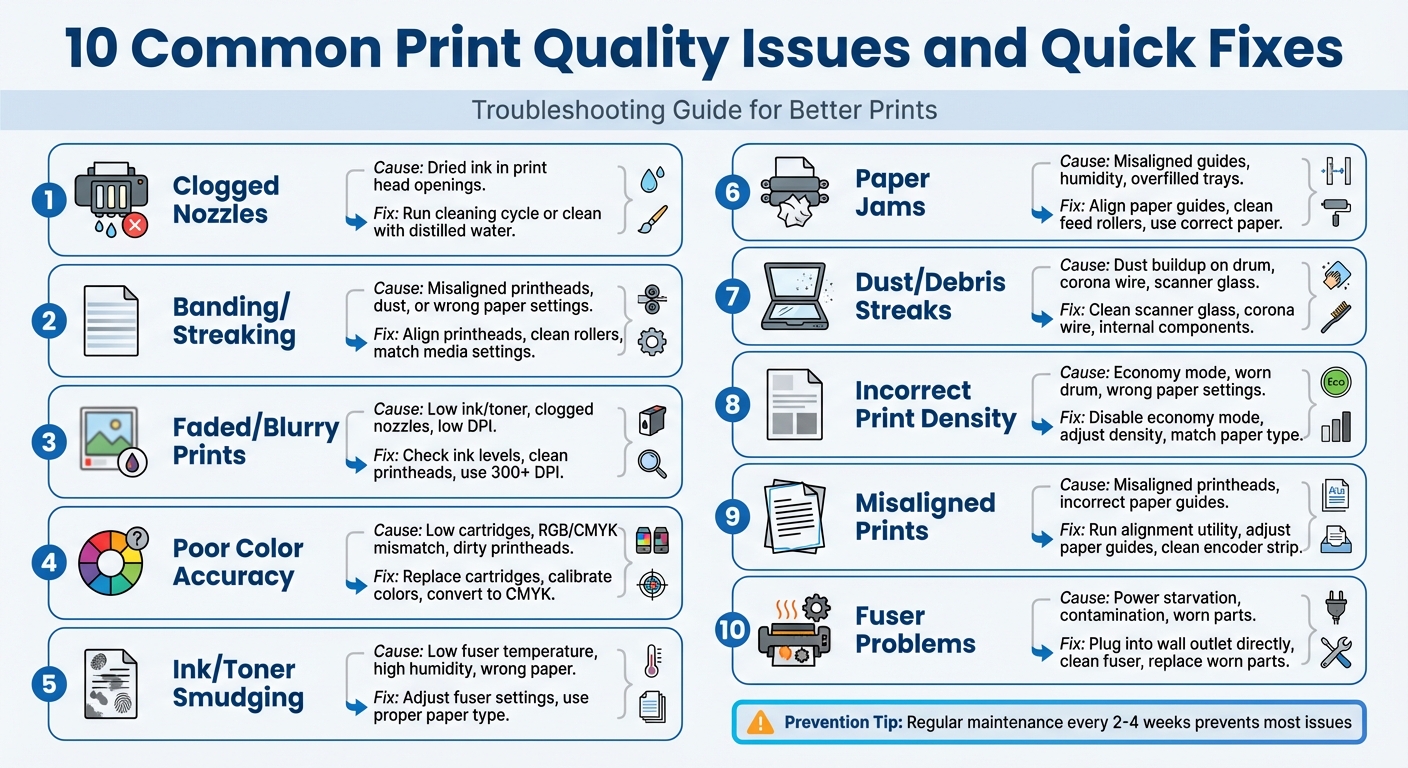
- Clogged Nozzles: Run a nozzle cleaning cycle or clean manually with distilled water.
- Banding/Streaking: Align printheads, clean rollers, and adjust media settings.
- Faded/Blurry Prints: Check ink/toner levels, clean printheads, and use higher DPI settings.
- Poor Color Accuracy: Replace low cartridges, calibrate colors, and convert files to CMYK.
- Ink/Toner Smudging: Adjust fuser settings, use proper paper, and clean rollers.
- Paper Jams: Align paper guides, clean feed rollers, and use the right paper type.
- Dust/Debris Streaks: Clean scanner glass, corona wire, and internal components.
- Incorrect Print Density: Adjust density settings, clean drum units, and match paper types.
- Misaligned Prints: Align printheads, adjust paper guides, and clean the encoder strip.
- Fuser Problems: Plug directly into a wall outlet, clean the fuser, and replace worn parts.
Quick Tip:
Regular maintenance – like cleaning components, aligning printheads, and using quality supplies – can prevent most of these issues. For more persistent problems, consult a professional service.
Let’s dive into the details of each issue and how to resolve them step-by-step.
10 Common Print Quality Issues and Quick Fixes
1. Clogged Nozzles and Print Heads
Cause of the Issue
Clogged nozzles can seriously affect print quality, and they happen when ink dries up in the tiny openings of the print head. This issue often arises from leaving the printer idle for too long, the presence of air bubbles, dust, or debris, using low-quality inks, or exposure to unfavorable conditions like high heat or low humidity.
Impact on Print Quality
When nozzles are clogged, you’ll notice problems like gaps in text, streaky lines across images, or colors that are entirely missing. Partial clogs usually result in horizontal or vertical banding, while fully blocked nozzles can cause missing colors altogether. Prints may also look faded or feature "hollow" characters, where the edges are clear, but the centers are missing. A quick way to detect these issues is by running a nozzle check test, which prints a grid of lines and colors. Any gaps or faint areas in the grid signal a clog.
Actionable Fix or Solution
Most printers have a built-in "Head Cleaning" function accessible from the control panel. Start with one cleaning cycle, and if the clog persists, run a second cycle – but don’t go beyond two cycles to avoid wasting too much ink. Afterward, let the printer sit for about 10 minutes to allow air bubbles to dissipate. For tougher clogs, gently wipe the nozzle with a lint-free cloth dampened with distilled water or isopropyl alcohol. If that doesn’t work, turn off the printer and let it rest for around four hours before trying again.
Preventative Measures
To keep nozzles clear, print a test page every two weeks, use ink cartridges recommended by the manufacturer, and ensure your printer is in a clean, temperature-controlled space. Even if the printer seems fine, running a cleaning cycle once a month can help prevent clogs.
2. Banding and Streaking
Cause of the Issue
Banding appears as repeating horizontal stripes, while streaking shows up as long, continuous lines. These printing flaws can arise from several factors, including dust obstructing the laser path, misaligned printheads, low ink or toner levels, or dirty paper feed rollers. Another frequent cause is a mismatch between the printer settings and the type of paper in use. For instance, selecting "Glossy Photo Paper" in the printer settings while using plain bond paper can lead to these issues.
One example comes from an HP Designjet T520 user who experienced 1 1/4" wide color bands due to a "Paper Type" mismatch. The problem was resolved by aligning the printer’s media type settings with the actual paper being used. These errors not only diminish print quality but can also disrupt your workflow.
Impact on Print Quality
"Even a trace of horizontal banding can render a printed image ugly, distracting, and unprofessional." – Justin Bodin, Breathing Color
Banding can ruin images with visible stripes and make text appear faint, while streaking creates thin blank lines or dark smudges. These defects not only damage the visual appeal of your prints but also lead to wasted materials like paper, ink, and toner.
Actionable Fix or Solution
Start by running a nozzle check to identify whether the issue is due to a clog or a settings problem. If banding is detected, ensure the printer’s "Media Type" matches the paper loaded. Clean the paper feed rollers using a lint-free cloth lightly dampened with distilled water (avoid alcohol). Additionally, switching from "Draft" or "Economy" mode to "High Quality" or "Best" mode can help by slowing the printhead and increasing ink application. If the lines appear staggered, use the printer’s alignment utility to correct the issue.
Preventative Measures
To reduce the chances of future problems, align printheads every 6 to 12 months and print at least one page weekly on inkjet printers to maintain proper ink flow. Store paper in its original sealed packaging in a cool, dry location, as humidity can cause uneven ink absorption and blotching. Always double-check that your printer’s media settings match the type of paper you’re using to avoid configuration mistakes that lead to banding.
3. Faded or Blurry Prints
Cause of the Issue
Faded or blurry prints often stem from low ink or toner levels. Printer settings like "Toner Save" or "EconoMode" can also reduce ink usage, leading to lighter and less vibrant prints. Environmental factors, such as high humidity or extreme temperatures, can interfere with ink adhesion and toner density. Ideally, keep your printer in an environment between 68°F and 72°F with a relative humidity of 30% to 50%.
Hardware issues can also play a role. Clogged print head nozzles, dirty corona wires, or a worn imaging drum can produce streaks or faint areas on the page. Additionally, using the wrong type of paper – like highly textured sheets not suited for your printer – can cause toner to fail to bond properly or ink to bleed. Finally, if your source files are lower than 300 DPI, even a fully functional printer will produce blurry, pixelated images. These issues directly impact the sharpness and clarity of your prints.
Impact on Print Quality
"Dealing with a printer’s blurry text can be a nightmare, especially if the document is to be submitted to a superior. Smudged text and unwanted streaks across the page can leave a sour impression on the reader and waste all your hard work on the document." – Ehtisham, Author
Faded or blurry prints make text difficult to read and obscure fine details. Low-resolution images appear fuzzy, and pixelated text looks unprofessional, particularly along the edges. Since printed materials often represent an organization’s brand and values, poor print quality can tarnish your professional image and waste both time and resources.
Actionable Fix or Solution
To restore clear and sharp prints, address the root causes. Start by disabling "Toner Save" or "EconoMode" in both the printer settings and driver. If prints are still faded, remove the toner cartridge and gently shake it to redistribute the powder. For laser printers, clean the corona wire using the built-in tab; for inkjet models, use the "Clean Print Heads" utility in the maintenance menu.
Check that the print driver’s "Media Type" matches the paper you’re using. Selecting options like "Thick" or "Labels" can increase fuser heat, improving toner adhesion. Use the printer’s built-in tools, such as "Color Calibration" or "Registration", to realign colors and enhance print density. Ensure your source files are at least 300 DPI for the best clarity. If the problem persists, print a test page directly from the printer’s control panel. A clear test page suggests the issue might lie with the driver or software.
Preventative Measures
Preventing blurry prints requires regular maintenance and attention. Replace ink or toner cartridges before they are completely empty, and avoid using remanufactured or refilled cartridges, which have a reported failure rate of around 40%. Keep your printer away from drafty areas, such as open windows or air-conditioning vents, to minimize humidity-related issues. Regularly update your printer’s firmware and drivers to avoid compatibility problems that may affect print quality. For laser printers, inspect the green imaging drum for any scratches or fingerprints, as these can directly impact clarity. By following these steps, you can maintain reliable and professional-looking prints over time.
Fix print quality problems | HP inkjet printers | HP Support
4. Poor Color Accuracy
Getting your prints to look sharp and vibrant is about more than just fixing faded or blurry images – accurate colors are key to achieving a professional finish. Poor color accuracy often stems from a few common issues. For instance, when a single color cartridge runs low, the printer may try to compensate by blending other colors, resulting in strange shifts like blue turning green or red looking brown. Another culprit is the mismatch between RGB (used by digital screens) and CMYK (used by printers). Since screens rely on Red-Green-Blue pixels while printers use Cyan-Magenta-Yellow-Black inks, the result can be a noticeable difference between what you see on your screen and the final print.
Dirty printheads can also disrupt proper ink application, leading to missing colors or washed-out images. Expired ink – typically with a shelf life of about two years – can thicken or degrade, further throwing off color accuracy. Outdated or corrupted printer drivers may ignore specific color settings or fail to process color data correctly . Even environmental factors, like high humidity or extreme temperatures, can mess with how ink or toner adheres to paper, causing dull or uneven coloring.
Impact on Print Quality
Inaccurate colors can ruin the professionalism of your prints. Imagine a marketing brochure with muted or off-color hues – it’s not exactly eye-catching. Or a business presentation where the colors misrepresent data or your brand’s identity. Printed materials often reflect an organization’s values, so poor color accuracy can hurt your credibility and lead to expensive reprints.
"When your printer stops printing colors the way it should – wrong hues, washed-out images, or one color missing altogether – it’s usually a fixable problem." – OEM Connect
Addressing these problems quickly can help restore your prints’ vibrant, true-to-life colors.
Actionable Fix or Solution
To tackle color issues, start by replacing low or empty cartridges and running cleaning cycles for the printhead and corona wire . Updating your printer drivers can also resolve many color-related problems. For better consistency between screen and print, convert your documents to CMYK before printing. Many printers have a "Color Calibration" or "Color Adjust" tool in their maintenance menu – use these to realign colors and fine-tune the output .
If your prints have a persistent tint – like being too red or too blue – manually adjust the "Color Balance" settings for Cyan, Magenta, Yellow, and Black in your printer’s properties. Also, make sure the "Media Type" or "Paper Type" setting in the print driver matches the actual paper in the tray. This helps the printer manage color density effectively . For tasks that require precise colors, consider switching to PostScript (PS) drivers instead of PCL drivers, as they handle color better. Finally, disable settings like "EconoMode" or "Toner Save", which reduce color density to save ink or toner .
Preventative Measures
Once you’ve fixed the issue, a few simple habits can help keep your colors consistent over time. Print a color document at least once a week to keep the ink flowing and prevent clogs. Store ink cartridges properly and place your printer in a stable environment – away from drafts, open windows, or air-conditioning vents – to avoid temperature and humidity fluctuations . Running a color calibration routine monthly can also help maintain consistent output. Lastly, use high-quality paper designed for your printer type to ensure your colors stay vibrant and true to your design.
5. Ink or Toner Smudging
Cause of the Issue
Ink or toner smudging happens when the colorant doesn’t bond properly with the paper, leaving marks that easily rub off. A common culprit is high humidity, which causes paper to absorb moisture, making it harder for ink or toner to stick . In laser printers, the fuser unit must heat up to a specific temperature to melt the toner and fuse it to the paper. If the fuser doesn’t get hot enough, the toner stays loose and smears when touched . Incorrect media settings – like selecting "Plain Paper" while using thicker or glossy paper – can also interfere with proper fusing . Additionally, worn toner cartridges, dirty imaging drums, and dust or paper fragments inside the printer can cause uneven toner application . Knowing these causes can help you identify the right fix.
Impact on Print Quality
Smudged prints can look sloppy and unprofessional. Text may become hard to read, images might blur, and colors could bleed together, reducing the overall quality of your documents. In more severe cases, you might notice streaks, blotches, or patchy areas where the toner hasn’t adhered properly . Loose toner can also transfer onto your hands, clothing, or other documents, creating a messy situation . Beyond the printed pages, excess toner can coat internal components like rollers and the fuser, leading to recurring smudges on future prints . Addressing the issue quickly helps maintain clear, professional-looking prints.
Actionable Fix or Solution
Start by checking your paper. Use standard 20 lb. (80 g/m²) paper to see if the smudging stops; if it does, the issue likely lies with incompatible media . Make sure your printer settings match the paper type – if you’re using thick or specialty paper, adjust the settings to ensure the fuser applies the correct heat . Clean the imaging drum with a lint-free cloth and check the fuser lever position, which is typically set "up" for standard paper and "down" for envelopes .
If smudging persists, remove the imaging unit and gently shake it to redistribute the toner evenly . If toner spills, avoid using a standard vacuum or compressed air, as these can spread harmful toner particles. Instead, use a toner vacuum with a HEPA filter. If toner gets on your clothes, wash them in cold water, as heat can permanently set the stain. Following these steps should help you achieve clean, smudge-free prints.
Preventative Measures
To avoid smudging issues in the future, store your paper in its original packaging and keep it in a cool, dry place to prevent moisture absorption . Fan the paper stack before loading it into the printer to prevent pages from sticking together. Use genuine ink and toner cartridges whenever possible, as refilled or non-genuine cartridges are more prone to leaking . Run your printer’s "Cleaning Page" tool periodically to remove dust and excess toner from internal components. For thicker or specialty media, enable settings like "Improve Toner Fixing" or "Thick Paper" mode in your printer driver to increase the fuser temperature and slow down printing, ensuring better adhesion . Lastly, avoid exposing the imaging drum to direct light for more than 10 minutes, as this can permanently damage it.
sbb-itb-ce53437
6. Paper Jams and Misfeeds
Cause of the Issue
Paper jams and misfeeds happen when sheets don’t flow smoothly through the printer. One common culprit is a poorly adjusted paper tray. If there are gaps between the paper stack and the side or end fences, the paper can feed at an angle and get stuck. Humidity also plays a role – paper stored in damp conditions absorbs moisture, which makes it expand, curl, and stick together. Overfilled trays or unevenly stacked paper can disrupt the feeding process, while dust or debris on friction pads and feed rollers reduces their grip. Using paper that’s either too thin, too thick, or outside the printer’s recommended specifications further increases the chances of a jam. All these issues lead to production delays and potential defects.
Impact on Print Quality
Paper jams bring everything to a halt, forcing you to stop the printer and clear the blockage manually. Misfeeds can leave behind wrinkles, creases, or curled edges on the paper. If the paper isn’t aligned properly, you might end up with skewed or diagonal prints that look unprofessional. Multi-feeds, where several sheets are pulled in at once, can cause the printer to skip pages or jam mid-job. This often results in incomplete print sets and wasted materials.
Actionable Fix or Solution
To resolve these issues, start by adjusting the paper guides so they sit snugly against the paper stack without squeezing it. Fan the paper stack before loading it to separate any curled or stuck sheets. Avoid overfilling the tray – stick to the marked fill line. Regularly clean the friction pads and feed rollers to maintain their grip. If the paper is curled, reorient it before loading, and in humid conditions, activate the printer’s High Humidity Mode to handle damp sheets more effectively.
Preventative Measures
Taking steps to prevent jams can save time and keep your operations running smoothly. Proper paper handling is key.
"Paying attention to how you handle the paper you feed into your copiers and printers is a cheap, easy, and effective way to minimize downtime from paper jams."
– Kirk Studebaker, President, Coordinated Business Systems
Store paper in its original packaging in a cool, dry place to keep moisture out. Use the oldest paper first to avoid letting it sit too long, and don’t load new paper until the tray is empty. Keep different paper weights and types separate – mixing them in one tray can lead to feeding problems. Follow the directional indicators on the ream for proper loading. Also, avoid opening the paper tray while a print job is in progress. For duplex jobs with heavy toner coverage, consider reducing solid area coverage to lower the risk of jams.
7. Dust and Debris Streaks
Cause of the Issue
Dust and debris streaks happen when particles like dust, dried ink, and toner build up inside your printer or on scanning surfaces. Paper naturally sheds dust during use, and coated or double-sided papers can leave sticky residues. Ink can dry on nozzles, while toner particles often cling to internal parts like the drum unit, corona wire, or fuser. Toner waste can also add to the mess. For scanning and copying, even tiny dirt particles on the scanner glass or document feeder can cause dark vertical lines. Adhesive from labels or sticky notes can melt onto the drum, leading to repeating black spots at regular intervals. This accumulation disrupts toner transfer and scan clarity, which directly impacts the quality of your prints.
"Dirt or fluff can also build up in the ink cartridge holder where the print heads are located."
– Stuart Deavall, Technical Printer Expert, Toner Giant
Impact on Print Quality
These streaks often appear as vertical black or white lines, random spots, or repeating marks running down the page. White lines typically mean debris is blocking toner transfer, obscuring text or images, while black lines suggest issues like a dirty corona wire or a contaminated drum unit. If dust reaches the fuser or exit rollers, you might notice toner smears along the page edges. If the streaks only show up on copies (but not on documents printed directly from your computer), the problem likely lies with the scanner glass.
Actionable Fix or Solution
Start by using your printer’s built-in cleaning features – most models have options like head cleaning or drum cleaning. For scanners, clean the glass and document feeder with a microfiber cloth and a gentle, non-abrasive cleaner to remove dust and smudges. Use a lint-free cloth dampened with isopropyl alcohol to wipe down rubber-coated feed rollers, clearing away paper residue and ink buildup. Canned air is great for blowing out loose dust and paper fragments from the feed path, but handle delicate sensors with care. For laser printers, slide the cleaning tab on the drum unit several times to clear the corona wire, ensuring it’s returned to its original position afterward.
Preventative Measures
To keep your printer running smoothly, regular maintenance is key. Fan your paper stack before loading it to reduce static and loose dust, and store paper in its original packaging in a dry place to avoid moisture absorption and fiber shedding. Clean scanner glass and feed rollers routinely. Also, avoid using paper with staples or clips, and choose labels specifically designed for your printer to prevent adhesive from damaging internal components.
8. Incorrect Print Density
Cause of the Issue
After dust-related problems, incorrect print density is another common culprit behind poor print quality. This issue can arise from several factors, such as low ink or toner levels, worn-out components like drum units or transfer rollers, and improper printer settings (like "Toner Save" or "Economy Color" modes). Environmental conditions also play a role – high humidity can make paper absorb moisture, leading to blurry prints. Similarly, rapid temperature shifts can cause condensation inside the printer. Another overlooked factor is mismatched paper settings; for instance, selecting "Plain Paper" in the print driver while using heavy cardstock can prevent the fuser from applying enough heat, resulting in uneven density.
Impact on Print Quality
Incorrect print density can make your prints look either too light or overly dark. Light prints can make text hard to read and obscure fine image details, while excessive density can create unwanted gray backgrounds, reducing contrast and professionalism. Uneven density across the page not only looks sloppy but can also diminish credibility. Additionally, colors might appear muted or patchy, falling short of the intended design.
Actionable Fix or Solution
Start by turning off "Toner Save" or "Economy Mode." If the prints are faint, gently shake the toner cartridge to redistribute the toner evenly. Adjust the print density settings through the printer’s control panel, and double-check that the paper type selected in the print driver matches the paper loaded in the tray. Cleaning components like the corona wire and drum unit can also help. If these steps don’t resolve the issue, replacing the toner cartridge or drum unit might be necessary. Typically, toner cartridges last about three to six months.
Preventative Measures
To avoid moisture issues, store paper in its original packaging in a cool, dry place. If you’ve moved the printer to a new environment with a different temperature, let it sit for at least an hour to adjust. Always ensure the media settings in the print driver align with the paper type you’re using. For most business documents, printing at 300–600 DPI strikes a good balance between quality and toner efficiency. Regularly checking and maintaining print density will help you achieve consistently sharp and professional results.
9. Misaligned Prints
Cause of the Issue
Misaligned prints happen when the document doesn’t align properly on the page, resulting in skewed or shifted output. Over time, print heads can lose their alignment. Paper guides that aren’t snug against the edges of the paper can cause it to feed at an angle. In larger setups, like commercial or wide-format printers, loose paper rolls can lead to sideways shifting during printing. Software mismatches are another culprit – choosing the wrong paper size or type in the print driver can lead to incorrect margins or clipped content. Hardware issues, such as poorly installed cartridges or small bits of paper stuck inside the printer, can also disrupt alignment. Tackling these problems requires both immediate fixes and consistent maintenance.
Impact on Print Quality
Misalignment impacts more than just appearance – it can make your prints look unprofessional and waste pricey materials like specialty paper or labels. Blurry or fuzzy text, and even "double printing", can make documents hard to read. Key design elements or text may be cut off if they fall into the non-printable margins, which are typically about 0.25 inches from the edge of the page.
Actionable Fix or Solution
To correct misalignment, start by running the printer’s alignment utility. You can find this in Windows Printing Preferences or within the printer’s maintenance software. Then, adjust the paper tray guides to fit the paper size and double-check that the print settings match the loaded media. If you’re dealing with double printing or fuzzy text, open the scanner cover, reposition the print head to the center, and carefully clean the gray encoder strip with a dry, lint-free cloth – wipe gently from right to left and back again. Be sure to clear any debris, focusing on alignment-related areas rather than general cleaning.
Preventative Measures
Perform regular alignment checks, especially after handling high-volume print jobs, to avoid long-term issues. Before starting large production runs, test the printer’s non-printable margins and adjust your designs to fit within them. Always set the print scale to "Actual Size" or "100%" in your PDF or browser settings to prevent automatic resizing that could throw off alignment. Using genuine cartridges from the manufacturer and keeping your printer’s firmware updated can also help maintain consistent alignment over time. For persistent alignment challenges, you can reach out to professionals like Miro Printing & Graphics Inc. for expert assistance (https://bergencountyprinters.com).
10. Fuser Unit Problems
Fuser issues can disrupt print quality, leaving you with subpar results. Here’s how to identify and address them effectively.
Cause of the Issue
The fuser unit works by using high heat to bond toner to paper, but several factors can interfere with this process. One frequent issue is power starvation, which happens when the printer is plugged into a surge protector or UPS instead of directly into a wall outlet. This can prevent the fuser from reaching the necessary temperature. As HP Community Expert Repairatrooper explains:
Common cause of fuser errors is power starvation from plugging into either a surge protector or a Uninterruptible power supply (UPS).
Other culprits include contamination from toner, dust, or adhesive residue that builds up on the fuser rollers. Mechanical wear, such as damaged heating elements or worn rollers, and misaligned internal levers (used for specialty media) can also impair the fuser’s functionality.
Impact on Print Quality
When the fuser malfunctions, it can cause uniform ghosting or smudging, which happens when the toner isn’t properly bonded to the paper. Ghosting appears as faint images or text that reappear about 5 inches further down the page. Fuser problems can also lead to paper jams, particularly when the paper wraps around the rollers, often triggering a "Jam at C" error. Additionally, error code 50.2 indicates that the fuser isn’t heating up fast enough, which could point to a damaged heating element or insufficient power supply.
Actionable Fix or Solution
Start by plugging the printer directly into a wall outlet to ensure it gets adequate power. If you see streaks or spots across your prints, try running 10–20 blank pages through the printer to clear debris from the fuser rollers. For more hands-on fixes, power down the printer, loosen the fuser’s mounting screws, pull it out slightly, re-seat it firmly, and retighten the screws. Check that the envelope levers are set to "up" for standard paper. If smudging persists, enabling the "Improve Toner Fixing" mode can help. These steps can help restore your printer’s performance and ensure professional-quality prints.
Preventative Measures
To minimize fuser issues, always use paper that meets the manufacturer’s specifications. Non-recommended media can damage the fuser and compromise the printer’s reliability. Avoid feeding paper with staples or clips, as these can scratch critical components. Make sure your printer driver settings match the type of media you’re using – selecting options like "Thick Paper" or "Bond" ensures the fuser applies the correct amount of heat. Regularly printing a consumables or configuration report can help you track the fuser’s remaining life. Additionally, maintaining a stable and cool environment can help prevent temperature-related problems.
Conclusion
Fixing print quality problems becomes much easier when you understand their root causes and how to address them. The first step is regular maintenance. Simple tasks like cleaning feed rollers, corona wires, and scanner glass can prevent many issues from cropping up repeatedly.
"Outdated print devices can cost you more money in parts, supplies, energy use, and time than you might think."
Consistent upkeep doesn’t just enhance immediate output – it also sets the stage for reliable, long-term performance. Controlling temperature and humidity helps avoid problems like paper curling, wavy images, or hollow prints. Keep paper sealed in its original packaging until it’s ready to use, and double-check that your printer driver settings align with the media loaded in the tray. Printing test pages regularly can also help you spot small hardware issues before they turn into costly repairs.
Of course, when DIY fixes don’t cut it, turning to professionals can save time and ensure top-notch results. For those high-stakes projects where quality matters most, Miro Printing & Graphics Inc. in Hackensack, NJ, offers a complete range of services. With over 30 years of experience, they provide in-house design, comprehensive bindery options, and meticulous attention to every detail of the production process. Whether you’re troubleshooting your own equipment or need expert printing services, understanding these common issues gives you the confidence to make the right call. Plus, Miro Printing & Graphics Inc. offers free estimates for all printing and marketing projects, combining quality results with cost efficiency.
FAQs
What steps can I take to avoid frequent print quality issues?
To keep print quality issues at bay, try these practical tips:
- Choose the right materials: Always use paper and media that meet your printer’s specifications in terms of weight, coating, and size. This can help reduce smudging, streaking, and uneven colors.
- Maintain proper conditions: Keep your printer on a stable, level surface in a room with a moderate temperature (68–75°F) and humidity levels between 40–60%. These conditions minimize paper warping, ink bleeding, and other environment-related problems.
- Align and clean your printer regularly: Make it a habit to align the printer heads and calibrate the machine, especially before tackling large print jobs. Clean internal parts like the drum and fuser to remove toner buildup and replace consumables as needed.
- Work with high-quality files: Use files that are at least 300 dpi and include the correct color profiles. This ensures sharp details and accurate colors without pixelation or misalignment.
If you’re looking for expert assistance, Miro Printing & Graphics Inc. can help fine-tune your equipment and workflow for consistent, high-quality results.
What can I do if my printer’s cleaning cycles don’t fix clogged nozzles?
If your printer’s built-in cleaning cycles don’t fix clogged nozzles, here are a few additional steps you can take:
- Try a deeper cleaning cycle: Most printers have a maintenance menu where you can select a medium or heavy cleaning option. These settings apply extra pressure to push ink and air bubbles through the nozzles.
- Print a test page: After running each cleaning cycle, print a test page to see if there’s any improvement. If you still notice gaps or streaks, repeat the process as needed.
- Manually clean the nozzles: Turn off the printer, then carefully clean the nozzle area and ink channels with a lint-free cloth dampened with distilled water. Avoid using tap water and never touch the nozzles directly, as this could cause further damage.
- Replace the ink or printhead: If cleaning doesn’t help, the ink might be expired, or the printhead could be damaged. In this case, replace the problem cartridge or consult a technician for assistance.
These steps can often clear up stubborn clogs when standard cleaning cycles fall short.
How do humidity and temperature affect print quality?
Environmental conditions, such as humidity and temperature, can have a major influence on print quality. Paper naturally absorbs moisture from the air, so when humidity levels climb above 55%, problems like warping, curling, or sheets sticking together can occur. These issues often lead to smudges, streaks, or even paper jams. On the flip side, low humidity (below 45%) can make paper dry and brittle, increasing static buildup. This can result in feeding errors, clogged ink, or prints that look faded.
Temperature is another critical factor. Most printers perform best in a controlled range of 68–77°F. If it gets too hot, ink can become thinner, which may cause colors to appear inconsistent. In colder environments, ink tends to thicken, leading to poor flow and uneven color application.
At Miro Printing & Graphics Inc., we address these challenges by maintaining a climate-controlled production space. By carefully managing humidity and temperature, we can avoid common problems like curling, static, and color shifts, ensuring that every print project meets our high standards for quality.
Related Blog Posts
- Troubleshooting Surface Coating Defects in Printing
- 5 Common ICC Profile Issues and Fixes
- Common Post-Press Quality Issues and Fixes
- CMYK Print Defects: Misregistration vs. Banding
https://app.seobotai.com/banner/banner.js?id=69683095b8cd632afdd10f7a
