
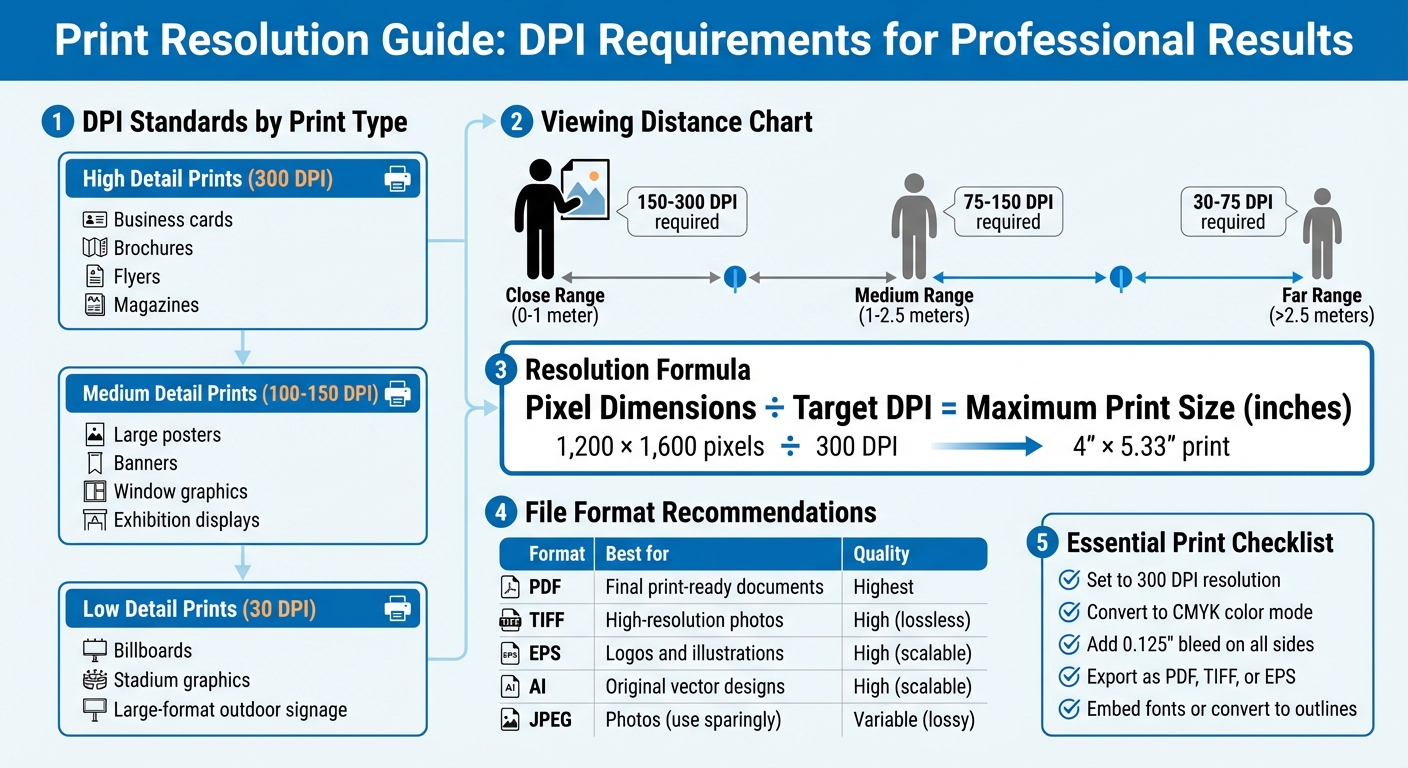
The quality of your printed materials depends heavily on the file resolution. To ensure sharp, clear prints, you need to understand DPI (dots per inch) and how it impacts print quality. For most projects, 300 DPI is the standard for professional results. Here’s what you need to know:
- DPI vs. PPI: DPI is for printing, while PPI is for digital screens.
- Standard Resolutions:
- 300 DPI: Ideal for brochures, business cards, and flyers.
- 100–150 DPI: Works for large posters or banners viewed from a distance.
- 30 DPI: Sufficient for billboards seen from far away.
- Resolution Formula: Pixel Dimensions ÷ Target DPI = Maximum Print Size (in inches).
- How to Check Resolution: Use tools like Photoshop, InDesign, or GIMP to verify file settings.
Proper resolution ensures clear, professional prints. Start with high-resolution files, convert to CMYK for accurate colors, and include a bleed (0.125 inches) to avoid trimming issues. Always export as PDF, TIFF, or EPS for the best results.
Read on to learn how to set and adjust resolution in your design software.
Print Resolution Guide: DPI Requirements by Viewing Distance and Application Type
HOW TO RESIZE AN IMAGE AND EXPORT FOR PRINTING IN PHOTOSHOP
sbb-itb-ce53437
How to Determine the Required Resolution
Figuring out the right resolution for your project starts with understanding pixel dimensions, print size, and the target DPI (dots per inch). Once you have these, applying the calculations within your design software becomes straightforward.
Understanding the Resolution Formula
The connection between pixel dimensions, print size, and resolution can be summed up with this formula:
Pixel Dimensions ÷ Target DPI = Maximum Print Size (in inches)
This tells you how large you can print an image without losing quality. For example, if you have an image that’s 1,200 × 1,600 pixels and print it at 300 DPI, the maximum size is 4″ × 5.33″. Stretching it to 8″ × 10.66″ drops the resolution to 150 DPI, which results in a less sharp appearance.
To calculate the pixel dimensions you need for a specific print size, use this formula:
Print Width (in inches) × Target DPI = Required Pixel Width
For instance, an A0 poster (33.1″ × 46.8″) printed at 150 DPI needs 4,965 × 7,020 pixels. If viewed from a medium distance and printed at 100 DPI, the requirement drops to 3,310 × 4,680 pixels.
"Resolution and image size are inversely proportional to each other. Enlarge an image, the resolution decreases; reduce an image, the resolution increases." – Printing for Less
Here’s a quick guide for typical print scenarios:
| Viewing Distance | Recommended DPI | Typical Applications |
|---|---|---|
| Close (0–1 meter) | 150–300 | Brochures, business cards, magazines |
| Medium (1–2.5 meters) | 75–150 | Posters, window graphics, exhibition displays |
| Far (>2.5 meters) | 30–75 | Banners, billboards, stadium graphics |
Once you know the required pixel dimensions, check and adjust your file’s resolution in your design software to ensure it meets these specifications.
Checking Current Resolution in Design Software
Before printing, verify your file’s resolution. Here’s how to check in common tools:
- Photoshop: Go to Image > Image Size.
- InDesign: Use the Info panel to check Effective PPI, which accounts for any scaling applied to the image.
- Windows: Right-click the file, select Properties > Details.
- macOS: Open the file in Preview and use the Inspector tool.
For PDFs, online DPI checkers can confirm that embedded images haven’t been downsampled below 300 DPI. Ensuring your file matches the required resolution is critical for professional-quality prints.
Scaling Images Without Losing Quality
To increase the effective DPI, reduce the print size. For example, a 1,200 × 900 pixel image printed at 12″ × 9″ has an effective resolution of 100 DPI. Shrinking it to 4″ × 3″ boosts the resolution to 300 DPI without changing the pixel data.
"Reducing print size is a simple and effective way to organically boost DPI for print." – Thomas Group Printing
If reducing the print size isn’t an option, consider AI-powered upscaling tools like Photoshop’s Preserve Details 2.0. Using Smart Objects ensures non-destructive resizing .
When scanning images, aim to capture extra detail. For example, scanning a 2″ × 3″ photo at 750 DPI allows you to enlarge it to 5″ × 7.5″ at 300 DPI. Avoid using images from websites or emails, as they’re often saved at 72–96 DPI and can look blurry or pixelated when printed.
Setting Print File Resolution in Design Software
Now that you’ve figured out the resolution your project needs, here’s how to configure it properly in your design software.
Adobe Photoshop
In Photoshop, resolution is managed through the Image Size dialog box. Go to Image > Image Size to access these settings. Resolution here refers to the number of pixels printed per inch (PPI).
You’ll need to decide whether to resample (changing the pixel count) or resize (adjusting physical dimensions without altering pixel data). To adjust resolution while keeping the original pixel count intact, uncheck the Resample box. This way, the total number of pixels stays the same, and the print dimensions adjust automatically. For instance, halving the physical size of an image doubles its resolution because the same pixels are packed into a smaller space.
Keep the link icon active to ensure proportional scaling. For most high-quality prints, especially on inkjet printers, aim for 300 PPI. If you’re increasing resolution (upsampling), consider applying the Unsharp Mask filter to improve clarity. You can also set resolution with the Crop tool by entering specific width, height, and resolution values in the options bar before cropping. The Info panel can help you monitor the pixel dimensions of your selection.
| Method | Resample Setting | Effect on Pixel Dimensions | Effect on Print Quality |
|---|---|---|---|
| Resizing | Deselected | No change; total pixels stay the same | Changes physical size; higher PPI increases detail density |
| Upsampling | Selected | Adds new pixels | Can cause blurriness, jagged edges, or blockiness |
| Downsampling | Selected | Removes pixels | Reduces file size; safer than upsampling |
For projects involving vector graphics, consider switching to Adobe Illustrator to ensure sharpness at any scale.
Adobe Illustrator
Illustrator handles resolution differently because it’s designed for vector graphics, which are resolution-independent. Unlike raster images (which rely on fixed pixel dimensions), vector artwork can be scaled infinitely without losing quality.
"Vectors are resolution independent, so they can be scaled to any size with absolutely no loss of quality." – PsPrint
To manage resolution for raster effects in Illustrator, expand the Advanced Options when creating a new file (File > New) and set Raster Effects to High (300 PPI). For existing documents, go to Effect > Document Raster Effects Settings and select 300 PPI. This ensures your file meets the professional print standards mentioned earlier.
To check the quality of imported images, open the Document Info panel (Window > Document Info) and select Embedded Images. This lets you verify the actual PPI of placed raster images. Avoid upscaling images beyond their limits; their effective resolution should stay at or above 300 PPI. Before finalizing, convert text to outlines (Type > Create Outlines) to avoid font issues during printing.
When exporting, select File > Export > Export As and ensure the resolution is set to High (300 PPI) for formats like TIFF or JPEG. For vector artwork, save as PDF or EPS to preserve scalability and prevent pixelation.
If you’re using other software, the next section covers how to adjust resolution in tools like GIMP and Canva.
Other Tools (Canva, GIMP)
Setting resolution in GIMP or Canva is just as important for ensuring high-quality prints.
In GIMP, use the Print Size command to adjust physical dimensions and resolution without affecting pixel data. Go to Image > Print Size, choose your preferred unit (like inches), and set the X and Y resolution to 300 PPI. Keep the chain icon active to maintain the aspect ratio. Changing the resolution here automatically updates the print dimensions based on the existing pixel count. If your image defaults to 72 PPI, make sure to reset it to 300 PPI to avoid pixelation.
For Canva, download your design using the highest quality settings available. Double-check that the file dimensions align with a 300 DPI output for proper print resolution.
File Formats and Settings for High-Quality Printing
Once you’ve nailed down the resolution, the next step is selecting the right file format and print settings to achieve crisp, professional results.
Recommended File Formats
Picking the right file format can make or break the quality of your prints. PDF (Portable Document Format) is widely regarded as the best choice for print-ready files because it preserves fonts, graphics, and formatting across different devices and systems.
For high-resolution images or multi-colored artwork, TIFF (Tagged Image File Format) is a top contender.
"TIFF (Tagged Image File Format) is a lossless format, preserving all image data. This makes it the preferred choice for professional printing where quality is paramount" – 4OVER4
Unlike JPEG files, which use lossy compression and lose data every time they’re saved, TIFF files retain consistent color and image quality no matter how often they’re used.
For logos and illustrations, EPS (Encapsulated PostScript) is a solid choice because it supports vector graphics, allowing images to scale to any size without losing clarity. Similarly, AI (Adobe Illustrator) files are perfect for complex vector artwork, as they keep all paths and scalability intact. On the other hand, PNG is not recommended for professional printing since it doesn’t support the CMYK color mode required by printers.
| File Format | Type | Best For | Quality |
|---|---|---|---|
| Container | Final print-ready documents | Highest (preserves all data) | |
| TIFF | Raster | High-resolution photos and scans | High (lossless) |
| EPS | Vector/Raster | Logos, icons, and illustrations | High (scalable) |
| AI | Vector | Original design files | High (scalable) |
| JPEG | Raster | Photographs (use sparingly) | Variable (lossy compression) |
Color Mode and Bleed Settings
Monitors display colors in RGB (Red, Green, Blue), but printing presses use CMYK (Cyan, Magenta, Yellow, and Black) inks. Converting your file to CMYK before printing ensures your colors appear accurate and vibrant. For designs that include small text, bumping up the resolution to 400 DPI can help maintain sharpness .
To avoid unwanted white borders after trimming, always include bleed settings. Add a 0.125-inch bleed on all sides by extending background colors and images beyond the trim line. For example, if you’re designing an 8.5" x 11" flyer, set up your document as 8.75" x 11.25". Also, keep critical elements like text and logos at least 0.125 to 0.25 inches inside the trim line to prevent them from being cut off.
Once you’ve double-checked these settings, you’re ready to prepare your file for submission.
Submitting Files to Miro Printing & Graphics Inc.
When your file is ready, follow these steps to ensure a smooth submission process with Miro Printing & Graphics Inc.
First, package all related components together. If you’re submitting multiple files, compress them into a single ZIP archive. For larger files (over 10–20 MB), use cloud storage services like Dropbox or Google Drive .
Before uploading, flatten all layers in formats like PSD or TIFF to reduce file size and prevent any shifts during printing. If your design includes custom fonts, make sure they’re embedded in the PDF or converted to outlines in Illustrator using the Type > Create Outlines feature. This avoids font substitution issues.
Double-check that your file meets these key requirements:
- CMYK color mode
- 300 DPI resolution
- 0.125-inch bleed on all sides
- PDF, TIFF, or EPS format
Troubleshooting Common Resolution Issues
Getting the resolution right is key to achieving high-quality print results. Even with careful preparation, resolution issues can sometimes sneak in. Spotting and fixing these problems early can save you a lot of time, money, and headaches.
Identifying Signs of Low Resolution
The most obvious signs of low resolution are pixelation and jagged edges. When an image is enlarged beyond its original size, the software tries to fill in the gaps by creating new pixels, which often leads to blocky edges and a noticeable loss of detail. Similarly, blurriness and lack of sharpness are telltale signs that an image doesn’t have enough pixel data to produce a crisp print. Simply scaling up a low-resolution image won’t add the fine details or smooth gradients that weren’t there to begin with.
Another issue to watch for is compression artifacts, which are common in JPEG files. These artifacts look like random noise or distortion and can be especially noticeable in printed materials. Misleading on-screen displays can also trip you up. For example, a 600 DPI scan might appear huge on your monitor if your software defaults to showing it at 72 DPI, but this doesn’t reflect how it will print.
To avoid these pitfalls, double-check your resolution using this formula: width in inches × DPI = required pixels. If you’re working with PDFs, use a PDF DPI Checker to verify the resolution of embedded images before submitting your file.
Fixing Resolution Problems
If you’ve identified resolution issues, here’s how to address them effectively. The best solution is to start with a higher-quality source. This might mean rescanning the original image at a higher DPI or capturing a new image with better settings. If rescanning isn’t possible, reducing the print size can increase the effective DPI.
Avoid the temptation to simply increase the DPI in your software without resizing the image dimensions. This doesn’t actually improve the quality and will lead to blurry, pixelated results. In layout programs like InDesign, always use the Place command instead of Paste. Pasting can embed a low-resolution preview instead of the full-quality image.
If you need to enlarge an image, calculate the required scanning DPI first. For example, enlarging a 2" × 3" image to 5" × 7.5" (2.5× its original size) requires scanning the original at 750 DPI. When saving your edits, stick to lossless formats like TIF or EPS to maintain quality. Avoid repeatedly saving in JPEG format, as this can degrade the image over time.
Pre-Flight Checks for Final Files
Before sending your file to the printer, perform a detailed pre-flight check to catch any lingering issues. In Adobe Acrobat Pro, the Pre-flight tool can flag images that fall below 300 DPI. If you find a problematic image, right-click it, choose Save image as, and open it in Photoshop. There, you can verify its exact DPI under Image > Image Size.
For documents with transparency, use the PDF Optimizer tool to detect and merge image fragments, which can help reduce file size and avoid printing errors. The Flattener Preview tool can also be useful for adjusting the Raster/Vector balance slider to its highest setting, ensuring professional-quality output. When everything is ready, save your file as a Press-ready PDF (PDF/X) using the PDF/X-4 profile to meet industry printing standards.
| Pre-flight Task | Tool/Menu Path (Adobe Acrobat Pro) | Purpose |
|---|---|---|
| Resolution Check | Print Production > Pre-flight | Flags images below 300 DPI |
| Image Verification | Right-click > Save Image > Photoshop | Confirms pixel dimensions and DPI |
| File Optimization | Advanced > PDF Optimizer | Merges image fragments, reduces file size |
| Transparency Flattening | Print Production > Flattener Preview | Converts transparent objects for printing |
| Final Export | Save as Other > Press-ready PDF (PDF/X) | Ensures PDF/X-4 print standards |
Conclusion
Getting the print file resolution right isn’t complicated, but it’s critical for producing professional-quality results. The industry standard of 300 PPI is your go-to for projects like business cards, flyers, brochures, and other commercial printing. As Natalie Wiley, Content Marketing Supervisor at Printivity, puts it: "300 PPI is the standard benchmark for optimal print quality. It’s considered the minimum resolution required for high-quality printing, especially for images and graphics."
The golden rule? Start with a high resolution. Always set your canvas to 300 PPI at the final print size before you begin designing. Trying to increase the resolution after finishing your design just leads to blurry, pixelated results – it’s impossible to add detail that wasn’t there to begin with. Use high-resolution photos straight from a camera instead of web images or screenshots, which are typically only 72 DPI and unsuitable for print.
For logos, text, and illustrations, vector graphics (like AI or EPS files) are your best friend. These formats scale perfectly without losing clarity. For raster images, check the effective PPI in your design software to ensure the resolution holds up after scaling. If an image’s resolution is too low, reducing its physical size can help boost its effective DPI.
Before sending your files to Miro Printing & Graphics Inc., take a moment to run a pre-flight check. Tools like Adobe Acrobat Pro or your design software’s built-in features can flag images below 300 PPI. Export your final files as high-resolution PDFs, ensuring fonts are embedded and images are preserved. These steps can help you avoid production delays, costly errors, and disappointing results.
Spending a little extra time upfront to verify your resolution settings can save you hours of headaches later. When you start with the right resolution, your printed materials will reflect the quality and precision your brand stands for.
FAQs
What size can I print my image without it looking blurry?
To get sharp, clear prints, make sure your image resolution is set to 300 pixels per inch (PPI) or dots per inch (DPI) at the size you plan to print. This is the standard for producing high-quality prints.
Does changing DPI alone actually improve print quality?
Changing DPI by itself doesn’t automatically improve print quality. For sharp and vibrant prints, you need both the right DPI setting – usually 300 dpi – and a suitable resolution. If you adjust DPI without ensuring the resolution matches, the final print might not look any better.
When should I use PDF vs. TIFF vs. EPS for printing?
For most printing tasks, PDF is the go-to option. It maintains formatting and works seamlessly across different systems. When dealing with high-resolution raster images, such as photographs, TIFF is the preferred choice because it offers lossless quality. For scalable vector graphics, like logos or detailed illustrations, EPS is the best fit due to its ability to preserve sharpness at any size.
So, think of it this way: PDF for layouts, TIFF for photos, and EPS for vector-based designs.
Related Blog Posts
- Large Format Printing: DPI vs. PPI Explained
- Image Resolution Standards for Offset Printing
- How to Set Up Artboards for Printing
- How to Adjust DPI for Large Format Prints
https://app.seobotai.com/banner/banner.js?id=698fa9b5efc60cc2af06df44
