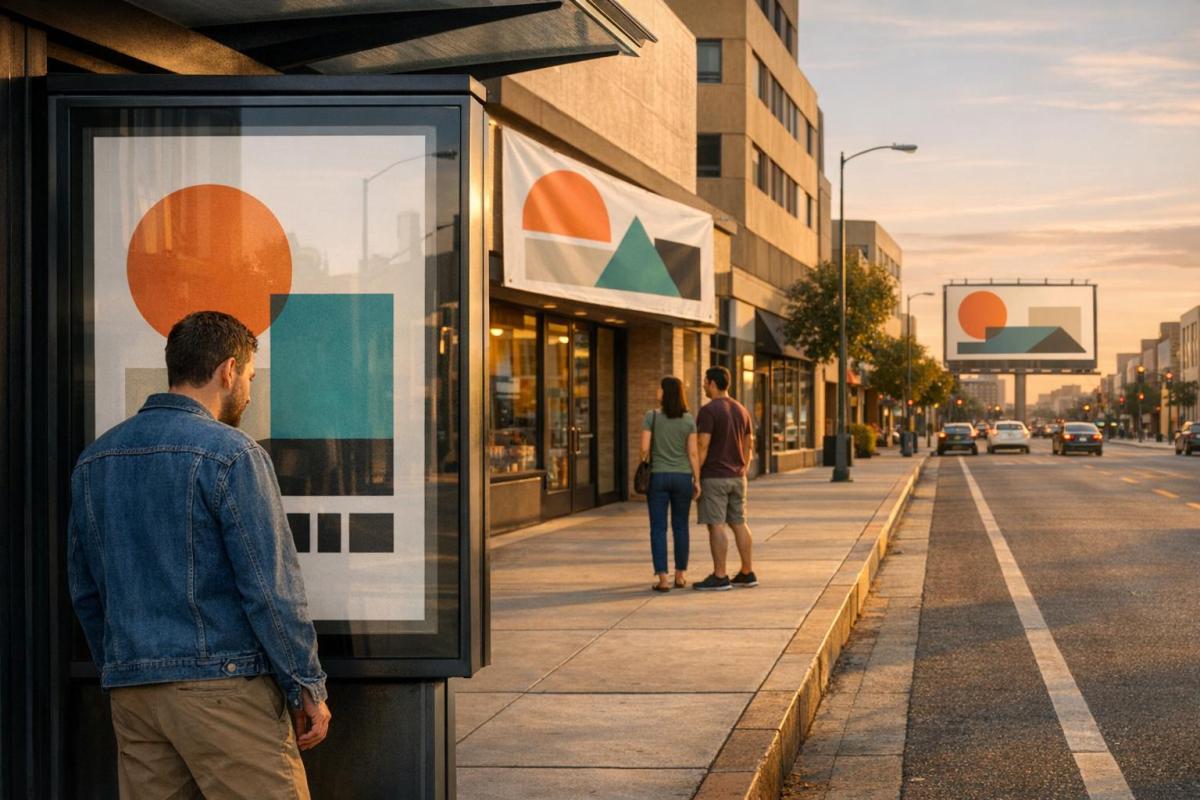
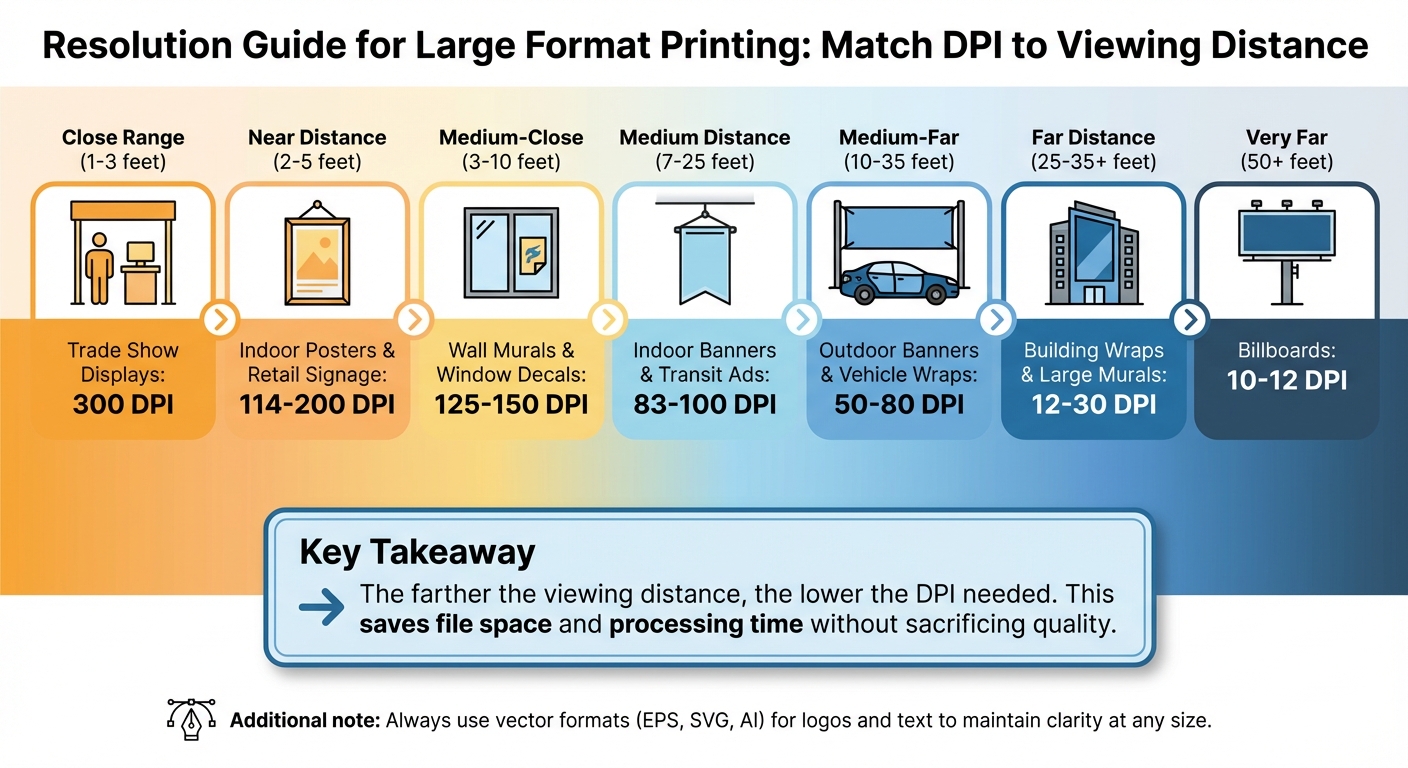
Large format printing isn’t about 300 DPI. Unlike small prints like business cards or brochures, large-scale projects like banners and billboards rely on viewing distance to determine resolution. The farther away your audience is, the lower the resolution you can use without sacrificing sharpness. For example:
- Billboards (50+ feet away): 10–12 DPI
- Outdoor banners (10–35 feet): 50–80 DPI
- Indoor posters (2–5 feet): 114–200 DPI
- Close-up displays (1–3 feet): 300 DPI
This approach saves file space, reduces processing time, and ensures professional results. Always match resolution to viewing distance and use vector formats for logos or text to maintain clarity at any size. If unsure about file prep, check PPI, use CMYK color, and consult professionals to avoid common mistakes.
Large Format Print Resolution Guide by Viewing Distance
How Resolution Works in Printing
DPI vs. PPI Explained
When it comes to understanding resolution, two key terms often come up: PPI (Pixels Per Inch) and DPI (Dots Per Inch). These terms may seem interchangeable at first glance, but they refer to different aspects of image and print quality.
PPI is all about the density of pixels in a digital image or on a screen. Think of it as the "input" resolution – how much detail your digital file holds. On the other hand, DPI deals with the "output" resolution, describing how many ink dots a printer places on a physical surface per inch.
As Investopedia puts it, "PPI tends to refer to an input resolution… Dots per inch (DPI), on the other hand, refer to an output resolution". While designers often use PPI and DPI interchangeably, there’s typically a 1:1 mapping between them in practice. The essential takeaway? Higher PPI or DPI means sharper, more detailed images.
This distinction becomes especially important when printing. For example, a 1.92-megapixel camera (1,600 x 1,200 PPI) can produce a crisp 4 x 6-inch print. However, if you try to enlarge that image, the quality will drop, resulting in blurry prints. To calculate the maximum print size for high-quality output at 300 DPI, divide the pixel dimensions by 300. For instance, a 1,024-pixel-wide image translates to a print width of about 3.4 inches.
Grasping these concepts is essential for properly preparing files, especially for large-scale printing projects.
Why Large Format Prints Need Different Resolution
The resolution requirements for large format prints differ significantly from smaller prints, largely due to viewing distance. Unlike a photo held in your hand, large prints are typically viewed from several feet away.
"The further a pixel is away from the viewer’s eye, the less visible that pixel becomes, and the lower resolution your graphic can be." – Infinity Images
This explains why large format prints can look sharp even at just 100 PPI when viewed at their intended distance. In fact, billboards – often viewed from 20 feet or more – can appear crisp with resolutions as low as 30 to 50 DPI. At these distances, the human eye simply can’t distinguish the loss of detail below 100 PPI.
There’s also a practical reason for using lower resolutions in large format printing: file size. A 10 x 20-foot banner printed at 400 DPI would require a staggering 17.2 GB file, which most design tools and printers can’t handle efficiently. Even the highest-end digital cameras don’t capture enough megapixels to maintain 300 PPI for something as massive as a billboard. By tailoring resolution to the viewing distance, designers can achieve sharp results without overwhelming their hardware.
Understanding how resolution ties into viewing distance and file size is the key to producing professional-quality large format prints without unnecessary complications. This sets the foundation for determining the ideal resolution for different projects, which will be explored further in the next sections.
sbb-itb-ce53437
Resolution Standards for Common Large Format Projects
Billboards and Outdoor Signs
When it comes to billboards and outdoor signage, the resolution requirements are surprisingly low. This is because these displays are typically viewed from far away. For instance, a billboard seen from a distance of 51 feet needs only about 11.2 DPI. In general, most billboards placed over 50 feet from the viewer look sharp with resolutions ranging between 10 and 12 DPI.
Similarly, building wraps and large murals, which are often viewed from 25 to 35 feet away, require resolutions between 12 and 30 DPI. The key here is to match the resolution to the viewing distance, ensuring the final image looks clear from where it’s meant to be seen. Let’s move on to banners and indoor signs, where closer viewing distances demand higher resolutions.
Banners and Indoor Signs
Indoor banners need higher resolution than outdoor displays because they are examined from much closer distances. For banners and transit ads viewed from 7 to 25 feet, a resolution of 83 to 100 DPI is recommended. On the other hand, wall murals and window decals, often seen from just 3 to 10 feet away, should be printed at 125 to 150 DPI to ensure sharpness in both text and images.
Outdoor banners and vehicle wraps, typically seen from 10 to 35 feet away, work well with resolutions between 50 and 80 DPI. As a general rule, the closer the audience, the higher the resolution needed to maintain a polished, professional look. For applications viewed from extremely close distances, such as trade show displays, let’s examine the resolution requirements for rigid materials.
Rigid Materials and Close-View Prints
For prints on rigid materials designed for close-up viewing, the highest resolution standards are essential. Trade show displays and retail signage, which are viewed from just 1 to 3 feet, should be printed at 300 DPI for maximum clarity. Intermedia Print Solutions emphasizes this point:
"For graphics viewed from a close distance (like tradeshow banners or retail displays), resolutions of around 300 PPI provide exceptional clarity and sharpness".
Fine art reproductions and museum graphics, also viewed at close range, typically require resolutions of 150 to 180 DPI for a high-quality finish. Posters and retail window graphics, which are generally seen from 2 to 5 feet, perform well with resolutions between 114 and 200 DPI. For these close-view applications, using vector formats (like .EPS, .SVG, or .AI) for text and logos is a smart choice, as they scale without losing quality.
This breakdown underscores the importance of aligning resolution with viewing distance – a fundamental principle in large format printing.
| Application | Viewing Distance | Recommended Resolution |
|---|---|---|
| Billboards | 50+ feet | 10–12 DPI |
| Building Wraps / Murals | 25–35+ feet | 12–30 DPI |
| Outdoor Banners / Car Wraps | 10–35 feet | 50–80 DPI |
| Indoor Banners / Transit Ads | 7–25 feet | 83–100 DPI |
| Wall Murals / Window Decals | 3–10 feet | 125–150 DPI |
| Posters / Retail Signage | 2–5 feet | 114–200 DPI |
| Fine Art / Museum Graphics | Close range | 150–180 DPI |
| Trade Show Displays | 1–3 feet | 300 DPI |
How to Calculate Image Size for Your Print
The Formula: DPI, Print Size, and Pixels
To determine the pixel dimensions needed for your print, multiply the physical size (in inches) by the desired resolution (PPI). The formula is straightforward: Physical Dimension (inches) × Resolution (PPI) = Required Pixels.
You’ll need to apply this formula separately for both the width and height. For example, if you want a print that’s 48 inches wide at 100 PPI, you calculate 48 × 100, which equals 4,800 pixels. Repeat the same process for the height to get the complete pixel dimensions.
This method provides the baseline for ensuring your file is prepared at the correct size for printing.
Sample Calculations for Large Format Prints
Using the formula above, let’s break down a few examples to see how pixel dimensions are calculated for different large-format prints:
- For a 48" × 72" banner printed at 100 DPI, you multiply 48 × 100 to get 4,800 pixels wide, and 72 × 100 to get 7,200 pixels tall. This means your image should be 4,800 × 7,200 pixels.
- A 24" × 36" poster designed for closer viewing at 150 PPI requires higher resolution. Multiply 24 × 150 to get 3,600 pixels for the width, and 36 × 150 to get 5,400 pixels for the height. The final dimensions: 3,600 × 5,400 pixels.
- For an A0 poster measuring 33.1" × 46.8" at 150 PPI, the required dimensions are 33.1 × 150 = 4,965 pixels wide and 46.8 × 150 = 7,020 pixels tall, resulting in 4,965 × 7,020 pixels.
To ensure quality, always round up your calculations. Many professionals go a step further, designing files at 1.25 to 1.5 times the calculated dimensions. This extra buffer allows for production tweaks without affecting print quality. By following these steps, you can guarantee your files are ready for high-quality large-format printing.
Preparing Files for Large Format Printing
Which File Format to Use
Choosing the right file format is just as important as nailing the resolution. For most large format printing needs, PDF is the go-to option. It’s reliable because it embeds fonts, preserves your design elements, and supports both raster and vector graphics. This ensures your design looks exactly as intended, no matter where it’s printed.
If you’re working on high-quality photographic prints or fine art, TIFF is your best bet. It uses lossless compression, meaning you won’t lose any image quality, and it retains maximum color depth. On the other hand, if your project involves logos, icons, or designs heavy on text, EPS or AI formats are ideal. These vector-based formats allow for infinite scaling without any pixelation, ensuring sharp results every time.
| File Format | Best Use Case | Key Advantage |
|---|---|---|
| General layouts, banners, signs | Embeds fonts and maintains formatting across devices | |
| TIFF | High-res photos, fine art | Retains maximum detail and color with lossless compression |
| EPS/AI | Logos, icons, text-heavy designs | Allows infinite scaling with no quality loss |
Steer clear of formats like JPEG or PNG for large format projects. These use lossy compression, which can introduce visible artifacts, and they don’t support CMYK color profiles – essential for accurate print colors.
Once you’ve selected the right file format, it’s time to focus on avoiding common mistakes during file preparation.
Common File Preparation Mistakes to Avoid
Even with the correct file format, mistakes in preparation can compromise the final print quality. One major error is upscaling low-resolution images. Images optimized for web use – typically at 72 PPI – won’t cut it for large format printing. Enlarging these files will only result in grainy or blurry prints. Always start with high-resolution source files to ensure crisp results.
Another critical step is converting your files from RGB to CMYK. RGB is designed for screens, but printers use CMYK to reproduce colors accurately. Failing to make this conversion can cause unexpected color shifts in the final print.
Don’t forget to convert text to outlines. If you skip this step, the printer’s software might substitute your fonts with defaults, completely throwing off your design. Additionally, include a proper bleed – usually about 2 inches on all sides – to avoid unwanted white edges in the final print.
"300 dpi images at large sizes can produce extremely large files – in the Gigabytes range. This is usually not necessary and places an extra burden on all raster image processing systems (RIPs)." – Tectonics
Before submission, flatten all layers in your file to prevent unexpected printing errors. For large black areas, use a "Rich Black" formula (50C, 50M, 50Y, 100K) instead of just 100% K. This creates a deeper, more vibrant black that looks much better in print.
What really matters when you make bigger prints. Resolution, viewing distances and sharpness
Matching Resolution to Viewing Distance
The resolution you need for a print isn’t a one-size-fits-all deal – it depends on how far away people will be when they view it. The farther the distance, the lower the resolution can be, which means smaller file sizes without sacrificing how sharp the print looks. This is especially important for large-scale prints where balancing quality and file management is key.
For example, a billboard viewed from over 50 feet away only needs 10–25 DPI to appear sharp, while a poster inspected up close (about 2 feet away) requires 150–300 DPI. Sarah Chen, a Print Production Specialist at ForestXL, highlights the risks of going overboard:
"One of the most common mistakes is over-resolution. Sending a 300 DPI file for a billboard wastes time uploading, costs more to process, and won’t look any better than a properly prepared 25 DPI file."
Here’s a practical illustration: a 10 ft x 4 ft banner at 300 DPI creates a file size of around 400–600 MB. However, the same banner at 75 DPI results in a file size of just 25–40 MB – perfect for viewing from 10+ feet away. This simple adjustment can reduce file sizes by over 90%, speeding up uploads and processing while keeping the print visually impressive.
Resolution and Viewing Distance Reference Chart
To make things even clearer, here’s a quick reference chart showing recommended DPI based on viewing distance and common applications:
| Viewing Distance | Recommended DPI/PPI | Common Applications |
|---|---|---|
| 1–3 feet | 150–300 | Posters, brochures, retractable banners |
| 3–10 feet | 75–150 | Trade show displays, window graphics, wall murals |
| 10–25 feet | 50–100 | In-store banners, hanging signs |
| 25–50 feet | 25–50 | Building wraps, large outdoor signs, car wraps |
| 50–100+ feet | 10–25 | Billboards, stadium graphics |
As a general rule, it’s smart to add about 25% to the minimum recommended DPI. This extra cushion ensures your print looks sharp even if viewers get closer than expected or if your design includes high-contrast elements like text or logos that can make imperfections more obvious.
Finding the Right Balance Between Quality and File Size
Choosing the right resolution is all about finding the sweet spot between visual quality and manageable file sizes. Start by considering where your print will be displayed and estimating the typical viewing distance. For instance, a trade show banner viewed from 5–8 feet away would look great at 100–125 DPI, keeping the file size reasonable without compromising clarity.
The material you’re printing on also plays a role. Glossy photo paper tends to show more detail, so it benefits from higher resolutions. On the other hand, textured materials like matte canvas or fabric naturally soften the image, allowing you to use a lower resolution without losing much visual appeal. For printed fabric, 180 DPI is often the maximum useful resolution since the texture limits how much detail can be displayed.
Lastly, for text and logos, always use vector formats like EPS or AI. These formats scale perfectly to any size, ensuring your design stays sharp and professional. By following these steps, you can strike the perfect balance between crisp visuals and efficient file management for any large-format print project.
Checking Quality and Getting Professional Help
Ensuring your file’s image quality is up to par can save you from costly reprints. You don’t need to be a tech wizard – just follow a few straightforward steps in your design software.
How to Check Image Quality Before You Print
Start by opening your file in design software like Adobe InDesign or Illustrator, and check the "Links" tab. This will show the "Effective PPI" at the final printed size. For most large-format prints, aim for a minimum of 100 PPI at the final output size.
Next, zoom in to 100% magnification to scrutinize the details. Watch for pixelation (visible square blocks), jagged edges on curves or text, and "noise" (random color specks, especially in smooth areas like skies). These issues might not be obvious when viewing the design at a smaller scale, but they’ll stand out in the final print.
To get a better sense of how your design will look, print an 8×10-inch section of it at full resolution on a standard office printer. This provides a real-world preview of the sharpness of your text and details. You can also double-check using a simple formula: multiply your print width and height (in inches) by your target PPI to ensure you have enough total pixels.
For high-stakes projects, consider requesting physical proofs from your print shop. These are printed on the actual material you’ll use, giving you an accurate preview of the final quality. If you’re still unsure or your file’s resolution is borderline, it’s time to bring in an expert.
When to Work with a Professional Print Shop
Once you’ve reviewed your file, professional input becomes crucial when the stakes are high or technical issues arise. Reach out to a print shop like Miro Printing & Graphics Inc. if your file’s resolution is slightly below the recommended threshold (e.g., 80 PPI instead of 100 PPI). Skilled prepress operators can use advanced tools like interpolation or AI-based upscaling to improve image quality without noticeable degradation. For example, in September 2025, Infinity Images shared how their team routinely enhances resolution from 80 PPI to 100 PPI for borderline files, ensuring production quality remains intact.
Professional help is especially valuable for intricate projects like museum displays, fine art reproductions, or retail branding. These often require careful decisions about materials and viewing distances. Experts can advise on specialized inks (such as UV or Latex) and substrates (like acrylic, metal, or textiles) to ensure your project meets durability and environmental requirements. Additionally, print shops run automated preflight checks to catch resolution or technical issues you might overlook.
If your design exceeds software size limits (typically 18–19 feet), involves specialty inks like white or spot varnish, or demands precise brand color matching, professional expertise ensures your vision is faithfully translated to the final product. Miro Printing & Graphics Inc. in Hackensack, NJ offers large-format printing services and in-house design support, making them a reliable partner for projects where quality and precision are non-negotiable.
Conclusion
The resolution needed for large-format images largely depends on how far away the viewer will be. For instance, a billboard seen from 50 feet away might only require about 11.2 DPI to look sharp, while an indoor poster viewed up close may need around 114 DPI to maintain clear details. By using a resolution based on viewing distance, you can avoid creating unnecessarily large files – a 10×20‑foot banner at 400 DPI, for example, would result in a massive 17.2 GB file.
For most large-format projects, 100 DPI is often a reliable starting point, though it’s not a one-size-fits-all rule. Additionally, vector graphics are an excellent choice for logos and text, as they bypass resolution limitations entirely.
Before sending your project to print, it’s essential to verify the quality of your file. Check the effective PPI in your design software and print test sections at full resolution to ensure everything looks as expected. Also, converting your files to the CMYK color space is a smart move to maintain accurate colors during printing.
If you run into resolution issues or face complex requirements – like specialty inks, precise color matching, or oversized files – don’t hesitate to consult a professional. Companies like Miro Printing & Graphics Inc. in Hackensack, NJ, offer expert design support and high-quality printing services to handle even the most demanding projects.
FAQs
What DPI should I use if people might view the print from different distances?
For prints meant to be viewed up close, aim for a resolution of 150–300 DPI. However, for displays intended for distant viewing, such as billboards or large outdoor signs, a lower resolution of 20–100 DPI works just fine. Selecting the right DPI based on the viewing distance helps maintain a good balance between image quality and file size.
How can I tell if my image resolution is high enough at the final print size?
To get sharp and clear results for large format printing, your image resolution should ideally be 300 PPI (pixels per inch) at the final print size. For instance, if you’re printing something that’s 24 inches wide, your image needs to be at least 7,200 pixels wide. While larger prints that are meant to be viewed from a distance can work with lower resolutions, sticking to 300 PPI ensures crisp detail for close-up viewing.
When should I use vector files instead of photos for large format prints?
When designing graphics for large format prints – like logos, illustrations, or line art – it’s best to use vector files. Why? Unlike photos, which rely on pixels, vectors are built using mathematical formulas. This means they can be scaled up infinitely without losing clarity or becoming blurry. Perfect for projects where crisp, clean lines are a must!
Related Blog Posts
- Large Format Printing: DPI vs. PPI Explained
- Image Resolution Standards for Offset Printing
- How to Adjust DPI for Large Format Prints
- Standard DPI for Commercial Printing
https://app.seobotai.com/banner/banner.js?id=6998f88cefc60cc2af08a7bf
