Folding isn’t just about creasing paper – it’s about precision and design. Whether you’re crafting brochures, maps, or invitations, the way you fold impacts readability, alignment, and overall quality. Manual folding ensures control over these details, especially for projects requiring specific layouts or tactile finishes. Here’s what you need to know:
- Plan folds early: Design with folding in mind to avoid costly errors. Adjust inner panels by 3/32" to 1/8" to prevent buckling.
- Choose the right fold type: Options include half folds (simple), tri-folds (common for brochures), double parallel folds (compact), and roll folds (progressive reveals).
- Use proper tools: Bone folders, scoring tools, and templates are key for clean, sharp folds.
- Pay attention to paper: Fold parallel to the grain to avoid cracking, especially with heavier stocks. Scoring is a must for thick paper.
Manual folding is all about precision and preparation. Testing your design with a physical dummy and understanding fold mechanics can save time, money, and frustration. Ready to fold like a pro? Dive into the details.
How to Crease Paper
sbb-itb-ce53437
Parallel Folding Methods
Manual Folding Techniques Comparison Guide for Print Projects
Parallel folds all move in the same direction, stacking panels neatly on top of one another. These folding techniques are a staple for print projects like brochures and event programs. Let’s break down some popular methods – half, tri-, double parallel, and roll folds – and their practical applications.
One challenge with parallel folds is panel compensation. To prevent buckling, inner panels need to be slightly narrower than outer ones. As Puget Bindery explains:
"Inside panels must be slightly narrower than outside panels. Without this adjustment, nested panels buckle and the piece will not sit flat."
For standard paper, reduce the fold-in panel by 3/32" to 1/8". For heavier cover stock, adjust this to 1/8" to 3/16". Additionally, always fold parallel to the paper grain to avoid uneven or cracked creases, especially with thicker paper.
Before committing to a full print run, it’s smart to create a physical dummy. Print a copy, trim it, and fold it manually to check panel alignment and ensure the reading flow makes sense. Below are details on specific parallel fold types and their ideal uses.
Half Fold (Bi-Fold)
A half fold divides a sheet with a single central fold, creating four panels (two on each side). Both panels are equal in width, making this method straightforward for manual folding. It’s a go-to for greeting cards, event programs, menus, and simple booklets. When designing, think of the layout as two facing pages, ensuring the left and right panels work together visually.
Tri-Fold (Letter Fold)
The tri-fold divides a sheet into three sections using two parallel folds, resulting in six panels. One end folds inward by about a third of the width, and the other folds over it. This style is widely used for brochures and mailers because it fits neatly into standard business envelopes. For an 8.5" x 11" sheet, the two outer panels are typically 3.6875 inches wide, while the inner fold-in panel is about 3.625 inches wide – a slight difference (1/16 inch) that prevents telescoping. To avoid design issues, keep text and graphics at least 1/8 inch away from fold lines.
Double Parallel Fold
This fold starts by halving the sheet, then folding it in half again in the same direction, creating eight panels. Since the panels nest twice, each inner panel needs to be slightly smaller than the previous one to avoid uneven edges. For thicker paper (above 170gsm or 100# cover), scoring the folds first can help prevent cracking along the edges.
Roll Fold
The roll fold creates a cascading effect with multiple inward folds, resulting in eight or more panels. It’s perfect for step-by-step guides, detailed pamphlets, or marketing materials where content is revealed progressively. Each inner panel should be about 1/16 inch smaller than the one it folds into to prevent buckling. Keep in mind that many people flatten roll-folded documents immediately, so design the inside spread with this in mind.
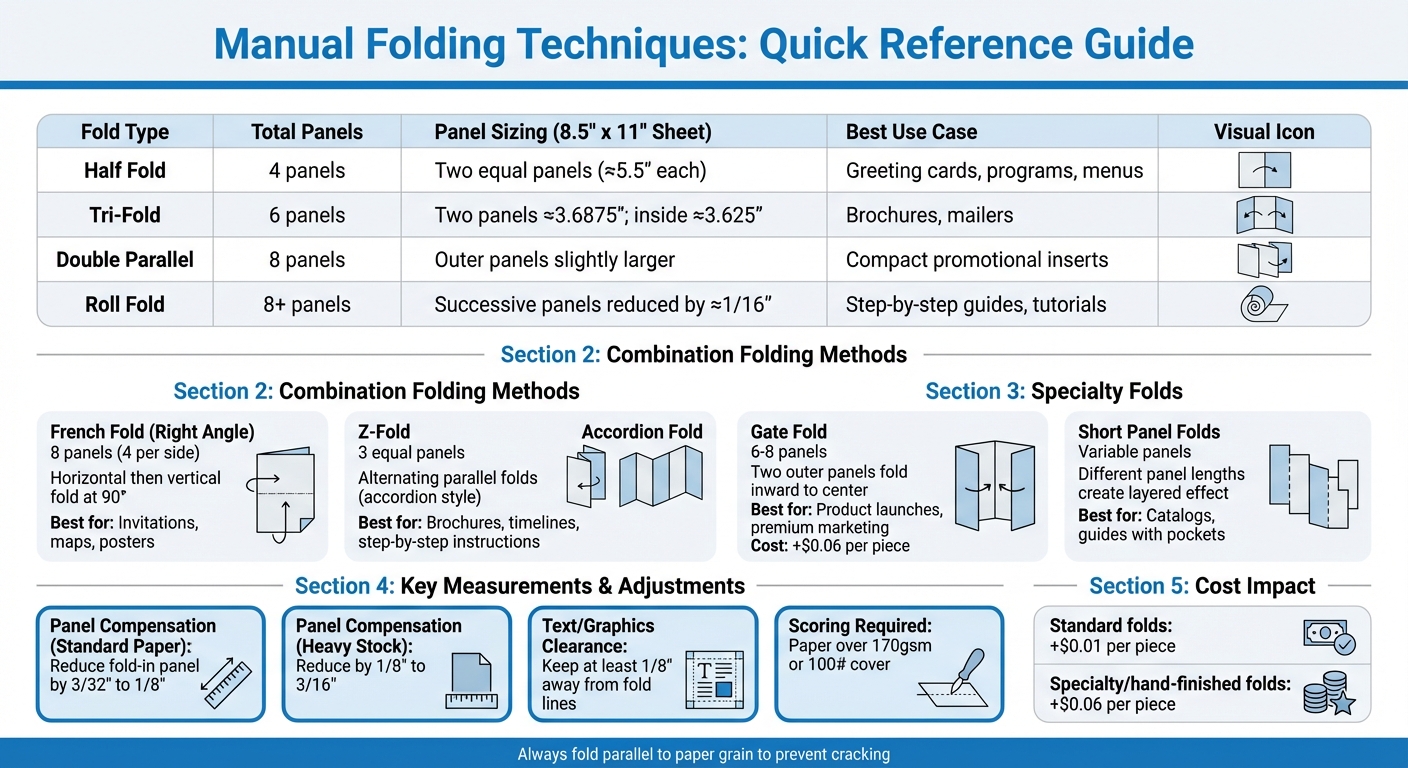
| Fold Type | Total Panels | Panel Sizing (8.5" x 11" Sheet) | Best Use Case |
|---|---|---|---|
| Half Fold | 4 | Two equal panels (≈5.5" each) | Greeting cards, programs, menus |
| Tri-Fold | 6 | Two panels ≈3.6875"; inside ≈3.625" | Brochures, mailers |
| Double Parallel | 8 | Outer panels slightly larger | Compact promotional inserts |
| Roll Fold | 8+ | Successive panels reduced by ≈1/16" | Step-by-step guides, tutorials |
Combination Folding Methods
Combination folds alternate folding directions to create compact, dynamic layouts, making them perfect for collapsing large sheets or guiding readers through step-by-step content. Two popular options here are the French fold and Z-fold variations.
Unlike parallel folds, which rely on consistent crease directions, combination folds introduce variety, enhancing how content flows. For example, the French fold uses a right-angle approach – one horizontal fold followed by a vertical fold – while Z-folds create a zig-zag pattern by alternating fold directions. As Puget Bindery explains:
"Folding structure directly influences how readers move through content. Choose the fold before beginning layout, not after."
These folds don’t require adjustments to panel widths, unlike roll folds where panels nest inside each other. However, grain direction is critical – fold parallel to the grain to avoid cracking, especially with heavier paper stocks. For such stocks, scoring the fold lines is essential to reduce stress on the paper fibers.
French Fold (Right Angle Fold)
The French fold, also known as a quarter fold, involves folding a sheet in half horizontally, then folding it again vertically at a 90-degree angle. This creates eight panels (four on each side) and reduces a large sheet into four equal quadrants. It’s ideal for invitations, maps, posters, and programs where you want a dramatic "grand reveal" effect – starting with a compact piece that unfolds into a larger display.
Typically, French folds are printed on one side, with the blank side folding inward. This layout works well for designs needing uninterrupted space, like product imagery, technical diagrams, or event posters. To ensure clean results, keep all text and key design elements at least 1/8 inch away from fold lines to accommodate any panel shifts during folding.
Z-Fold Variations
The standard Z-fold uses two alternating parallel folds to create three equal-width panels, opening like an accordion. Because the panels don’t overlap, they can all remain the same width without causing buckling. This setup is great for brochures, timelines, or step-by-step instructions since content flows naturally across the panels as the reader unfolds them.
For extended content, accordion folds continue the zig-zag pattern across four or more panels, making them perfect for longer timelines or detailed guides. Map folds take this concept further by combining multiple parallel and cross folds, allowing large sheets – like tourism maps or engineering layouts – to collapse into pocket-sized formats. When designing Z-fold pieces, avoid placing heavy ink on fold lines, as these areas are more likely to crack, exposing the white paper underneath.
With these folding methods clarified, the next section will explore the tools and materials needed for precise manual folding.
Specialty and Asymmetric Folds
Specialty and asymmetric folds push beyond traditional methods, offering creative ways to make print projects stand out. These designs incorporate unique shapes, diagonal creases, and dimensional elements that often require extra steps like scoring, die-cutting, or even manual folding. Trish Witkowski, Founder of Foldfactory, highlights their appeal:
"The Specialty category is the most exciting of the bunch. Filled with unique formats, many of these styles require scoring and die‐cutting, and possibly hand‐folding."
Asymmetric folds take this creativity to another level with panels of varying sizes that create layered, dynamic effects. However, this approach demands precision – outer panels need to be slightly narrower (by 1/16" to 1/8") than inner panels to ensure smooth nesting and avoid buckling. Because of their complexity, it’s crucial to request a finishing template from your printer before starting your layout. While standard folds typically add about $0.01 to the base printing cost, specialty folds requiring manual labor can add around $0.06 per piece. Below are examples of common specialty folds and how to design for them.
Gate Fold
The gate fold, sometimes called a barn door fold, is designed to immediately capture attention. It features two outer panels that fold inward from opposite sides to meet at the center, creating a dramatic "reveal" effect. Readers first see the outer spread, then open the "gates" to uncover the full interior content. This format works especially well for product launches, invitations, or premium marketing pieces where building anticipation is key.
A standard gate fold includes three panels (six surfaces in total), while a closed gate fold adds an additional fold along the center, resulting in eight panels with a booklet-like structure. To avoid production issues, adjust panel widths to prevent buckling, and keep text and graphics at least 1/8" away from fold lines to account for slight mechanical shifts during printing.
Short Panel Folds
Short panel folds add both visual appeal and practical functionality, such as pockets for holding additional materials. These folds use panels of different lengths, giving them a modern and layered look. For example:
- Stepped Double Parallel: This design shortens the cover panel and adjusts the trailing panels to create visible tabs along one edge, perfect for navigation-heavy content like catalogs or guides.
- Asymmetrical Accordion: Here, panel lengths vary in pairs, creating overlapping layers while maintaining a clean, flush appearance when folded.
For a more functional twist, the Carrier Combo fold flips a short panel inward from the bottom, forming a pocket to hold items like business cards or coupons. This not only adds utility but also increases engagement with your print piece. When working with short panel folds, ensure the paper grain runs parallel to the folds for smoother results, as previously mentioned.
Tools and Materials for Manual Folding
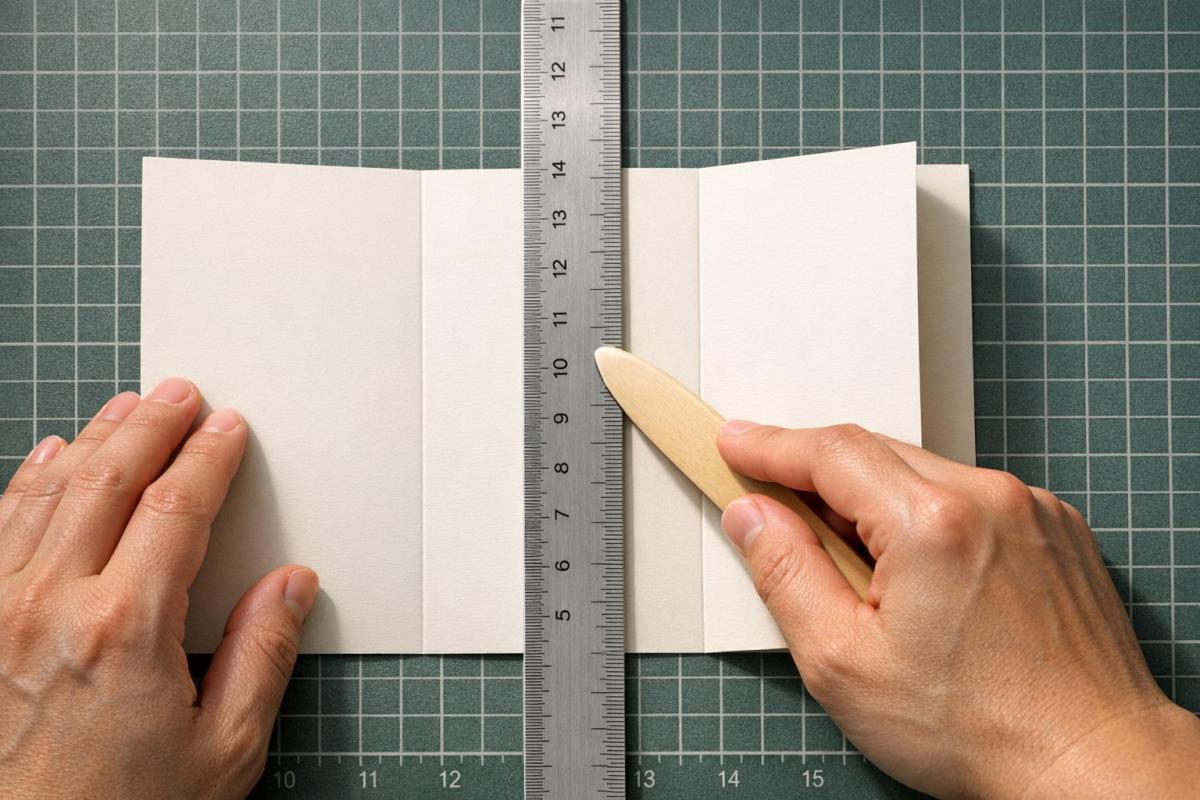
Having the right tools on hand is crucial for achieving precise manual folds. Basic essentials include a ruler, scissors, and a pencil to mark fold lines accurately. Using these tools helps maintain alignment, which is key to preserving print quality. Another critical factor is paper grain – it should always run parallel to the fold line. Folding against the grain forces all the fibers to bend simultaneously, leading to resistance and cracking, especially with heavier paper stocks. These basics set the stage for more advanced techniques like scoring and using guides to handle different paper types effectively.
Bone Folders and Creasing Tools
For heavier paper weights, scoring tools are indispensable. Scoring compresses the paper fibers before folding, which prevents cracking and ensures the finished piece lays flat. Without scoring, heavy stocks can develop ragged edges and visible damage along the fold lines. A bone folder is particularly useful for creating sharp, clean creases after the initial fold, giving your project a polished and professional look. After scoring and folding, templates can help maintain consistent dimensions across your work.
Templates and Guides
Templates are a lifesaver when it comes to ensuring accurate panel geometry before folding. Many commercial printers offer free downloadable templates in formats like InDesign, Illustrator, or PDF. These templates come with pre-set fold lines and die-cut marks, making them an essential tool for projects involving precise panel adjustments. They also account for panel math, which ensures that inner panels are slightly narrower – by 1/16" to 1/8" – than outer panels to prevent buckling. Jesse Park from Action Graphics highlights the importance of testing designs early:
"It’s much better (not to mention less expensive) to discover design problems on your own laser proof than after it has gone to press".
Printing and folding a test copy is a simple but effective way to verify alignment and catch potential issues.
Paper Types and Weights
Choosing the right paper weight is essential for successful manual folding. Heavier cover stocks require scoring to avoid cracking and also need wider panel adjustments. As noted by the Puget Bindery:
"Grain should run parallel to the fold whenever possible. Incorrect grain direction increases cracking, warping, and inconsistent folds".
Each fold doubles the paper’s thickness, which reduces the area available for subsequent folds and makes precision even more critical. For sturdy folded pieces, 160 gsm cardstock offers a great balance between durability and ease of folding.
Step-by-Step Folding Process
Once you’ve gathered your tools and materials, you’re ready to dive into the folding process. Follow these steps to ensure precise and professional results.
Preparing Your Workspace and Materials
Start by setting up on a flat, clean surface, and make sure your hands are clean as well. Before committing to the final design, it’s a good idea to test things out. As RoyerComm suggests:
"Before finalizing your design, print a test copy and physically fold it according to your chosen technique. This step can help you identify any issues with alignment, content placement, or folding accuracy."
To maintain precision, draw fold lines on the paper using a pencil and ruler, or opt for a patterned sheet to help guide your folds evenly. Keep in mind that inner panels should be slightly narrower (by about 1/16"–1/8") to avoid buckling when folded. For heavier paper stocks, scoring the fold lines beforehand is crucial – it compresses the fibers and prevents cracking. Also, ensure that critical text and design elements are positioned at least 1/8" away from the fold lines to accommodate slight shifts during the folding process.
Making Precise Folds
Precision starts with proper alignment. Carefully match the edges of the paper before applying any pressure. Once aligned, secure the edges and crease from the center of the fold outward using a bone folder. Always fold parallel to the paper’s grain when possible. Folding against the grain can create resistance, leading to a rough, uneven finish and increasing the chance of cracks. For larger stacks of paper, a paper jogger can help align the sheets perfectly and remove static, making the folding process smoother. Paying attention to these details ensures a polished, professional outcome.
Fixing Common Folding Errors
Even with careful preparation, mistakes can happen – but addressing them promptly can save your project. Here’s how to tackle some common folding issues:
- Telescoping (rounded edges that won’t stay closed): This occurs when the inner panels are too wide. To fix it, trim the inner panel width by at least 3/32".
- Cracking along the folds: This is often a result of heavy paper stock. Switch to a lighter, more flexible paper or ensure you’re scoring the fold line before applying pressure.
- Uneven folds: If folds aren’t lining up, slow down and apply consistent pressure throughout the process.
Trish Witkowski, President of Finishing Experts Group, underscores the importance of catching mistakes early:
"A mistake caught in the bindery almost always means a reprint, or an undesirable work-around."
Quality Control and Finishing
Once the precise manual folding is done, a thorough quality control process ensures your print project achieves a polished, professional appearance. This step involves checking alignment, crease quality, and the overall condition of the paper to avoid expensive reprints.
Creasing for Clean Folds
When working with heavier paper stocks – anything over 170g for standard boards or 140g for translucent papers – pre-creasing is a must to prevent cracking during folding. Creasing compresses the paper fibers to create a hinge, while scoring partially cuts the stock. Typically, the crease bead should be positioned inside the fold. As printing consultant Steven Waxman explains:
"The bump that the scoring rule creates should be inside the final fold rather than outside of it. This allows for more even folding and less stress on the paper fibers".
However, translucent papers are an exception; they should be folded away from the bead to avoid surface damage. Maintaining a relative humidity of around 50% is also important to keep the fibers flexible and prevent cracking. Once creased and folded, check that every fold aligns perfectly to maintain consistency.
Checking Alignment and Consistency
Small inaccuracies in folding can quickly escalate. Jesse Park from Action Graphics highlights this issue:
"If the first fold is off by 1/32 of an inch, the next one multiplies any variation, shifting the second 1/16 of an inch, and the third 1/8 of an inch and so on".
To avoid such problems, create a physical folding dummy. Mark it with letters or incremental lines – like "A" meeting "A" or one line for the first fold, two for the second – to act as your guide. These alignment checks, combined with proper creasing, ensure consistent results. For nested panels, such as tri-folds or roll folds, confirm that interior panels are 1/16" to 1/8" narrower than the outer panels to avoid telescoping.
Handling Specialty Papers
Specialty papers demand extra care to avoid damage during folding. Always fold parallel to the paper grain for the best results. For papers with heavy ink coverage or dark solids, avoid placing these elements directly on fold lines, as cracking is most visible in these areas. Bali Print Shop offers this advice:
"The only way to totally eliminate cracking is to apply a film laminate to the surface. The laminate encapsulates the surface of the paper and will not allow any cracking".
Recycled papers, with their shorter fibers, are more prone to tearing and poor-quality folds compared to virgin paper. For translucent papers weighing 200gsm or more, leave at least 4–6 mm (0.16–0.24 inches) of space between parallel folds to maintain structural integrity. Additionally, when using slow-drying or metallic inks, apply varnish before folding to prevent smudging. Keep in mind that varnish creates a slippery surface, which can affect grip during the folding process.
Conclusion
Mastering manual folding techniques revolves around three main types: parallel folds (like half, tri-fold, or roll), accordion or Z-folds (with alternating directions), and gate or specialty folds (such as inward folds or intricate designs like the French fold). Grasping these basics not only ensures precision but also unlocks creative possibilities in print design.
Attention to detail is key: fold parallel to the grain, adjust inner panels by 3/32" to 1/8" to avoid buckling, and leave at least 1/8" of clearance around text and images. As Trish Witkowski, President of the Finishing Experts Group, advises:
"Think finishing at the beginning. Resist the temptation to design in a vacuum and get your printer’s opinion early".
Creating a physical folding dummy early in the process is critical. It helps verify reading order, panel measurements, and catch potential errors. Tools like bone folders and scoring for heavier stocks can make a big difference, and frequent alignment checks prevent mistakes from adding up.
Cost-wise, standard folds typically add about $0.01 to your base print price, while more intricate hand-finished folds start around $0.06. Folding remains one of the most cost-effective ways to enhance both the visual and tactile appeal of your print projects. Experimenting with paper weights and specialty folds can further elevate engagement. By applying these techniques, your designs will consistently deliver both functionality and striking visual impact.
FAQs
How do I know the paper grain direction before folding?
To figure out the grain direction of a sheet of paper, you can try the fold method:
- Take a standard 8.5 x 11-inch sheet of paper.
- Fold it once along the length (long side) and then along the width (short side).
- Pay attention to which fold feels smoother or easier. The direction where the paper folds more effortlessly is the grain direction.
Why does this matter? Folding against the grain can lead to cracks or uneven folds, which can affect the quality of your print projects. Knowing the grain direction helps you achieve cleaner, sharper folds.
When should I score instead of just folding by hand?
When working with heavier or thicker paper stocks – typically those measuring 0.006 inches or more – it’s better to score the paper rather than folding it by hand. Scoring creates a crease that minimizes fiber stress, prevents cracking, and ensures a neat, polished fold. This is especially important for heavy cardstock, designs with dark inks, or full-coverage prints. While thinner paper that folds easily might not need scoring, it’s strongly advised for thicker materials or folds made against the grain.
Which fold style is best for my project’s content flow?
The best fold style depends on what you’re aiming to achieve and the type of content you’re presenting. For neatly organized sections or step-by-step instructions, a tri-fold or half fold is a solid choice. If your content follows a timeline or sequence, an accordion fold can make it easier to follow. Want something visually bold? A gate fold or Z-fold can make your design stand out. Pick a fold that improves readability and draws readers into your content.
Related Blog Posts
- 5 Tips to Prevent Cracking on Folded Prints
- 8 Common Folding Styles for Print Materials
- What Are Cross Fold Designs?
- How Folding Machines Handle Complex Print Layouts
https://app.seobotai.com/banner/banner.js?id=699b9d6fefc60cc2af0910ef
