Managing deadlines for custom print projects requires careful planning, clear communication, and proactive problem-solving. These projects often have fixed deadlines tied to events or launches, making timely delivery critical. Here’s how to stay on track while maintaining quality:
- Plan thoroughly: Define the project scope, set realistic timelines, and break the work into milestones.
- Use tools: Gantt charts, Kanban boards, and project management software help track progress and dependencies.
- Communicate clearly: Regular updates and streamlined approval processes prevent delays.
- Prepare for issues: Include buffer time for unexpected delays and have contingency plans ready.
- Maintain quality: Conduct checks at every phase to avoid rework and ensure a polished final product.
Setting Realistic Timelines and Planning Your Project
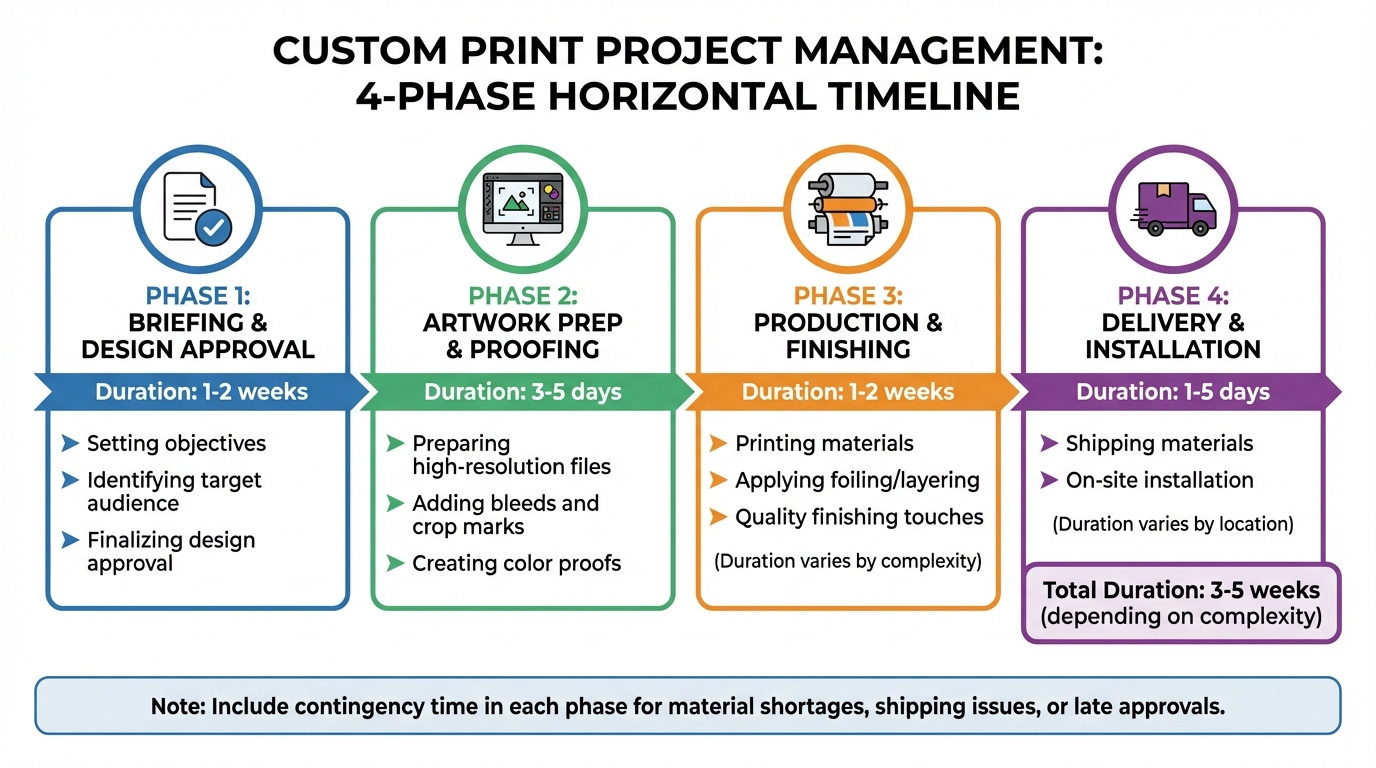
Custom Print Project Timeline: 4 Key Phases from Briefing to Installation
Before diving into production, it’s crucial to have a detailed plan in place. This plan should clearly outline tasks, deadlines, and responsibilities. A well-organized project roadmap can mean the difference between smooth execution and complete chaos.
Defining Project Scope and Requirements
Your project begins with a strong foundation: a clear and detailed brief. This document should cover the essentials, including objectives, target audience, design specifics (like size, materials, colors, and finishes), quantities, and whether the project is a one-time effort or involves multiple locations with varying needs, such as creative design, installation, or removal. Don’t forget to account for any local challenges, such as difficult-to-access locations.
It’s equally important to define what’s excluded from the project scope and implement a formal process for handling change requests. This approach helps you avoid “scope creep” – those unexpected mid-project additions that can throw off your timeline.
"A great print project feels effortless, but that comes from careful planning. When communication flows and expectations are clear, everything else follows naturally." – Matt Walsh, Operations Director, KGK Genix
To stay on track, industry experts advise setting aside 5–10% of your budget for unexpected adjustments or last-minute creative changes. This buffer ensures you’re prepared for surprises without jeopardizing the project’s progress.
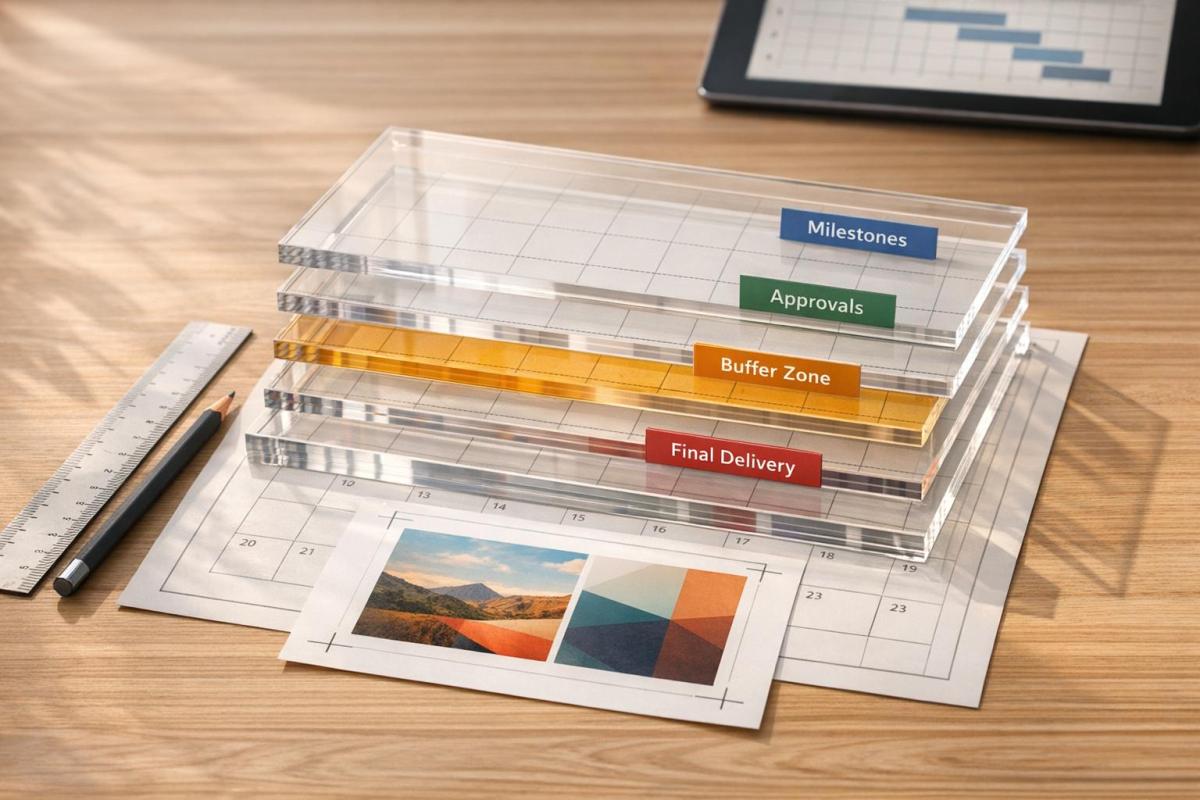
Dividing Projects into Milestones
Once the project scope is defined, break it down into manageable milestones. These checkpoints help you monitor progress and ensure that each stage is completed before moving on to the next. For instance, you can’t begin printing until the client signs off on the final proof, and installation can’t be scheduled until the printed materials are delivered to the site.
| Project Phase | Estimated Duration | Key Activities |
|---|---|---|
| Briefing & Design Approval | 1–2 weeks | Setting objectives, identifying the audience, and finalizing design approval |
| Artwork Prep & Proofing | 3–5 days | Preparing high-resolution files, bleeds, and color proofs |
| Production & Finishing | 1–2 weeks | Printing, foiling, layering, or other finishing touches (depending on complexity) |
| Delivery & Installation | 1–5 days | Shipping materials and completing on-site installation (varies by location) |
Make sure to include contingency time in each phase to account for common delays, such as material shortages, shipping issues, or late client approvals.
Timeline Tracking Tools and Methods
After establishing milestones, use tracking tools to monitor progress and adjust schedules as needed. Tools like Gantt charts are great for visualizing task durations, overlaps, and dependencies, making it easier for everyone involved to understand the timeline.
For more complex projects, PERT charts can help identify the "critical path" – the sequence of tasks that must be completed on time to avoid delays. Meanwhile, Kanban boards are ideal for tracking workflow through specific stages like design, prepress, and production.
Modern project management software such as Smartsheet or Jira can automate updates and keep schedules in sync. For example, Welocalize, a language services company, used Smartsheet to manage thousands of localization projects across time zones. By centralizing project data and using dynamic Gantt charts, they reduced project kickoff time from 8 hours to 2 hours and saved each project manager 1 hour per day.
No matter which tool you choose, it should act as a single source of truth for everyone involved. Use features like color-coded deadlines, clearly marked task dependencies, and real-time updates to keep the team aligned. When everyone understands how their role fits into the bigger picture, the project is far more likely to stay on track.
sbb-itb-ce53437
Communicating Effectively with Stakeholders
Once you’ve established a solid project timeline, keeping the communication channels open and clear with stakeholders becomes essential for the success of custom print projects. When you have multiple teams involved – designers, production staff, clients, and installers – miscommunication can quickly derail progress and lead to missed deadlines. This is where a project manager plays a pivotal role, acting as the go-between to translate technical terms like bleeds, crop marks, and CMYK color profiles into something clients can easily understand. Without this clarity, files might arrive unprepared for production, creating delays that affect the entire schedule.
Consistent check-ins with all stakeholders help everyone stay aligned and provide opportunities to make adjustments as needed. These regular feedback loops ensure that small issues – like a slight color mismatch or an incorrect material choice – don’t grow into major problems that halt production. When communication is consistent and clear, teams can tackle challenges early, avoiding costly delays or revisions.
Setting Communication Expectations
During the initial briefing phase, it’s critical to define your communication methods and timelines. Decide upfront whether updates will be shared via email, project management tools, or scheduled calls, and set expectations for response times. For instance, if clients typically need 2–3 business days for approvals, build that into your schedule instead of relying on faster responses that may not happen.
Implement a centralized tracking system to give every stakeholder access to the project’s current status. This eliminates the need for endless follow-up emails and confusion about which design version has been approved or whether materials have been ordered. A single source of truth keeps everyone on the same page, streamlining client approvals and revisions while keeping the project on track.
Handling Client Approvals and Revisions
Referring back to the documented project scope is essential when evaluating client-requested changes. This ensures you can determine whether a change fits within the original agreement or requires adjustments to the timeline or budget. Clear documentation allows you to manage these requests efficiently, avoiding unexpected disruptions to the project.
Structure the workflow so that each phase relies on the previous one being completed and approved. For example, production should only begin after the client has signed off on the final proof, and installation should only be scheduled once printed materials are ready. This setup encourages timely client decisions and prevents delays. Allocate 1–2 weeks for design approvals and 3–5 days for artwork proofing in your timeline, and communicate these deadlines early so clients know when their input is required. This approach keeps the project moving forward without unnecessary hold-ups.
Improving Prepress and Production Efficiency
Once communication channels are in place, the next step is to fine-tune the technical side of things – specifically, prepress and production. These stages are the backbone of converting digital designs into physical prints. By understanding the technical requirements and teaming up with a full-service print provider, you can cut down on production times without sacrificing quality.
Preparing Print-Ready Files
The first priority is ensuring your digital files are truly ready for print. This means they must meet specific technical standards, such as:
- Using the CMYK color mode
- Including 0.125-inch bleeds and crop marks
- Maintaining a resolution of at least 300 DPI (higher for intricate designs)
"The printer is asking for high-res files, bleeds, crop marks, CMYK, and you’re sitting there wondering if it’s too late to say this was meant for digital only." – Denisa R., PMP-certified project manager
These specifications aren’t just recommendations – they’re essential for keeping production on track and avoiding quality issues. Since distractions can derail this process, try to dedicate uninterrupted time to file preparation. Research shows that after a distraction, it takes an average of 23 minutes and 15 seconds to regain full focus. Catching errors early in this stage saves time and resources later.
Working with Full-Service Print Shops
Collaborating with a full-service print shop can simplify your workflow and reduce inefficiencies. Many of these shops use advanced Print Management Information Systems (MIS) to automate repetitive tasks like order entry, file prep, and job routing. This automation can drastically cut down on turnaround times. For example, manual order processing often takes 10–20 minutes per order, but automated systems handle these tasks much faster.
A great example of this efficiency in action comes from a 2024 case study. An insurance provider switched to the Avanti Slingshot Print MIS to overcome the challenges of outdated, fragmented systems. Before the change, employees spent eight hours a day on manual order processing. After adopting the new system, that time dropped to just 30–60 minutes daily, and error rates fell from 3–5% to a mere 0.5%. This shift saved both time and money on labor and materials.
"Manual rekeying of orders, especially from web-to-print tools, can take 10-20 minutes per order, wasting valuable time and resources." – Matt Prusa, Director of Sales at Ricoh USA
Integrated print shops, like Miro Printing & Graphics Inc., offer everything under one roof – digital printing, offset printing, large format printing, and bindery services. This all-in-one setup eliminates delays caused by outsourcing and keeps your timelines more predictable. When prepress, printing, and finishing are handled in the same facility, the entire process becomes smoother and easier to manage.
Preparing Contingency Plans for Delays
Even with streamlined prepress and production workflows, delays can still happen. And when they do, they can derail entire projects if you’re not prepared. Here’s a key stat to consider: 92% of missed deadlines in the printing industry are caused by approval delays, while 82% are linked to communication breakdowns between stakeholders. Knowing where delays are likely to occur – and having a plan in place – can turn potential disasters into manageable setbacks.
Common Causes of Print Project Delays
Delays in print projects often snowball, leaving little room to recover. For instance, data readiness issues – like incomplete mailing lists, incorrect file dimensions, or missing bleeds – can bring production to a standstill. These kinds of errors force rework, eating into the time allocated for later stages [15, 16].
Another major culprit? Approval workflow bottlenecks. Teams that rely on manual proofing through email often run into version control problems. Proofs can sit idle for days, and confusion over who has final approval authority can lead to unnecessary debates and delays [15, 17].
Then there’s the issue of production capacity. If you’re relying on a single print facility, you’re vulnerable to equipment downtime, maintenance issues, or seasonal surges – like those during the holidays or end-of-quarter rushes [15, 16]. Large-scale projects, in particular, tend to take 20% longer than planned, making buffer time a must.
"Always add in buffer time to accommodate slippage in the schedule. The larger the project, the more buffer you will need." – Storey Kenworthy
On top of that, external factors like subcontractor delays or extreme weather can throw off timelines. For example, if a freelance designer misses a deadline or a supplier runs out of specialty paper, the entire project can get pushed back. Identifying these risks upfront is key to creating solid contingency plans.
Developing Backup Strategies
The best way to prepare for delays is to plan backward from your delivery date. Start by setting milestones and then add buffer time – extra days to handle unexpected issues. For complex projects, this buffer should account for 5-10% of the total timeline, giving you room to address last-minute changes without compromising quality [1, 20].
Streamline your approval process by limiting the number of reviewers to only those who are essential. Use centralized proofing tools instead of email to avoid version confusion and ensure the latest iteration is always the one that moves forward [15, 17]. Assign one person to have final sign-off authority from the start.
Diversify your vendor options. Don’t rely on just one print facility. Build relationships with multiple suppliers, including those offering a range of services, like Miro Printing & Graphics Inc., which handles digital, offset, and large-format printing along with in-house bindery. This approach gives you flexibility if one vendor faces capacity issues or equipment problems [15, 16].
To avoid last-minute surprises, standardize pre-flighting by checking file specifications – like bleeds, resolution, and dimensions – before proofing begins. If your project involves specialty materials, confirm their availability with suppliers early on [15, 20]. This step can save you from scrambling at the eleventh hour.
Lastly, plan ahead for seasonal surges. High-volume campaigns during peak periods, like holidays, require extra foresight. Schedule maintenance, build in buffer time, and establish quick revision workflows to keep momentum even when unexpected changes arise [15, 16, 19].
Maintaining Quality While Meeting Deadlines
Once contingency plans are in place, it’s essential to weave quality control into every step of the process. This prevents rework and keeps projects on schedule without sacrificing standards. Quality checks shouldn’t just come at the end; they need to be part of the workflow, from prepress to finishing. Catching issues early – like during proofing or production – saves time and avoids costly delays.
Think of quality control as an ongoing process rather than a last-minute task. For example, you might verify color accuracy during proofing, ensure materials meet specifications before production, and inspect final prints before they leave the facility. Skipping these steps to save time can backfire, leading to redoing entire projects and missing deadlines.
Setting Up Quality Inspection Points
To maintain high standards, set up inspection points at critical stages:
- Prepress Checks: Confirm file specifications – like bleeds, resolution, and color profiles – before proofing. This prevents flawed files from entering production and causing delays.
- Production Monitoring: During printing, check for color consistency, especially in large-format or offset projects where variations can stand out. Inspect alignment, registration, and material quality as sheets come off the press. For specialty finishes (like embossing or foiling), review samples before full production begins.
- Finishing and Installation: Precision matters during finishing and installation. For example, poorly applied graphics can result in visible seams or uneven surfaces that harm the final look. Post-installation checks ensure everything is secure and meets brand standards. Depending on complexity, delivery and installation typically take 1 to 5 days per location.
Using tools like Gantt charts can help track quality milestones alongside production deadlines. The 8/80 rule is another helpful guideline: tasks should generally take between 8 and 80 hours to maintain manageable tracking.
Once the project wraps up, conduct a post-project review. This helps assess whether deadlines were realistic and if quality standards were upheld. Such thorough inspections not only ensure a polished final product but also streamline delivery and fulfillment.
Managing Delivery and Fulfillment
Delivery and fulfillment are where all the planning and effort come together. To avoid last-minute surprises, build a 5–10% buffer into your project timeline for unexpected issues like material shortages or shipping delays.
Prepare for delivery by documenting key details, such as site access, safety protocols, and necessary tools for installation teams. This reduces the risk of delays caused by missing equipment or credentials.
For projects requiring ongoing fulfillment, partnering with a full-service print shop can simplify the process. For example, Miro Printing & Graphics Inc. offers digital, offset, and large-format printing, along with mailing and fulfillment services. Their in-house capabilities minimize miscommunication and logistical challenges during production and delivery.
Regular check-ins, like mid-week updates, help keep deadlines on track. Using a prioritization matrix to sort tasks by urgency and importance can also prevent last-minute chaos.
For long-term installations, schedule periodic maintenance to extend the lifespan of materials and maintain brand quality.
"Remember, a rushed job is often a twice-done job." – Claudio Gutierrez, President & Founder, Valens Project Consulting
Conclusion
Managing deadlines effectively can turn custom print projects from stressful endeavors into manageable and successful operations. The key lies in three main principles: thorough planning, clear communication, and smart contingency measures. Begin with a detailed brief that outlines your goals, technical requirements, and firm deadlines. Then, implement a structured, phased plan to ensure everyone stays on the same page and accountable throughout the process. These steps form the backbone of a project, balancing efficiency with quality.
Incorporate a 5–10% buffer at every stage to absorb unexpected delays, and include quality checks – like proofing and final inspections – to minimize the risk of rework. Maintain consistent, documented communication with regular updates among all team members and stakeholders to address issues promptly and keep the project moving forward.
"Project management is really about trust. Our clients trust us to bring their ideas to life, and we take that responsibility seriously from start to finish." – Graham Pitts, Managing Director, KGK Genix
Wrap up each project with a comprehensive review to fine-tune your timeline, communication, and quality assurance strategies for future projects. Assess whether your timeline was realistic and gather client feedback to continually improve. By embedding these practices into your workflow, you’ll create a dependable system that delivers impactful print projects on schedule.
FAQs
How much buffer time should I add to a print project schedule?
When planning your print project schedule, it’s wise to include a buffer of 10-20% of the total estimated production time. This extra time helps account for potential delays, such as proofing, approvals, or unexpected technical hiccups.
For instance, if your project is expected to take 10 days, adding 1-2 extra days can make a big difference. Be sure to communicate this buffer clearly with your team and clients. This way, everyone stays on the same page, and the project is more likely to wrap up smoothly and on time.
What’s the fastest way to prevent approval delays?
Using digital tools like web-to-print software is a smart way to sidestep approval delays. These tools simplify the review process, cutting down the time wasted on manual workflows. With features that allow for quicker proofing and approvals, they help ensure custom print projects stay on track.
What should I check to ensure my files are print-ready?
To get your files ready for printing, make sure they meet these key requirements: high resolution, the correct CMYK color profiles, bleed areas, and crop marks. Using high-resolution graphics is crucial to avoid pixelation, and proper color settings help prevent mismatched tones. Following these steps ensures smoother production and a polished final print.
Related Blog Posts
- Post-Press Quality Control Checklist
- Printing Turnaround Times Explained
- Print Project Timeline: Steps to Stay on Track
- How to Coordinate Print Projects with Vendors
https://app.seobotai.com/banner/banner.js?id=69c1d6481b352ff267cbc481
