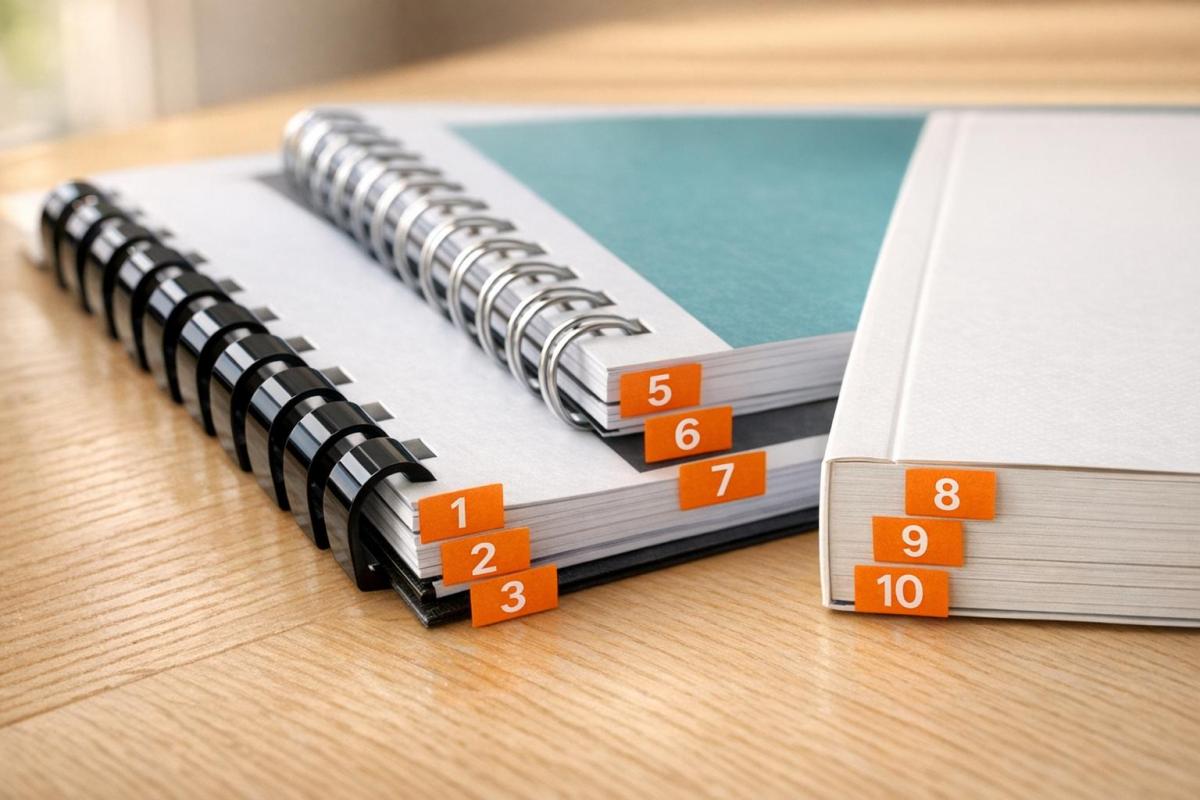
Binding mistakes can ruin your printed materials. From cracked spines to misaligned pages, these errors can lead to wasted time, money, and resources. Avoiding common pitfalls ensures your documents look professional and last longer.
Here are the 10 most common binding mistakes to avoid:
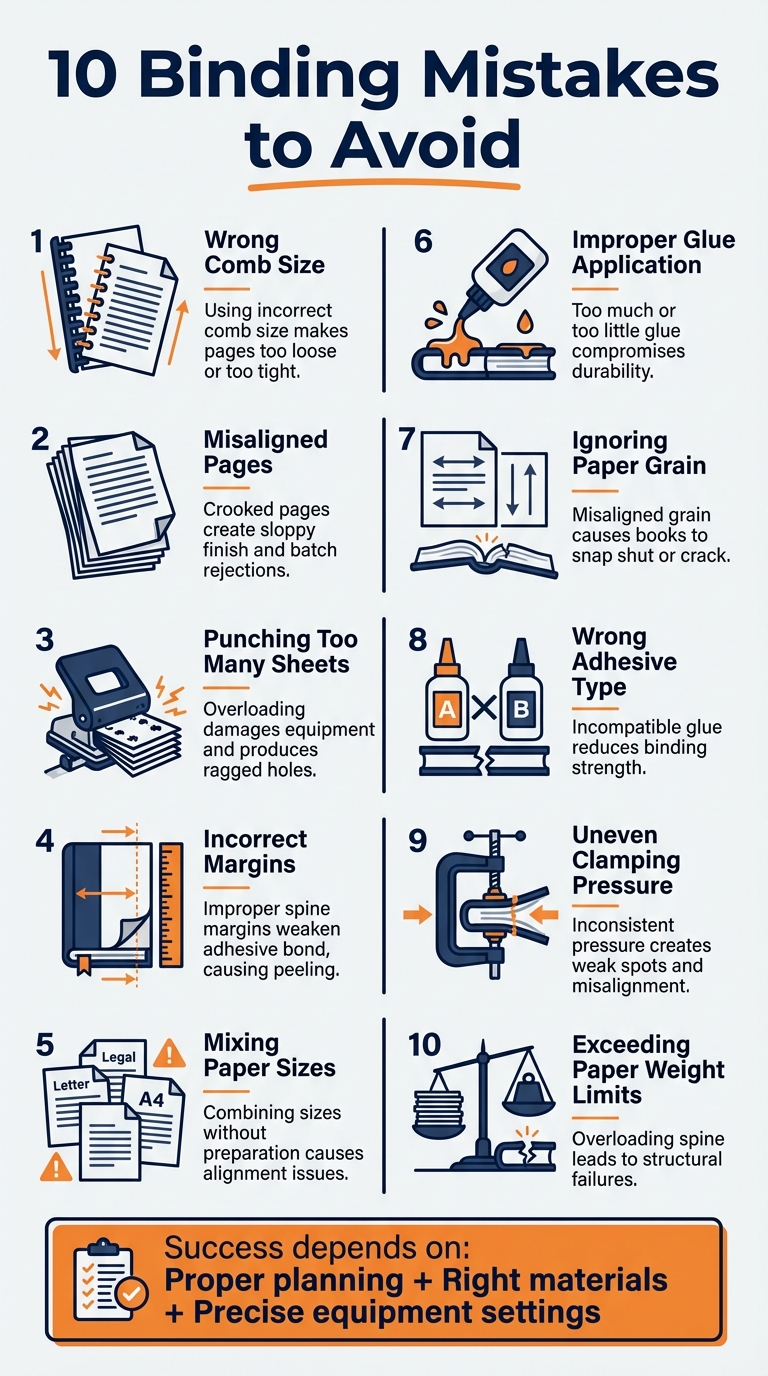
- Wrong Comb Size: Using the incorrect comb size can make pages too loose or too tight, affecting usability and appearance.
- Misaligned Pages: Crooked or uneven pages create a sloppy finish and can lead to rejected batches.
- Punching Too Many Sheets: Overloading your punching machine can damage equipment and produce ragged holes.
- Incorrect Margins: Improper spine margins weaken the adhesive bond, leading to peeling pages.
- Mixing Paper Sizes: Combining different paper sizes without proper preparation results in alignment issues.
- Improper Glue Application: Too much or too little glue compromises durability and causes messes.
- Ignoring Paper Grain: Misaligned grain direction can cause books to snap shut or crack at the spine.
- Wrong Adhesive Type: Using incompatible glue for the paper type reduces binding strength.
- Uneven Clamping Pressure: Inconsistent pressure creates weak spots and misaligned covers.
- Exceeding Paper Weight Limits: Overloading the spine with heavy paper can lead to structural failures.
Key takeaway: Successful binding depends on proper planning, the right materials, and precise equipment settings. Skipping these steps can result in costly mistakes. For reliable results, consider professional services like Miro Printing & Graphics Inc.
10 Common Binding Mistakes to Avoid for Professional Print Quality
Another Printer Made a Mistake, Tips About Proper Book Making, Selecting Correct Paper
sbb-itb-ce53437
1. Choosing the Wrong Comb Size
Picking the wrong comb size can throw off both the look and functionality of your bound document. A comb that’s too large can make the pages shift around and feel loose, while one that’s too small can prevent the pages from lying flat and make turning them a hassle – sometimes even leading to tears.
Equipment Settings and Usage
Binding machines come with adjustable mechanisms that help you correctly set up for different comb sizes. These settings ensure the comb opens to the right width for loading pages. Before you dive into binding, take the time to adjust the machine to match your selected comb size. Most machines also have auto-centering features to align the holes properly, which is key to getting a clean, professional look.
It’s a good idea to test your setup with scrap paper that matches the weight of your actual document. This way, you can fine-tune the settings and avoid costly mistakes when binding the real thing.
"Select a comb size that accommodates the thickness of your document without leaving too much excess space. This ensures a snug fit and prevents pages from shifting." – Phil Taylor, Manufacturing and Distribution Expert
While machine settings are crucial, making sure the comb size matches your document’s paper type and weight is just as important.
Compatibility with Paper Type and Weight
The total thickness of your document – not just the number of pages – determines the right comb size. Keep in mind that paper weight plays a big role here. For example, a 2-inch comb can bind around 604 pages of 70# offset paper but only about 318 pages of 100# cover paper. To avoid issues, measure the entire stack of your document, including any heavier covers, when choosing the comb size. This simple step can save you from the frustration of realizing your comb is too small after you’ve already punched the holes.
2. Misaligning Paper Before Binding
Once you’ve chosen the right comb size, the next step is ensuring your pages are perfectly aligned. Proper alignment is key to achieving a neat, professional finish.
When pages are misaligned before binding, the result can look sloppy. Uneven edges, crooked text blocks, and pages that don’t sit flush can ruin the overall appearance. These issues not only affect the look but can also lead to wasted materials and increased production costs.
Paper Alignment and Preparation
Start by organizing your pages in the correct order and ensuring all edges are aligned, particularly along the spine. Even small differences in paper thickness – like slight variations in 70 GSM paper – can disrupt the binding process and cause covers to set improperly.
"Even for the slightest bulk change or thickness variation… book covers might not set properly, leading to misalignment issues or even whole batch rejections." – Bindwel
To align the pages, firmly tap the stack on a flat, level surface. This step is essential, whether you’re using saddle stitching, perfect binding, or spiral coils. Proper alignment at this stage ensures the binding machine operates accurately and efficiently, giving your project a clean, polished look.
Equipment Settings and Usage
After physically aligning the pages, it’s time to focus on your binding equipment. A well-calibrated machine is essential for maintaining alignment throughout the process. Use tools like book thickness measurement devices to adjust the machine for any changes in bulk. While modern machines handle much of this automatically, it’s still important to double-check that the settings align with your specific paper type. Conduct test runs and periodic checks to catch issues like misalignment, glue problems, or paper incompatibilities early on. Addressing these problems upfront can save you the headache of redoing an entire batch.
At Miro Printing & Graphics Inc. (https://bergencountyprinters.com), we prioritize precise calibration and careful paper alignment in every project, ensuring top-notch results every time.
3. Punching Too Many Sheets at Once
Trying to punch too many sheets at once is a common mistake that can seriously affect the quality of your final product. It can damage your equipment, compromise binding, and lead to unnecessary downtime.
Equipment Settings and Usage
The capacity of your punching equipment is based on the total thickness of the paper stack – not the number of sheets. To figure out how many sheets you can safely punch, divide the machine’s maximum thickness by the thickness of a single sheet. For example:
- A single sheet of 20# bond paper is about 0.004 inches thick. If your machine can handle 2 inches, it can punch approximately 500 sheets.
- For 32# bond paper, which is thicker at 0.006 inches per sheet, the same machine can only manage about 333 sheets.
Exceeding the recommended capacity puts undue stress on your machine. Electric punches may experience motor strain, while manual punches can suffer wear on the handle and linkage. Overloading can also damage the punching pins, leading to ragged holes and misaligned sheets. This makes adjusting for paper thickness and weight a critical step to maintain both equipment health and output quality.
Compatibility with Paper Type and Weight
The weight of the paper plays a big role in determining how many sheets you can punch at once. For example, switching from standard 20# bond paper to heavier 80# stock (commonly referred to as 32# bond) requires you to reduce the number of sheets proportionally. Guessing the capacity can lead to jams or equipment damage, so it’s always better to calculate first. This ensures smooth operation and clean, well-aligned holes every time.
At Miro Printing & Graphics Inc., proper equipment handling is key to achieving professional, durable binding results.
4. Setting Margins Incorrectly
Getting margin settings wrong can ruin even the most carefully crafted binding. The spine margin, in particular, plays a critical role since it’s where the adhesive connects with the paper. If heavy ink coverage gets too close to the spine, the solvents in the ink can interact with hot-melt adhesives. This weakens the bond and can eventually cause the spine to crack or pages to peel away over time.
"Smart design choices – such as leaving proper margins near the spine – help maintain the integrity of the perfect binding process." – Bindwel
Paper Alignment and Preparation
Creating a "glue-free" zone near the spine is essential. This zone keeps heavy ink away from the binding area, allowing the adhesive to bond directly to the paper fibers instead of sitting on top of the ink. Additionally, make sure the paper grain runs parallel to the spine. This alignment reduces the risk of cracking and ensures a smoother, more durable binding.
Equipment Settings and Usage
Accurate margins depend not only on proper paper preparation but also on precise equipment settings. Even slight variations in paper thickness can throw off margin alignment. Using modern thickness measurement tools allows for micro-adjustments during each job, preventing issues like misaligned covers or rejected production runs. These tools help fine-tune glue application, ensuring it covers the edges without spilling over. They also compensate for temperature changes, keeping the adhesive effective and the binding secure.
At Miro Printing & Graphics Inc., proper margin settings are a key part of delivering high-quality, professional binding results. Attention to these details ensures that every project meets both aesthetic and structural standards.
5. Combining Different Paper Sizes
Managing mixed paper sizes can be tricky, especially when trying to maintain proper alignment and margin settings. For instance, combining 8.5×11 with 11×17 paper often requires binding along different edges, making it harder to ensure consistent hole placement. Even simpler combinations, like Letter and Legal sizes, can create alignment issues due to varying orientations.
Paper Alignment and Preparation
To ensure uniformity across different paper sizes, it’s crucial to adjust binding edge settings properly. Use the punching guide or an auto-centering feature to align holes consistently, regardless of paper width. Before binding, stack and align all documents neatly – this can help avoid torn pages or uneven holes during the punching process. If you’re binding manually, an alignment jig is a helpful tool to keep pages evenly spaced and with consistent margins before punching or joining them together.
Compatibility with Paper Type and Weight
When mixing paper sizes, the type and weight of the paper also come into play. Perfect binding, for example, is especially sensitive to variations in paper thickness. Even slight differences can cause the cover to set incorrectly, leading to misalignment or rejected batches. While some digital binding systems can detect and adjust for different paper sizes, you’ll still need to ensure that the grain direction of all sheets runs parallel to the spine for a smooth finish.
Duplex printing adds another layer of complexity when mixing paper sizes for the front and back. Many systems handle this by inserting blank pages or shifting content to a new sheet. Running test batches can help spot potential issues, like glue application problems or mismatched pages, before they become major setbacks.
If you’re tackling a mixed-size project, the team at Miro Printing & Graphics Inc. (https://bergencountyprinters.com) specializes in achieving precise alignment and reliable binding for even the most complex jobs.
6. Applying Too Little or Too Much Glue
Getting the glue application just right is key to keeping your documents intact. Using too little glue can cause the cover to detach or not stick at all. It can also make the adhesive watery, leading to drips where you don’t want them. On the other hand, applying too much glue can create a mess and even disrupt your machine’s operation.
Adhesive and Binding Material Quality
The adhesive you choose plays a major role in how durable your binding will be. Polyurethane Reactive (PUR) glue stands out compared to the more common Ethylene Vinyl Acetate (EVA). PUR glue provides stronger bonds, better flexibility, and holds up well under extreme temperatures. However, even the best adhesives won’t work if they’re applied incorrectly or if the paper isn’t prepared properly.
Temperature control is another critical factor. For instance, protein glue should stay within a range of 140-150°F to maintain the right viscosity. Modern high-end binders are designed to keep temperature fluctuations within ±1°C, ensuring consistent glue thickness. Older machines, however, can vary as much as ±10°C, which directly affects how much glue is applied. To prevent issues like warping or cracking, keep the paper’s moisture level between 5% and 6%. Proper control of these factors ensures uniform glue distribution during the binding process.
Once you’ve got the adhesive parameters sorted, the next step is to fine-tune your equipment settings.
Equipment Settings and Usage
Most professional binding machines allow you to adjust glue volume based on the type of paper and the number of sheets. These settings are often displayed on a numerical scale (e.g., -6 to +6), making it easier to make precise adjustments. Always test with a sample booklet before starting full production to identify any glue application issues early.
For accuracy, measure glue thickness using a MIL depth gauge. Also, keep an eye on how close the ink is to the spine, as this can weaken the adhesive bond. By fine-tuning these settings and running test batches, you can ensure consistent and reliable binding results every time.
7. Ignoring Paper Grain Direction
Paper grain direction plays a key role in book production, yet it’s often overlooked – even though it can lead to costly mistakes. Grain refers to the alignment of paper fibers during manufacturing, and it directly affects how your book performs. The rule to remember? The grain should always run parallel to the spine for both the text pages and the cover.
Paper Alignment and Preparation
If the grain runs in the wrong direction, you’ll end up with what’s called a "mousetrap" book – one that snaps shut and refuses to lie flat. These books often creak when opened and develop cracked hinges far too quickly. To avoid this, you can perform a simple tear test when the paper arrives. Tear the paper in both directions: a clean, straight tear shows the correct grain direction, while a jagged tear means the grain is running across. Another option is the bend test – gently bend the paper in both directions. The direction that bends more easily indicates the grain.
"Grain direction isn’t a small detail – it’s a profit lever. By getting it right, you deliver books that open well, last longer, and strengthen customer trust." – Bindwel
Simple tests like these can save you from major headaches later on.
Compatibility with Paper Type and Weight
Proper grain alignment doesn’t just make books easier to open – it also enhances the durability of the binding. This is especially important for heavier paper stocks. For covers weighing 80# or more, scoring along the spine is essential to prevent cracking, particularly when folding against the grain. Digitally printed covers are especially prone to issues, as the heat from laser printers dries the paper, making grain alignment even more critical.
For heavy covers, consider double-scoring and adjusting the score depth to match the thickness of the inner book block. Also, keep the paper’s moisture content between 5% and 6% to avoid warping or cracking along the spine. These small adjustments can make a big difference in the book’s longevity and overall quality.
8. Using the Wrong Type of Adhesive
Getting the glue application right is only part of the equation – choosing the correct adhesive is just as important. The adhesive you use directly affects the strength and durability of your binding. Selecting the wrong type can weaken the spine, reduce flexibility, or even react with printing ink, causing cracking or peeling near the spine.
Adhesive and Binding Material Quality
The type of adhesive you choose matters significantly. EVA (Ethylene Vinyl Acetate) hot melt glue, for instance, is a polymer-based adhesive that melts at around 350°F and sets quickly as it cools. It’s a reliable choice for most standard paper weights, offering strong page-pull resistance. However, because it forms a mechanical bond, EVA can struggle to adhere properly to coated papers.
On the other hand, PUR (Polyurethane Reactive) glue is often the go-to solution for more challenging materials. Unlike EVA, PUR creates a chemical bond with paper fibers by absorbing moisture from the air. While it takes 24 hours to fully cure, this process ensures a stronger and more flexible bond, making it ideal for high-end perfect binding and coated stocks.
Selecting the right adhesive based on your materials can prevent common binding failures.
Compatibility with Paper Type and Weight
The type and finish of your paper are critical when choosing an adhesive. Standard adhesives like EVA may not adhere well to coated papers (such as gloss, matte, or silk finishes), which can lead to pages detaching. For such papers, PUR is the better option. If your paper’s weight is outside the typical 60–80 GSM range, it’s wise to conduct trial runs to ensure the adhesive bonds effectively.
For the best results, leave adequate margins near the spine to avoid ink solvents interfering with the adhesive. Additionally, make sure the spine is properly prepared – through notching and milling – to expose enough paper fibers for a solid mechanical bond.
If you’re unsure about the best adhesive for your project, the experts at Miro Printing & Graphics Inc. can provide tailored advice to help you make the right choice.
9. Applying Uneven Pressure When Clamping
When it comes to creating a strong and durable binding, even clamping pressure is just as important as proper glue application and alignment. Uneven pressure can lead to weak spots, trapped air pockets, or misaligned covers, all of which can compromise the quality and durability of the finished product.
Equipment Settings and Usage
The way your binding machine is set up plays a major role in ensuring consistent pressure distribution. For instance, modern perfect binders are designed to keep glue temperature fluctuations within ±1°C. In contrast, older machines can vary by as much as ±10°C. These fluctuations affect the glue’s viscosity, which in turn impacts how evenly the adhesive spreads. If the glue is too cool and thick, it won’t distribute properly, leading to uneven bonding along the spine.
To address this, using book thickness measurement tools is crucial. These devices help adjust your equipment to accommodate even small variations in paper thickness. Regular calibration of your machinery ensures consistent pressure, reducing the risk of weak spots. Once your equipment is calibrated, the next step is preparing the spine correctly to achieve a uniform bond.
Paper Alignment and Preparation
Even with perfectly adjusted equipment, proper preparation of the spine is essential for achieving even clamping. The adhesive can only spread uniformly if the spine is prepped correctly. Additionally, storing paper in a climate-controlled environment prevents curling or warping, which can lead to thickness variations that affect pressure distribution.
When working with thinner or more flexible materials, you can use supports like rubber, foam, or cardboard to evenly distribute pressure across the surface. This helps avoid localized stress points. For the best results, always apply clamps starting from the center and work outward to eliminate any trapped air pockets.
At Miro Printing & Graphics Inc. (https://bergencountyprinters.com), we prioritize these practices. With advanced equipment and a skilled team, we ensure even clamping pressure for professional-quality, durable bindings.
10. Overlooking Paper Weight Limits
Ignoring paper weight limits is a common mistake that can undermine the durability and functionality of your binding project.
The weight of the paper plays a critical role in determining whether your binding will hold together or fail. Disregarding these limits can lead to spine failures, cracked pages, or even the need to split your book into multiple volumes.
Compatibility with Paper Type and Weight
Each binding method has specific thickness requirements that must be met. For example, perfect binding requires a minimum spine thickness of 0.125", which translates to at least 62 pages of 20# bond paper or 42 pages of 32# bond paper. Since 32# bond paper has a thickness of about 0.006" per sheet, fewer pages are needed to meet the minimum spine thickness.
Most perfect binding machines can handle books up to 2 inches thick. For reference, 1,000 pages of 20# bond paper will reach this limit, but 32# bond paper will exceed it at 666 pages. If your project surpasses these limits, you’ll need to divide it into multiple volumes.
While heavier paper enhances durability, it also reduces flexibility, making books stiffer. Additionally, folding heavy paper against the grain increases the risk of cracking along the spine, which can cause pages to tear out over time. Keeping these factors in mind is essential to ensure a successful binding process.
Equipment Settings and Usage
Proper equipment settings are just as important as choosing the right paper weight. To calculate the spine width, multiply the number of sheets by the paper’s caliper. This ensures your project stays within the 0.125" minimum and 2" maximum spine thickness range. Always measure a single sheet’s thickness with a caliper instead of relying solely on the listed pound weight.
For heavier or coated paper stocks, consider using Polyurethane Reactive (PUR) glue instead of traditional Ethylene Vinyl Acetate (EVA) glue. PUR provides better adhesion and flexibility, making it more suitable for challenging paper weights. For projects with a high page count, opt for lighter text weights such as 60# or 70# to maintain flexibility and prevent the book from becoming overly bulky or difficult to handle.
Conclusion
Binding is a detailed craft that transforms loose pages into a polished, professional product. As Oregon State University Libraries explains, "Decorative bookbinding was a complicated, inter-disciplinary trade. It required skills in leather, wood, and metalworking, a mastery of traditional binding techniques, and a great deal of facility with a variety of delicate tools".
The ten binding mistakes highlighted in this article – like selecting the wrong comb size or ignoring paper weight limits – often come from skipping essential planning steps or rushing through technical details. Even small errors can lead to expensive reprints. Avoiding these pitfalls starts with careful preparation: double-checking technical specs, choosing the right binding method for your content, and understanding how materials interact can save time, money, and frustration.
For complex projects, professional binding services take the uncertainty out of the process. Miro Printing & Graphics Inc., based in Hackensack, NJ, offers a range of in-house bindery services, including perfect binding, comb binding, and plastic coil binding. Their attention to detail – like precise adhesive application, proper spine preparation, and managing factors like paper grain and moisture – ensures durable and reliable results. These meticulous practices are at the heart of modern binding.
Investing in quality binding not only protects your brand but also avoids costly do-overs. For professional-grade results, Miro Printing & Graphics Inc. provides the expertise and advanced tools to deliver binding that stands the test of time. Visit bergencountyprinters.com to explore their services and ensure your next project exceeds expectations.
FAQs
How do I measure my document to pick the right comb size?
To pick the right comb size, start by stacking and aligning your pages neatly. Then, measure the thickness of the stack using a ruler or tape measure. Use this measurement to reference comb size guidelines, which usually specify how many pages each comb can hold (for example, a 25mm comb accommodates roughly 200 pages). It’s a good idea to choose a comb that’s slightly larger than your measurement. This ensures a secure fit and leaves some extra space if you need to add more pages later.
How can I tell which way the paper grain runs before binding?
To figure out the paper grain direction, look closely for a faint pattern or texture that remains consistent. You can often spot it under good lighting or feel it by running your fingers along the surface to detect a slight ridge. Typically, the grain follows the longer side of the sheet (for example, in a 17" by 11" sheet, it runs along the 17" edge). Aligning the grain parallel to the spine during binding helps avoid cracking and gives the finished product a smoother appearance.
When should I use PUR glue instead of EVA glue?
When you need a stronger and more flexible bond, PUR glue is the way to go – especially for books that will see heavy use or need to stand the test of time. Compared to EVA glue, PUR provides about 60% greater resistance to pages pulling out, making it a solid choice for projects that demand dependable, long-lasting binding.
Related Blog Posts
- Top 6 Binding Methods for Professional Documents
- Ultimate Guide to Post-Press Finishing
- Common Post-Press Quality Issues and Fixes
- Ultimate Guide to Custom Binding Options
https://app.seobotai.com/banner/banner.js?id=69c8258c1b352ff267cc6bdb
