How to Pair Fonts for Professional Printing

Learn essential tips for effective font pairing in professional printing to enhance readability and design aesthetics for your brand.

Font pairing for professional printing is about achieving the right balance between visual appeal and readability. The goal is to create designs that are easy to read, visually organized, and aligned with your brand. Here’s a quick summary of the key takeaways:

  • Limit to 2-3 Fonts: Use one font for headlines, another for body text, and an optional third for accents.
  • Contrast and Harmony: Pair serif and sans-serif fonts for natural contrast, or use fonts from the same superfamily for consistency.
  • Readability First: Test font sizes, weights, and colors on print materials to ensure clarity across different paper types and lighting conditions.
  • Test Before Printing: Print samples on actual paper stock to confirm your choices look as intended.

Professional printers, like Miro Printing & Graphics Inc., can help fine-tune font choices, ensuring your materials look polished and professional. Whether it’s business cards, brochures, or large signage, the right font pairing can leave a lasting impression of your brand.

Font Pairing Basics

What Makes Fonts Work Together

Pairing fonts effectively is all about striking a balance between contrast and harmony. The goal is to have fonts that serve distinct purposes while sharing enough visual traits to feel cohesive.

One tried-and-true approach is using contrasting styles that complement each other. For example, pairing a classic serif font with a modern sans-serif creates a natural contrast. The serif font, known for its readability, works well for body text, while the sans-serif font shines in headlines and subheadings. This contrast helps readers quickly differentiate between sections of content.

Another key factor is proportional harmony. Fonts with similar x-heights (the height of lowercase letters like "a" and "e") and overall proportions tend to work well together, even if their styles are quite different. This similarity creates a consistent rhythm, making the design feel unified.

It’s also important to consider the weight ranges of the fonts you’re pairing. Fonts with comparable weight options allow for consistent emphasis and hierarchy throughout your design, ensuring a polished look.

Lastly, pay attention to character spacing and overall texture. Some fonts take up more space than others, and pairing a condensed font with a wide one can create an imbalance. The goal is to achieve a balanced visual texture, where neither font feels out of place.

These principles become even more critical when you’re designing for both digital and print formats, as each medium presents its own challenges.

How Print Materials Affect Font Choice

When designing for print, font compatibility must account for unique challenges posed by physical materials. The texture of the paper and how it absorbs ink can significantly impact legibility. For instance, thin strokes may fade or disappear on rough paper, while bold fonts tend to hold up better across various paper types, whether uncoated or coated.

The printing method itself also matters. Digital printing handles fine details differently than offset printing. For high-volume offset projects, fonts with sturdier designs often yield more reliable results. On the other hand, digital printing can handle more delicate typefaces with greater precision.

Font size is another critical consideration in print. A font that appears perfectly readable at 10 points on a screen might become hard to read when printed, especially on lower-quality paper. Always test how small sizes will look in print to avoid any surprises.

Finally, color plays a big role in print legibility. Light-colored text on dark backgrounds requires slightly heavier fonts to maintain clarity. Similarly, fonts with subtle contrasts between thick and thin strokes may lose their definition depending on the color combinations used. Testing these factors beforehand ensures your design translates smoothly from screen to paper.

Pairing Fonts – 3 effective ways to combine typefaces, from easy to advanced

Core Principles for Font Pairing

Good font pairing is all about balance. When done right, it ensures your design is visually appealing, easy to read, and professional. These three key principles will help you create typography that looks great and functions effectively.

Use 2-3 Fonts Maximum

Stick to just two or three fonts to keep your design clean and organized. A common strategy is to use one font for headlines, another for body text, and an optional third for accents like callouts or captions. For example, combining Cal Sans Semibold for headlines, Manrope Regular for body text, and PT Sans Regular for accents creates a layout that’s both polished and easy to navigate. By limiting your fonts, you create a sense of consistency and make it easier to establish a clear visual hierarchy.

Build Clear Visual Hierarchy

Once you’ve chosen your fonts, the next step is to arrange them in a way that naturally guides the reader’s eye. Use different sizes, weights, and styles to distinguish between headlines, subheadings, and body text. For instance, bold and large fonts work well for headlines, while smaller, regular-weight fonts are ideal for body content. You can also use style variations like italics, uppercase, or small caps to add emphasis without introducing new typefaces. Even subtle adjustments, such as fine-tuning kerning, can make headlines feel more authoritative and improve the overall readability of body text.

Focus on Readability First

No matter how stylish your font choices are, they need to be legible. Fonts should remain clear across various sizes, paper types, and printing methods. Look for fonts with well-defined letterforms, good contrast between thick and thin strokes, and balanced spacing. Avoid overly decorative or condensed fonts for body text – stick to options with open counters and even stroke widths to ensure clarity.

A classic example is pairing Times New Roman for body text with Source Sans Pro for headings. Times New Roman is easy to read at smaller sizes due to its balanced proportions, while Source Sans Pro adds a modern touch with its versatile weight options. Before finalizing your design, print test samples on the exact paper stock you’ll use. Fonts can look different on paper compared to a screen due to variations in color, contrast, and detail. Professional print shops, like Miro Printing & Graphics Inc., often recommend testing your combinations first. Their in-house design teams can help fine-tune your font pairings to ensure both readability and aesthetic appeal. These steps are crucial for creating a polished final product.

Font Pairing Methods for Print Design

Discover three practical approaches to combining fonts for polished and well-balanced print designs. Each method offers a way to create visual harmony while keeping readability front and center.

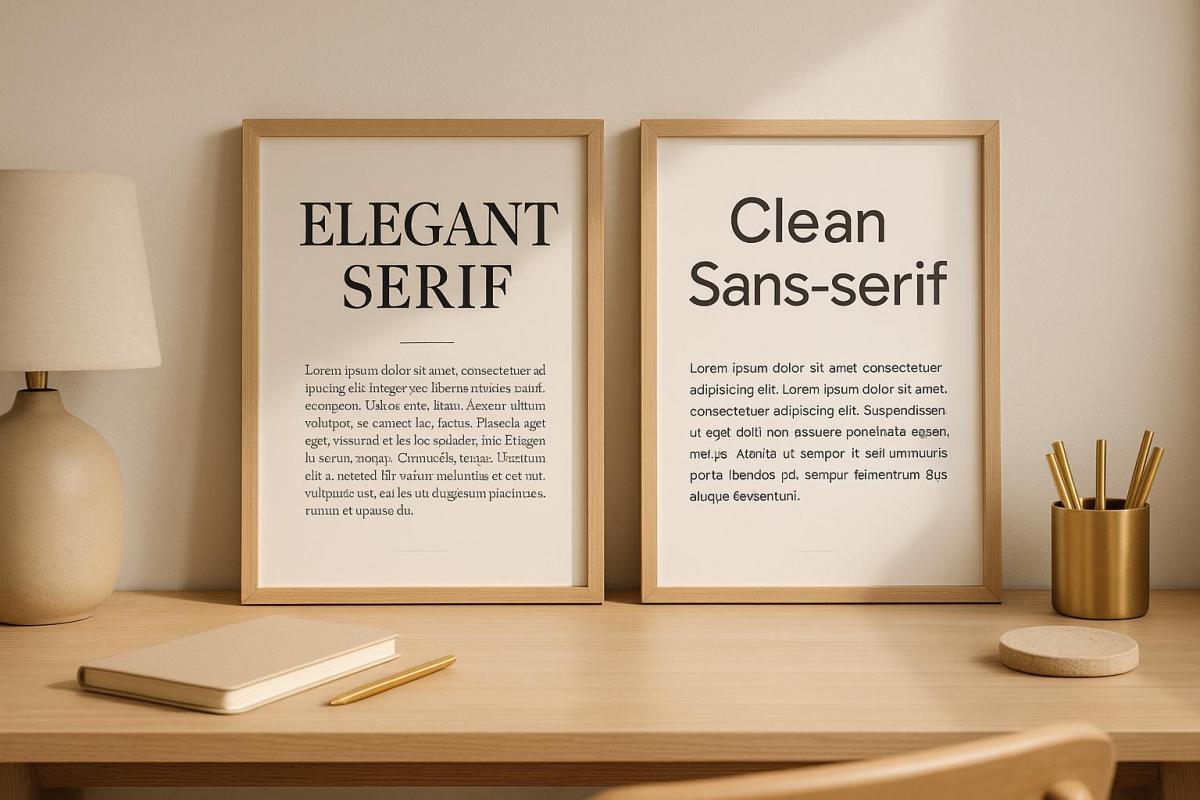
Pairing Serif and Sans-Serif Fonts

The timeless combination of serif and sans-serif fonts is a go-to for creating contrast in print. Serif fonts, with their decorative strokes at the ends of letters, are ideal for body text as they help guide the reader’s eye across the page. On the other hand, sans-serif fonts are sleek and modern, making them perfect for headlines and headings.

This pairing works because the two font styles complement each other beautifully. For instance, you can use a serif font like Georgia or Minion Pro for body text and pair it with a sans-serif font like Helvetica or Open Sans for headings. The contrast between the classic feel of serif fonts and the clean look of sans-serif fonts adds interest while maintaining a professional tone.

In brochures, you might use Caslon for body text and Futura for headlines. The key is to ensure that the serif font remains legible at smaller sizes, while the sans-serif font delivers bold, eye-catching headlines.

Next, let’s look at font families that are designed to make pairing even easier.

Working with Font Superfamilies

Font superfamilies are collections of typefaces that share the same core design but come in a variety of weights, widths, and styles. This ensures a cohesive look across your design while offering flexibility for hierarchy and emphasis.

Take Source Sans Pro or Univers, for example. These superfamilies provide a range of options to suit different needs. Use Source Sans Pro Light for body text, Source Sans Pro Semibold for subheadings, and Source Sans Pro Black for main headlines. This setup creates a clear hierarchy while maintaining consistency throughout your design.

Superfamilies shine in complex projects like catalogs or manuals, where multiple text styles are required. Instead of juggling unrelated fonts, you have a built-in toolkit that guarantees a harmonious design.

Finally, let’s explore how pairing display and body fonts can enhance both style and clarity.

Combining Display and Body Fonts

Display fonts are designed to grab attention at larger sizes, while body fonts are tailored for readability in smaller text. This pairing is especially effective for marketing materials, event invitations, and promotional designs where you need both impact and clarity.

When selecting display fonts, aim for ones that reflect your brand’s personality but avoid overly decorative options that might look unprofessional. A font like Bebas Neue, a condensed sans-serif, is great for bold headlines. Pair it with Lato for body text to balance impact with warmth and readability.

Another strong pairing is Playfair Display, a high-contrast serif with elegant letterforms, alongside Source Sans Pro for body text. Playfair Display works wonderfully for wedding invitations, upscale menus, or luxury branding, while Source Sans Pro keeps the supporting text clean and easy to read.

For display fonts, size relationships are key. The display font should be at least 2-3 times larger than the body text to establish a clear hierarchy. This ensures the decorative elements of the display font don’t overwhelm the design or compromise readability. Always test your font combinations at actual print sizes to confirm that the display font retains its impact and the body font remains legible.

Keep in mind that display fonts often have unique spacing or quirky letterforms that work well in headlines but can become problematic in longer text. Limit their use to headlines, pull quotes, or call-to-action elements for the best results.

sbb-itb-ce53437

Testing Your Font Combinations

After learning the basics of font pairing, it’s time to put your choices to the test. While digital previews can give you an idea of how fonts interact, nothing beats seeing your combinations in physical form. Testing ensures your final printed materials have the polished, professional look you’re aiming for.

Always start by printing test samples. Use the actual paper stock you plan to use for your project, as factors like texture and ink absorption can affect how fonts appear.

When reviewing your test prints, focus on clarity, contrast, and readability. Pay close attention to body text, especially at smaller sizes. What looks sharp and legible on a screen at 12pt may become harder to read once printed.

Evaluate your samples under different lighting conditions. This step ensures your materials remain easy to read and visually appealing, whether they’re viewed indoors, outdoors, or under dim lighting. Once you’re satisfied with the technical aspects, check that the design aligns with your brand’s identity.

Verify Brand Alignment

Technical perfection isn’t enough – your font choices also need to reflect your brand’s personality. Serif fonts, for instance, often convey a sense of tradition, while sans-serif fonts feel more modern. Your font pairings should reinforce the message your brand wants to send.

Compare your printed samples to your brand guidelines and existing materials. Do the fonts work well with your logo and color palette? Does the overall design feel consistent with your brand’s values and appeal to your target audience? Sometimes, a pairing that looks great in theory might not feel right for your brand in practice.

Gather feedback from others. Share your test prints with colleagues, clients, or even members of your audience. Ask specific questions about readability, professionalism, and whether the fonts align with your brand’s image. Fresh perspectives can catch details you might have overlooked.

For the most accurate evaluation, use real content in your test prints. This helps you see how the fonts handle your actual messaging and layout.

Finally, think about how your font choices will work across different materials. A combination that looks great on business cards might not translate well to brochures or large banners. Test your fonts in various sizes and formats to ensure they work consistently across your entire campaign.

If something feels off during testing, don’t hesitate to tweak your choices. Refining your fonts through multiple rounds of testing often leads to a stronger final product. Make adjustments as needed, and when you’re confident in the results, move forward with your print project.

Working with Professional Print Services

Once you’ve nailed down the basics of font pairing, collaborating with a professional print service ensures your design vision translates seamlessly from screen to physical print. A skilled print shop doesn’t just print your project – it elevates it by applying years of expertise in handling materials, print methods, and design intricacies that go far beyond what you can achieve with DIY tools.

Print experts know how fonts interact with various paper types, how ink absorption impacts readability, and which combinations work best for offset or digital printing. Their knowledge helps you sidestep expensive errors and guarantees a polished, professional result.

In fact, a survey by Adobe found that over 70% of consumers associate high-quality printed materials with a company’s professionalism. The process of working with a print professional often begins early in your project. They’ll review your brand guidelines, get to know your target audience, and suggest font pairings that align with your goals. This mix of technical know-how and creative insight ensures a smooth journey from concept to final print.

Professional print shops also have access to extensive font libraries and specialized software, offering thousands of premium typography options. This opens up design possibilities far beyond the basic fonts available on most systems.

How Miro Printing & Graphics Inc. Can Help

Miro Printing & Graphics Inc. takes these principles to the next level, turning design challenges into standout print solutions. Their in-house design team specializes in typography for print, ensuring your materials are both visually striking and professionally crafted.

Their process includes reviewing your brand guidelines, testing print samples, and fine-tuning font pairings to balance readability and aesthetics – whether you’re printing business cards, brochures, or large-scale signage. With expertise across a variety of print projects, they tailor font choices to suit each specific application and printing method.

Miro Printing & Graphics Inc. handles every stage of the process, from initial design to final production. They don’t just choose fonts – they optimize them for clarity, style, and print quality. This hands-on approach bridges the gap between design and production, ensuring a cohesive and high-quality outcome.

Based in Hackensack, NJ, Miro Printing & Graphics Inc. is well-versed in U.S. preferences, spelling conventions, and formatting standards. This local expertise ensures your printed materials are perfectly suited for American audiences and business needs. By combining their understanding of the market with professional design skills, they create materials that truly connect with your target audience.

When you work with Miro Printing & Graphics Inc., you gain access to exclusive typography resources and expert advice. They stay ahead of font pairing trends, offering combinations that are both timeless and modern – helping your printed materials stand out while appealing to a broad audience.

Conclusion: Getting Font Pairing Right

Nailing font pairing can completely elevate your printed materials. Start by focusing on readability – it’s the cornerstone of effective design. Stick to a maximum of 2-3 fonts to keep things clean and professional, and establish a clear visual hierarchy to guide your audience effortlessly through the content.

Strive for a balance between contrast and harmony. Pair fonts with different weights or styles to add dimension, but ensure they still work well together. Classic combinations often strike the perfect balance between being easy to read and visually appealing, offering a modern edge without overcomplicating the design.

Always test your font choices on print. What looks great on a screen doesn’t always translate well to paper, so printing samples can save you from costly missteps.

Typography should reflect your brand’s personality. Keep in mind that fonts interact differently with various paper types and printing methods. Collaborating with professional printers can be a game-changer – they can help you sidestep common mistakes, like clashing fonts, overloading on typefaces, or using decorative fonts that compromise legibility.

Ultimately, font pairing isn’t just about following a set of rules. It’s about creating materials that are both visually compelling and easy to understand. By combining these principles with expert advice, your print projects will stand out and leave a lasting impression, giving your brand that polished, professional edge.

FAQs

How do I choose fonts that reflect my brand’s identity for professional print projects?

When selecting fonts for print design, it’s important to choose styles that reflect your brand’s personality and values. For instance, serif fonts often evoke tradition and trust, whereas sans-serif fonts offer a more modern and friendly vibe. Consider how these characteristics align with the message you want to convey.

Consistency plays a major role in building brand recognition. Stick to the same font family or use complementary styles throughout your printed materials. Thoughtful font pairing can also make a difference – try combining a bold, eye-catching headline font with a clean, easy-to-read body font. This approach not only creates a clear visual hierarchy but also ensures a cohesive and professional appearance.

If you’re feeling uncertain about your font choices or need expert input, reaching out to a reliable print shop like Miro Printing & Graphics Inc. could be a smart move. Their in-house design team can help you craft print materials that are polished and perfectly aligned with your brand.

What mistakes should I avoid when pairing fonts for professional printing?

When selecting fonts for professional printing, it’s important to keep things simple. Avoid using too many fonts in one design, as this can make your layout feel messy and unorganized. Sticking to just two or three fonts that work well together helps keep your project clean and visually appealing.

Another common pitfall is choosing fonts that are too similar. When there’s not enough contrast between fonts, your design can lose its structure and fail to guide the reader’s eye effectively. For instance, pairing two serif fonts with only subtle differences can result in a dull, monotonous appearance.

Finally, steer clear of relying entirely on fonts from the same family, unless those fonts come with distinct variations like bold or italic styles. Overusing a single font family can make your design appear flat and lifeless. Focus on creating a balanced and readable layout to achieve a polished, professional look.

How do printing methods impact the way fonts look on different types of paper?

The printing method you select has a big impact on how fonts look on different types of paper. Offset printing is known for producing sharp, detailed text, especially when used with coated or heavier paper. This method enhances the clarity and boldness of fonts, making them stand out. On the other hand, digital printing offers great resolution and accurate colors, though the outcome can depend on the paper’s brightness and texture. Smooth, high-quality paper typically delivers the best readability with this method.

Other elements, like the pressure used during printing and the texture of the paper’s surface, also play a role in shaping the depth and overall appearance of the fonts. To achieve professional-looking results, it’s crucial to align your printing method and paper choice with your design goals, balancing both readability and aesthetics.

Related posts

https://app.seobotai.com/banner/banner.js?id=68a2adb0e8dbcfc9a27ce853

Binding Costs for Custom Print Sizes Explained

Explore how custom print sizes impact binding costs, and discover tips to manage expenses while achieving quality results.

When printing custom-sized materials, binding costs often increase due to equipment adjustments, material waste, and additional labor. Here’s what you need to know:

  • Custom Sizes Defined: Non-standard dimensions like 10" x 10" or 4" x 9" require extra setup and cutting steps, increasing costs.
  • Binding Methods Matter: Perfect binding handles custom sizes efficiently, while saddle stitching or spiral binding may need more recalibration, raising expenses.
  • Key Cost Drivers: Page count, paper type, and order size impact pricing. Smaller orders or specialty materials often result in higher per-unit costs.
  • Cost-Saving Tips:
    • Use standard sizes when possible to avoid extra setup fees.
    • Increase order volumes to lower per-unit costs.
    • Consult with in-house experts to optimize binding methods and materials.

Understanding these factors helps you balance design goals with your budget, ensuring you make informed decisions for your printing projects.

How Much Does Perfect Binding Cost? – Graphic Design Nerd

Graphic Design Nerd

What Affects Binding Costs for Custom Print Sizes

When it comes to custom-sized printed materials, several factors can influence binding costs compared to standard dimensions. Knowing what drives these costs can help you plan your project and stick to your budget.

Setup and Material Adjustments for Custom Sizes

Custom sizes often mean higher costs because they require adjustments to equipment, non-standard materials, and extra cutting steps. Standard binding components are usually larger than needed for custom sizes, leading to material waste and added manual work. This not only increases production time but also drives up labor costs. On top of that, the binding method you choose can further impact your overall expenses.

The Role of Binding Methods in Custom Printing Costs

The type of binding you select plays a big part in determining costs for custom-sized projects. Some methods are better suited for custom sizes than others. For instance, perfect binding – which involves trimming after binding – handles custom dimensions more easily. On the other hand, saddle stitching and spiral or comb binding often require recalibrations and additional hole-punch adjustments, which can increase costs. Case binding is another expensive option for custom sizes, as it requires modifications to boards and finishing elements, adding more manual labor to the process.

Additional Factors: Page Count, Paper Type, and Order Size

Other elements, like the number of pages, the type of paper, and the size of your order, can also affect costs. A high page count makes custom sizes more challenging, as more pages mean more recalibration and handling. Using specialty papers or placing smaller orders can also raise the per-unit cost. This happens because machines run slower with unique materials, and fixed setup fees are spread across fewer units. Understanding these aspects can help you make smarter decisions about binding methods and budget planning for your custom printing projects.

Binding Methods and Their Costs

When it comes to custom projects, understanding the differences in binding methods – costs, materials, and processes – can help you make the right choice. Here’s a detailed look at some common binding methods, along with their benefits and drawbacks.

Binding Method Cost Comparison

Each binding method varies in cost and suitability, especially for custom sizes. The table below highlights key details to consider:

Binding Method Cost Level Best For Key Benefits Main Drawbacks
Saddle Stitching Highly affordable Small booklets, magazines Simple process and very low cost Less durable; unsuitable for thicker materials
Perfect Binding Cost-effective Novels, textbooks, paperbacks Professional finish with a clean appearance Less durable than hardcover options
Comb/Spiral/Thermal Very low-cost for short runs Workbooks, manuals, short-run books Allows books to lie flat; low order minimums Costs depend on material choice
Case Binding Expensive Textbooks, coffee table books, special editions Premium look with excellent durability Higher production and shipping costs

Saddle stitching involves folding sheets and stapling them along the spine, making it a simple and budget-friendly option. It’s ideal for small-scale projects like magazines and brochures but isn’t suitable for thicker materials.

Perfect binding provides a polished, professional look at a reasonable cost. This method is commonly used for novels, reports, and mass-market paperbacks. However, it lacks the durability of hardcover options.

Comb and spiral binding are great for short-run projects, especially workbooks and manuals. These methods allow books to lie flat, which is particularly useful for reference materials. The cost can vary based on the type of binding material you choose.

Case binding is the go-to for premium projects like coffee table books or special editions. While it offers unmatched durability and an elegant finish, it comes with higher production and shipping costs due to the intricate assembly process.

How to Choose the Right Binding Method

Selecting the best binding method depends on your priorities: cost, durability, and functionality. For materials that need to lie flat, like workbooks, comb or spiral binding is a practical choice. If you’re aiming for a high-end, durable finish, case binding is worth the investment. Use the table above as a quick reference to align your project’s needs with the right binding option.

sbb-itb-ce53437

Ways to Reduce Custom Size Binding Costs

Following the earlier discussion on cost factors, these tips can help you manage binding expenses for custom print sizes while maintaining quality.

Use Standard Sizes When Possible

Sticking to standard dimensions is one of the easiest ways to control costs. Popular sizes like 8.5" x 11", 5.5" x 8.5", and 6" x 9" are more economical because they align with equipment capabilities, reduce setup fees, and minimize material waste. When feasible, adjust your design to fit these common sizes.

For instance, instead of a 7.25" x 10.5" booklet, you could adapt it to an 8.5" x 11" format and trim it accordingly, which is often less expensive. If standard sizes don’t suit your needs, aim for dimensions that maximize paper usage. For example, a 4.25" x 5.5" size allows four pieces to be cut from a single 8.5" x 11" sheet, reducing waste and keeping costs down.

Increase Order Volumes

Higher order quantities can significantly lower your per-unit costs. Since setup and calibration fees are fixed, spreading these costs across a larger batch reduces the price per piece.

Combining multiple projects into a single run can yield similar savings. If you have several custom-sized projects planned, consider scheduling them together. This strategy allows you to share setup costs and often unlocks volume-based pricing discounts.

For example:

  • A 100-piece custom binding job might cost $3.50 per unit.
  • Ordering 500 pieces could drop the price to $1.75 per unit.
  • A 1,000-piece order might lower it even further to $1.25 per unit.

By planning ahead and ordering what you’ll need for the next few months, you can avoid frequent small orders and take full advantage of these discounts.

Work with In-House Bindery Experts

Collaborating with experienced bindery professionals can uncover cost-saving opportunities. These experts understand which binding methods pair best with specific paper types, how to reduce material waste, and which alternatives can achieve your desired look at a lower price.

Take Miro Printing & Graphics Inc., for example. They offer in-house services like perfect binding, comb binding, and plastic coil binding, along with specialized finishing options. By keeping everything under one roof, you avoid the added markup and coordination challenges of outsourcing to multiple vendors.

Bindery professionals can also recommend practical adjustments to save money. They might suggest changing from case binding to perfect binding with a heavier cover stock, which can still deliver a polished appearance at a fraction of the cost. Additionally, in-house services improve quality control and speed up turnaround times. Since printing and binding happen in the same facility, there’s no risk of damage during transport, and any issues can be addressed immediately rather than after the job is complete.

Binding Services at Miro Printing & Graphics Inc.

Miro Printing & Graphics Inc., based in Hackensack, NJ, operates its own in-house bindery. This setup offers a clear advantage for custom print sizes by keeping everything under one roof. Without needing to outsource binding work, they can maintain direct control over quality and ensure faster production timelines. This hands-on approach allows them to offer a wide range of binding and finishing solutions tailored to various needs.

Available Binding and Finishing Options

Miro Printing & Graphics Inc. offers several binding options, including perfect binding, saddle-stitching, coil binding, hardcover binding, and comb binding. Each method is suited to specific types of projects. Beyond binding, they provide post-press services like collating, cutting, creasing, die cutting, drilling, and folding, all designed to handle a variety of custom sizes.

What makes their services stand out is their ability to accommodate a wide range of paper finishes, sizes, and cover styles. This is especially important for projects with non-standard dimensions, as many finishing setups struggle with anything outside typical sizes. Their in-house team can adjust equipment and processes to meet the unique requirements of your project.

Binding Method Best For Custom Size Capability
Perfect Bound Books, catalogs, thick documents Highly adaptable to custom sizes
Saddle-Stitched Booklets, newsletters, programs Good for smaller custom formats
Coil-Bound Manuals, calendars, presentations Excellent custom dimension flexibility
Comb Binding Reports, proposals, updatable documents Adaptable to custom widths
Hardcover Premium books, annual reports Limited by cover material dimensions

Custom Project Consultation Services

In addition to their binding options, Miro Printing & Graphics Inc. provides personalized consultation services to help clients optimize their projects. This is especially helpful for custom print sizes, where off-the-shelf solutions might not work. Their team offers guidance on selecting the right binding method and navigating the cost implications of custom dimensions.

During the consultation, they assist with formatting, layout, and design, ensuring your project achieves a polished, professional look. For custom sizes, they might recommend small adjustments to dimensions that can significantly cut costs without sacrificing the overall aesthetic.

Miro emphasizes clear, upfront quotes and works closely with clients to meet deadlines while staying on budget. Their transparent approach helps you understand how custom dimensions might affect costs, enabling you to make well-informed decisions. Whether you stick with custom sizes or adjust to more cost-effective alternatives, their team is committed to delivering projects that are both distinctive and cost-efficient.

Key Points for Managing Binding Costs

Keeping binding costs in check for custom print sizes requires some thoughtful planning. The best place to start? During the design phase. Even small tweaks to dimensions at this stage can lead to noticeable savings down the line.

Planning ahead is crucial. By understanding your binding needs early, you can design with cost-effective solutions in mind, rather than scrambling to fix expensive issues later. This means factoring in binding methods and how your chosen dimensions might impact production costs from the very beginning. Laying this groundwork makes it easier to implement other cost-saving measures.

Working with experts can also make a big difference. They can help you identify potential cost challenges early on and suggest practical alternatives for non-standard sizes. This proactive approach minimizes unexpected expenses.

Order volume is another key factor. Larger print runs tend to lower the per-unit cost since setup expenses are spread across more items. If you have multiple projects in the works, combining them into one larger run can create cost efficiencies, making custom sizes less of a financial burden.

The binding method you select also plays a role. It’s about finding the right balance between quality and budget. Understanding the trade-offs between different methods lets you make informed choices that align with your goals.

Additionally, keep in mind that heavier paper stocks and specialty finishes can drive up binding costs. Opting for a slightly lighter paper weight or a simpler finish can often achieve the look you want without breaking the bank.

Finally, clear communication with your printing partner is essential. Accurate quotes and open discussions help you avoid surprises, give you a clear picture of where your money is going, and highlight areas where adjustments could save you money.

FAQs

What is the most cost-effective way to bind custom-sized print projects?

When you’re working on custom-sized print projects, picking the right binding method can make a big difference in cost without sacrificing quality. Saddle stitch binding is one of the most budget-friendly options, especially for smaller booklets or projects with fewer pages. It’s straightforward, affordable, and lets the booklet lay flat for easy use.

For projects with more pages or when you want a polished finish, perfect binding is a great alternative. This method is ideal for books, catalogs, or larger projects, offering a clean and professional look. If your project is smaller and doesn’t require much binding, staple binding is another cost-effective choice.

To keep costs under control while ensuring great results, consider consulting a professional print shop like Miro Printing & Graphics Inc. They provide in-house bindery services, tailoring the final product to meet your specific needs.

How can I lower binding costs for custom-sized prints?

When planning for custom print sizes, sticking to standard dimensions can help you save on binding costs. Custom sizes often involve extra setup, which can quickly drive up expenses. By designing your project to fit commonly used sizes, you can simplify the process and cut costs.

You can also choose binding methods that are easier on the budget, such as saddle-stitching or perfect binding, which tend to be more economical, especially for larger print runs. To further manage expenses, consider trimming the page count, opting for larger page sizes, or selecting more affordable paper types. These small tweaks can significantly impact your overall budget without compromising the quality of your project.

How does the size of your order affect the cost of binding custom-sized prints?

The number of items in your order significantly impacts the binding cost for custom-sized materials. Larger orders often result in lower per-unit costs because the fixed setup and binding expenses are divided among more items. In contrast, smaller orders usually have a higher per-item price since those same setup costs are spread across fewer units.

To get the most value for your money, think about placing bulk orders whenever feasible. This strategy is particularly useful for custom-sized projects, where initial setup costs can be a bit steeper.

Related posts

https://app.seobotai.com/banner/banner.js?id=68a27577e5d59cb1662904a2

How to Choose Durable Banner Materials for Outdoors

Learn how to choose the best durable banner materials for outdoor use, focusing on weather resistance, lifespan, and cost-effectiveness.

When selecting materials for outdoor banners, durability and weather resistance are key to ensuring a long-lasting and effective display. Outdoor conditions like wind, rain, UV exposure, and temperature changes can quickly degrade banners made from poor-quality materials. Here’s what you need to know:

  • Vinyl: Best all-around option for outdoor use due to its durability, weather resistance, and cost-effectiveness. Ideal for long-term displays.
  • Mesh: Perfect for windy areas, as its perforated design reduces strain and prevents tears. Slightly less vibrant in print clarity.
  • Polyester Fabric: Offers vibrant colors and a polished look but fades quickly outdoors. Suitable for short-term events.
  • Canvas: Provides a textured, high-end appearance but requires protective coatings for outdoor use. Best for artistic or premium applications.

Key Takeaways

  1. Weather Matters: Choose UV-resistant, waterproof, or flexible materials based on local conditions like sun, wind, or rain.
  2. Durability vs. Cost: Higher-quality materials last longer, saving money on replacements for long-term use.
  3. Installation Considerations: Larger banners or those in high-stress areas need sturdy materials to avoid damage.

For tailored solutions, local print shops like Miro Printing & Graphics Inc. can guide you through material selection and provide durable, professional banners designed to meet your specific needs.

An Easy Guide to Choosing the Right Vinyl Banner Material and Banner Size

Main Factors in Outdoor Banner Durability

When choosing materials for outdoor banners, several important factors play a role in how well your banner holds up over time. Understanding these aspects can help you make smart decisions that align with both your needs and your budget.

Weather Resistance

Outdoor banners face constant exposure to the elements, and weather resistance is crucial. Factors like UV rays, wind, rain, and temperature swings can all take a toll. UV-resistant coatings or laminates help maintain vibrant colors and prevent fading. For windy locations, mesh banners are a smart option since they let air pass through, reducing the risk of tearing. Waterproof materials are essential to avoid damage from moisture, while materials that handle temperature fluctuations well can prevent issues like warping or cracking. These weather-specific features directly impact how long your banner will last.

Material Lifespan

The lifespan of the material you choose is another critical factor. High-quality materials are designed to last longer, even in tough conditions. On the other hand, budget-friendly options may save you money upfront but will likely require more frequent replacements. The environment where your banner will be installed also matters – banners placed in sheltered areas tend to last longer than those exposed to constant sun or wind. Carefully assessing your installation site and local weather patterns can help you find a material that balances durability with cost.

Cost vs. Value

While more durable materials may come with a higher price tag, they often save money in the long run by reducing the need for replacements and reinstallation. If your banner is for a short-term event, a less expensive material might do the job. However, for long-term use, investing in a higher-quality material pays off. Besides saving on future costs, a well-maintained, durable banner helps uphold your professional image, making it a worthwhile investment for your brand’s reputation over time.

Outdoor Banner Material Options Compared

Choosing the right material for your outdoor banner depends on understanding the unique qualities of each option. Here’s a breakdown of the most common materials, their benefits, and ideal uses.

Vinyl

Vinyl is the go-to choice for outdoor banners due to its impressive durability and resistance to weather. It stands up to UV rays, rain, and wind, keeping colors vibrant and the structure intact for years. Even in direct sunlight, vinyl resists fading and deterioration, making it a reliable option for long-term or semi-permanent displays. Whether it’s a business advertisement or an ongoing campaign, vinyl offers dependable performance at a budget-friendly price.

Mesh

Mesh banners are perfect for locations with high wind exposure. Thanks to their perforated design, air passes through easily, reducing the strain on the banner and preventing damage from strong gusts. This makes mesh ideal for construction sites, outdoor events in open spaces, or any windy environment.

However, the perforations can slightly reduce print clarity and vibrancy, making fine details less sharp. Still, when wind resistance is a priority, mesh provides a durable and cost-effective solution.

Polyester Fabric

Polyester fabric is known for its vibrant color reproduction and professional appearance, making it a great choice for short to medium-term outdoor use. These banners are visually striking and ideal for events or promotions where aesthetics take precedence over longevity.

That said, polyester fabric isn’t built for extended outdoor exposure. It fades quickly in direct sunlight and doesn’t hold up well against harsh weather. Additionally, it’s more expensive than vinyl, which makes it less practical for long-term outdoor use. However, for temporary displays lasting a few weeks or months, it’s an excellent option.

Canvas

Canvas banners stand out with their textured, high-end look. They’re durable in controlled environments and work well for indoor displays or short-term outdoor use in protected areas. With the right protective coatings, canvas can handle weather exposure for limited periods.

Without proper treatment, however, canvas lacks the weather resistance of vinyl or mesh. Its higher cost makes it better suited for artistic or specialized applications where the visual style outweighs the need for long-term durability.

Material Comparison Table

Material Outdoor Suitability Durability Cost Best Use Case
Vinyl Excellent High Budget-friendly Long-term displays
Mesh Excellent High Budget-friendly Windy areas
Polyester Fabric Poor Medium Higher cost Short-term quality displays
Canvas Medium High Higher cost Artistic or premium applications

For most outdoor projects, vinyl is the top choice due to its durability, weather resistance, and affordability. Mesh is ideal for windy conditions, while polyester fabric and canvas cater to specific needs where their unique qualities justify the added expense or maintenance.

sbb-itb-ce53437

How to Choose the Right Material for Your Outdoor Banner

Picking the right material for your outdoor banner means weighing a few important factors like weather, size, installation, and budget. By understanding the specific conditions your banner will face, you can find a material that lasts, performs well, and doesn’t break the bank.

Consider Weather and Location

Where your banner will be displayed plays a big role in deciding the material. If it’s going in a spot with direct sunlight – like a rooftop, parking lot, or open field – you’ll need something with strong UV resistance. Sun exposure and high temperatures can wear down certain materials faster.

Wind is another factor. Sheltered areas might not need heavy-duty materials, but if your banner is going up in a windy spot, like on an exposed building facade, a mesh material is a smart choice to prevent tears.

For regions with frequent rain, snow, or salty air, look for materials that resist moisture and salt damage. And in places with big temperature swings throughout the year, flexible materials are a must to avoid cracking or warping.

Think About Size and Installation

The size of your banner and how it’ll be installed also play into material selection. Bigger banners or those mounted with grommets, pole pockets, or sewn reinforcements create stress points. These setups need sturdy materials to hold up over time.

Pay attention to the mounting surface too. If your banner will rub against something that moves, like a chain-link fence, you’ll want a material that can handle that friction. And if the banner will be hard to access for maintenance, investing in a long-lasting material can save you the hassle of frequent replacements.

Balance Budget and Durability

Once you’ve figured out the environmental and installation factors, it’s time to think about costs. Spending more upfront on a high-quality material can actually save money in the long run. Durable materials mean fewer replacements and less maintenance, which adds up over time.

For short-term displays, a less expensive material might work just fine. But if your banner is going to be up for a while, investing in a tougher option is usually worth it. Don’t forget to factor in installation and replacement costs when making your decision – sometimes, the pricier material is the more economical choice overall.

Custom Printing Solutions with Miro Printing & Graphics Inc.

When it comes to durable, high-quality outdoor banners tailored to your needs, teaming up with a seasoned local print shop like Miro Printing & Graphics Inc. is a smart move. Their expertise ensures you make the right choices, starting with the materials.

Expert Help with Material Selection

Choosing the right banner material isn’t always straightforward. Weather conditions, installation challenges, and budget considerations all play a role. That’s where Miro Printing & Graphics Inc. steps in, offering hands-on guidance to simplify the process.

Whether your banner will endure intense UV rays on a rooftop, withstand strong coastal winds, or handle extreme temperature shifts, their team recommends materials designed to perform in those specific conditions. They don’t just hand you a catalog and let you guess. Instead, they consider factors like how the banner will be installed, how long it needs to last, and how it fits into your marketing goals. This thoughtful consultation helps you avoid the costly mistakes that can happen with impersonal online services.

"During the process, Miro Printing & Graphics Inc. will work with a professional, personal approach to better understand your company’s needs." – Miro Printing & Graphics Inc.

Customer Mike B. highlights the difference this level of service makes:

"Great customer service that we didn’t get with our old online printer. Attention to detail is what makes the difference!" – Mike B.

Complete Printing and Custom Services

Miro Printing & Graphics Inc. doesn’t just stop at material selection – they handle every step of the printing process. Their large-format printing services include durable vinyl banners for both indoor and outdoor use, and their in-house production capabilities mean you get better quality control and quicker turnaround times.

Their design team ensures your banners are not only visually stunning but also practical for outdoor use. From creating logos to optimizing layouts, they adjust designs to combat challenges like fading from direct sunlight, so your banners stay vibrant and impactful.

Additionally, their cutting and finishing services – like reinforced edges and precise grommet placement – ensure your banners are built to last.

Customer LycoRed T. praises their dependability:

"Mike and his team at Miro have delivered stars, comet, and galaxy size projects for Lycored. No matter how little or large, no matter what the deadline, I sleep at night knowing Miro is on it. Truly, a gem printer shop and more in New Jersey." – LycoRed T.

By managing everything under one roof, Miro Printing & Graphics Inc. eliminates the hassle of coordinating with multiple vendors. Their team ensures every detail aligns, from technical requirements to your broader business objectives.

"The end result is a finished piece that exceeds your highest expectations but never your budget!" – Miro Printing & Graphics Inc.

For businesses in Hackensack, NJ, and nearby areas, Miro Printing & Graphics Inc. offers a seamless, all-in-one solution for outdoor banner needs, backed by local expertise and a commitment to excellence.

Conclusion

Selecting the right material for your outdoor banner is crucial for maximizing its longevity and effectiveness. Durable materials shield your banner from the elements – intense sunlight, heavy rain, and strong winds – ensuring your message stays clear and impactful over time.

We’ve explored key factors like weather resistance, material durability, and cost-efficiency, all of which play a vital role in your banner’s success. For example, outdoor vinyl banners can last between 2 to 5 years, depending on environmental conditions like sun exposure, wind, and rain. Choosing UV-resistant inks and premium materials helps prevent issues like fading, tearing, and fraying, which means your banner will maintain its appearance and readability longer. This not only reduces the need for frequent replacements but also saves you money and avoids the hassle of ongoing maintenance. Whether you prefer vinyl for its versatility, mesh for its wind resistance, or fabric for its upscale look, aligning your material choice with your specific needs is what ensures the best results.

For those unsure about navigating technical considerations like UV resistance or installation, partnering with Miro Printing & Graphics Inc. can make all the difference. Their expertise in material selection, combined with their full-service printing and finishing solutions, guarantees that your banner performs perfectly from day one.

FAQs

What should I look for in outdoor banner materials for areas with extreme weather?

When choosing materials for outdoor banners in areas with tough weather conditions, focus on strength, resistance to the elements, and wind handling. Vinyl and PVC are great options because they hold up well against rain, intense sunlight, and strong winds. For locations with high winds, mesh banners are a practical choice since they let wind pass through, reducing stress on the material.

For a more durable option, go with heavy-duty vinyl (such as 18 oz). This type of vinyl is built for extra strength and a longer lifespan, making it a dependable and budget-friendly choice for outdoor advertising in challenging environments. Selecting the right material ensures your banner stays bright and intact, no matter what the weather throws at it.

What are the most durable and cost-effective materials for outdoor banners?

When you’re considering outdoor banners, vinyl is often the go-to choice. It’s built to last, offering weather resistance, waterproofing, and the toughness to handle wear and tear – perfect for long-term outdoor use. If wind is a concern, mesh banners are a smart alternative. Their perforated design lets air pass through, reducing strain while still holding up well against the elements. Meanwhile, fabric banners are better for indoor or short-term use since they lack the durability needed for extended outdoor exposure.

For most outdoor needs, vinyl banners strike the right balance between durability and affordability, keeping their look and functionality intact over time.

What are the benefits of choosing a local print shop like Miro Printing & Graphics Inc. for outdoor banners?

Choosing a local print shop, such as Miro Printing & Graphics Inc., gives you the advantage of personalized service that’s hard to get with online providers. You can work directly with experienced professionals, making it simple to discuss your specific needs, approve designs, or even request adjustments at the last minute.

Another perk? Faster turnaround times. Local shops often allow you to physically inspect materials, so you can be confident your outdoor banners are crafted with durable, high-quality materials designed to withstand the elements. On top of that, choosing a local business not only ensures professional results but also supports your community in a meaningful way.

Related posts

https://app.seobotai.com/banner/banner.js?id=68a121ea0b0222f8b9ecba06

Ultimate Guide to Post-Press Cutting Techniques

Explore essential post-press cutting techniques for achieving precision in printed products, including tools, methods, and modern advancements.

Post-press cutting turns printed sheets into finished products like business cards, brochures, and packaging. It’s the final step that ensures precision, clean edges, and the right dimensions. Here’s what you need to know:

  • Key Techniques:

    • Straight Cutting: Removes excess material for clean, uniform edges.
    • Die-Cutting: Creates custom shapes using steel dies.
    • Kiss Cutting: Cuts through top layers for labels and stickers.
    • Laser Cutting: Handles fine patterns with unmatched accuracy.
    • Scoring and Creasing: Prepares materials for easy folding.
    • Micro-Perforation: Adds tearable sections for coupons or forms.
  • Why Precision Matters: Inconsistent cuts can ruin product quality, making items look unprofessional or non-functional. Precision ensures consistency across large runs.
  • Tools Used:

    • Guillotine Cutters: Ideal for high-volume, straight cuts.
    • Rotary Trimmers: Gentle on delicate materials.
    • Digital Cutting Systems: Advanced, computer-controlled precision.
    • Die-Cutting Machines: Perfect for repetitive custom shapes.
  • Modern Advances:

    • Automated systems and computer-controlled tools improve accuracy.
    • Integrated workflows link design to production for faster results.
    • Multi-tool machines combine cutting, creasing, and perforating in one step.

Whether you’re cutting business cards or custom packaging, precision and the right tools are critical for professional results.

Layering Die Cut Shapes for Creative Brochures –FOW #652

Tools for Post-Press Cutting

Precision is key in post-press operations, and the right cutting tools can elevate the quality of printed materials. Each tool serves a unique purpose, ensuring professional results for a variety of cutting needs.

Guillotine Cutters

Guillotine cutters are the backbone of high-volume cutting tasks, delivering clean, straight cuts with remarkable consistency. These machines rely on a heavy, vertically descending blade to slice through stacks of paper, making them indispensable for projects requiring uniformity.

Hydraulic guillotine models take things up a notch, effortlessly cutting through stacks up to 4 inches thick. This makes them ideal for high-output jobs like trimming hundreds of business cards or brochures in one go. Modern versions come equipped with features like programmable back gauges and safety light curtains, ensuring both precision and operator safety.

However, guillotine cutters have their limitations. They excel at straight cuts but aren’t designed for curves, angles, or intricate shapes. They’re perfect for tasks like trimming margins, sizing business cards, or prepping materials for folding, but more complex designs require different tools.

Rotary Trimmers and Digital Cutting Systems

Rotary trimmers offer a gentler cutting method, using circular blades that glide along the material to create smooth edges without exerting crushing force. Manual rotary trimmers are great for small-scale projects, while digital systems bring automation and precision to the table.

Digital cutting systems are particularly advanced, using computer controls and cameras to read registration marks on printed sheets. These machines deliver accuracy down to thousandths of an inch, making them ideal for intricate shapes and variable data projects.

One standout feature is contour cutting, which allows the machine to follow printed graphics precisely, creating custom shapes that align perfectly with the design. This is a game-changer for tasks like packaging prototypes, promotional materials, and specialty products. Digital systems also pave the way for die-cutting techniques, which excel at producing consistent, specialized shapes.

Die-Cutting Machines

Die-cutting machines are the go-to solution for creating specific, repeatable shapes with precision. They use custom steel rule dies – essentially paper "cookie cutters" – to press through materials, producing identical shapes every time.

Flatbed die-cutters are designed for thicker materials, while rotary die-cutters shine in high-speed production, continuously feeding material through cylindrical dies for faster output.

Creating a custom die typically takes 3–5 business days and costs between $150 and $400, depending on the complexity. Once made, the die can be reused to produce thousands of identical pieces, making it a cost-effective option for medium to large production runs.

Another notable feature of die-cutting is kiss cutting, which is commonly used for labels and decals. This technique cuts through the top layer of material without slicing the backing, making it easy to peel stickers or labels while keeping them organized on sheets. It’s a must-have for sticker production and removable labels.

While the initial investment in custom dies may not make sense for small or one-off projects, die-cutting is a highly efficient choice for recurring jobs or large runs that demand precision and consistency.

Cutting Methods and Applications

Different cutting methods cater to specific materials and project requirements. Below, we’ll explore the techniques and uses of each method.

Straight Cutting

Straight cutting is all about creating precise, straight edges by trimming materials in clean lines. It’s a go-to option for basic resizing and trimming tasks.

One of the most popular methods here is guillotine cutting, which is ideal for high-volume jobs that demand consistent results. Think business cards, flyers, and brochures – this method handles them with ease. The standout feature? Speed. Guillotine cutters can trim hundreds of sheets in a single pass, making them perfect for production runs of 500 pieces or more.

However, the type of paper matters. Standard text-weight papers (20-24 lb) cut smoothly with minimal effort, while thicker materials like cardstock (80-110 lb) or cover stock above 110 lb require more force. In some cases, heavy-duty equipment or multiple passes are necessary to avoid issues like crushing or tearing.

For more delicate materials, rotary cutting is a gentler alternative. This method works especially well for synthetic materials, thin plastics, or textured and embossed papers. The rolling action ensures smooth, clean edges without the risk of damage. Precision matters here, with tolerances ranging from ±0.03 inches for standard cuts to as tight as ±0.01 inches for projects requiring exact dimensions, like pocket folders or presentation templates.

Die-Cutting and Kiss Cutting

Die-cutting is the go-to method for creating custom shapes with precision. Whether it’s rounded corners, windows, or intricate designs, this technique ensures consistent results for packaging, promotional items, and specialty products. Steel rule dies can handle materials up to 0.25 inches thick, making them versatile enough for paper, thin cardboard, and more.

The complexity of the design affects production speed. Simple shapes like circles or squares can be processed quickly, while intricate patterns may slow things down. For faster operations, rotary die-cutting is a great option, especially for continuous feed systems.

On the other hand, kiss cutting is a favorite for labels and stickers. It cuts through the top layer of material while leaving the backing intact, making peeling and application a breeze. Products like vinyl decals, address labels, and promotional stickers often rely on this technique. For best results, materials with consistent thickness (around 0.002 inches) are ideal, as uneven materials can lead to incomplete cuts or damage to the backing.

For more flexibility, digital die-cutting offers a modern solution. Instead of physical dies, it uses computer-controlled blades, making it perfect for prototypes, short runs under 100 pieces, or designs that frequently change. While setup is quick, the cutting speed is slower compared to traditional die-cutting, making it better suited for small-scale projects.

Creasing, Scoring, and Micro-Perforation

These techniques are all about creating weak points in materials for specific purposes – whether it’s folding or tearing.

Creasing compresses paper fibers to form a valley, making folds clean and professional. This is essential for coated papers, which are prone to cracking along fold lines. Heavy papers above 80 lb cover weight also benefit from creasing, as it prevents unsightly cracks and ensures sharp folds for business cards, invitations, and brochures.

Scoring, on the other hand, uses a thin rule to create a raised line that guides folding. It’s better suited for thinner materials (under 80 lb text weight) and is commonly used for tri-fold brochures and multi-panel pieces. While scoring is faster and requires less force, it may not provide the same crisp folds as creasing on heavier materials.

For projects that require easy tearing, micro-perforation is the way to go. This method creates tiny cuts and bridges, allowing controlled tearing for items like reply cards, coupons, and tear-off tabs. Adjusting the cut-to-bridge ratio ensures the right balance between tearability and sheet integrity.

In some cases, numbering and perforation are combined, such as for tickets, invoices, and forms. Sequential numbering equipment can integrate with perforation dies, streamlining production and reducing handling time. This combination is particularly useful for creating organized, ready-to-use document sets in one efficient step.

Cutting Method Comparison

Choosing the right cutting method is a critical step that can make or break your project’s success. Below, we break down the precision, speed, and material compatibility of various techniques to help you make an informed decision. Each method has its advantages and limitations, so understanding these differences is key to selecting the best fit for your needs.

Method Performance Analysis

Let’s dive into how these cutting methods stack up against one another based on key performance factors.

Precision and Accuracy

  • Kiss Cutting: Known for its high precision, kiss cutting is ideal for intricate designs. However, it demands careful calibration – too shallow or too deep, and the final product may suffer in quality.
  • Traditional Die Cutting: This method excels in creating uniform shapes and handles complex designs with consistent accuracy, making it a dependable option for many applications.
  • Laser Cutting: When it comes to precision, laser cutting is in a league of its own. It produces clean, burr-free edges with tolerances as tight as ±0.0005 inches to ±0.002 inches. This makes it perfect for projects requiring straight walls and exact dimensions.

Speed and Production Volume

  • Kiss Cutting: While setting up kiss cutting for custom designs can take time, rotary kiss cutting shines in high-volume production. Plotter kiss cutting, on the other hand, is better suited for low to medium production runs.
  • Die Cutting: Once the die is created, this method offers rapid turnaround times for standard shapes.
  • Laser Cutting: Laser cutting is highly flexible since it doesn’t require physical dies, making it a great choice for prototypes and short production runs.

Material Compatibility

  • Cardstock: Digital cutting systems perform well on medium-weight cardstock, delivering precise results. Manual tools like paper trimmers and rotary cutters also produce clean, straight cuts on cardstock.
  • Vinyl: Digital systems are tailored for precise cuts on vinyl materials.
  • Thin Paper: For delicate materials like thin paper, digital systems with specialized “intricate paper” settings ensure clean cuts without tearing.

Comparison Table

Method Best Materials Precision Level Production Speed Setup Requirements
Kiss Cutting Labels, stickers, vinyl decals High Fast for high-volume runs Custom die creation
Die Cutting Cardstock, packaging materials Excellent for uniform shapes Very fast after setup Steel rule die fabrication
Laser Cutting Multiple materials, prototypes Extremely high (±0.0005"-±0.002") Moderate, no die needed Digital file preparation
Digital Cutting Cardstock, vinyl, thin paper High with material-specific settings Good for short to medium runs Software setup and calibration

Choosing the right cutting method means balancing your material type, design complexity, and production volume with each technique’s strengths.

sbb-itb-ce53437

Modern Cutting Technology and Best Practices

The post-press cutting industry has seen a dramatic evolution over the last decade. Computer-controlled systems and automated equipment have replaced many manual tasks, delivering unparalleled accuracy while slashing production times. These technological advancements have reshaped how print shops handle cutting operations, making even the most complex projects more achievable and cost-efficient. By combining cutting-edge tools with established best practices, modern cutting solutions deliver exceptional results.

Digital and Automated Cutting Advances

Computer-controlled cutting systems have revolutionized post-press operations by minimizing reliance on operator skill. Building on traditional tools like guillotines, rotary cutters, and die-cutters, these systems execute cuts with mathematical precision by following detailed computer instructions. This shift eliminates manual measurements and reduces the chance of human error.

Automated cutting equipment takes things a step further, effortlessly handling intricate patterns and ensuring uniformity across large production runs.

Integrated workflows have also become a cornerstone of modern cutting technology. Today’s systems link directly with design software and print management platforms, enabling cutting instructions to flow seamlessly from the design phase to the final cut. This integration reduces setup time, eliminates transcription errors, and streamlines the entire process.

Another game-changer is the multi-tool capability of advanced cutting machines. These systems can cut, crease, score, and perforate materials in a single pass, eliminating the need for multiple setups or equipment changes. This not only saves time but also ensures precision across all operations.

Real-time monitoring features provide instant feedback on cutting quality and equipment performance. Sensors detect factors like blade wear, material thickness variations, and changes in cutting pressure, making automatic adjustments to maintain consistent results throughout production.

Best Practices for Quality Results

While technology has advanced, adhering to best practices remains essential for delivering high-quality outcomes. Precision, attention to detail, and rigorous quality control are as crucial now as they were in the days of manual cutting.

File preparation is the first step toward successful cutting. Digital files must be created with exact dimensions and proper bleed allowances. Vector-based files are ideal since they maintain sharp edges at any scale. Cut lines should be clearly defined, with color coding for different operations and dimensions aligned with the final output.

Regular maintenance and daily calibrations are non-negotiable for preserving blade sharpness and cutting accuracy. Dull blades can lead to ragged edges, excessive pressure, and material damage. Implementing a blade replacement schedule based on usage hours – rather than waiting for visible quality issues – helps avoid costly reprints and wasted materials.

Material handling procedures play a significant role in cutting accuracy. Proper storage prevents warping and moisture-related issues, while allowing materials to acclimate to room temperature ensures dimensional stability before cutting.

Quality control checkpoints throughout the process are invaluable for catching issues early. Performing test cuts on samples verifies settings, while dimensional checks with measuring tools ensure finished pieces meet specifications. A visual inspection of cut edges can reveal problems like blade chatter, incomplete cuts, or tearing.

Maintaining environmental controls in the cutting area is another critical factor. Stable temperature and humidity levels prevent dimensional changes in materials, and effective dust control ensures sensors and mechanical components function properly while keeping finished pieces clean.

Operator training is key to maximizing equipment capabilities and maintaining standardized workflows. Documenting settings for common jobs speeds up setup times and ensures consistent results when reprinting orders.

Finally, waste tracking and analysis offer valuable insights into efficiency and quality. Monitoring scrap rates can highlight when equipment maintenance is needed or when cutting parameters require adjustment. Additionally, analyzing the costs of different cutting methods helps identify the most economical approach for various projects and quantities.

Cutting Services at Miro Printing & Graphics Inc.

Miro Printing & Graphics Inc. brings precision and efficiency to every project by combining advanced cutting technology with the expertise of skilled technicians. By keeping all cutting operations in-house, the company ensures accurate results, shorter timelines, and cost-effective solutions.

Their approach blends modern cutting equipment with a deep understanding of how different materials behave during the cutting process. Whether it’s producing 100 business cards or 10,000 custom packaging pieces, Miro Printing & Graphics Inc. delivers consistent, high-quality results every time.

Custom Cutting and Die-Cutting Services

For businesses looking to stand out, Miro Printing & Graphics Inc. offers custom die-cutting and kiss-cutting services. These methods allow for intricate shapes and designs that add a unique touch to marketing materials, product packaging, and branded items. With these capabilities, they can handle even the most complex designs that traditional cutting methods simply can’t achieve.

Their cutting services include:

  • General cutting for standard trimming needs
  • Die cutting for custom shapes and designs
  • Creasing and scoring to create fold lines and dimensional effects
  • Micro-perforation for tear-away sections like coupons

This wide range of services ensures that most projects can be completed entirely in-house. The facility works with a variety of materials, including cardstock, vinyl, specialty papers, corrugated board, and even magnetic materials. Whether it’s custom-shaped door hangers, precisely scored presentation folders, or intricately die-cut stickers, their equipment and expertise guarantee professional results.

Every project undergoes strict quality checks to ensure clean cuts and precise dimensions, reducing the risk of errors and costly reprints while ensuring customer satisfaction.

In-House Bindery and Finishing Options

To complement their cutting services, Miro Printing & Graphics Inc. offers in-house bindery and finishing options, bringing every step of the process under one roof. This integrated workflow ensures consistent quality and eliminates the challenges of coordinating with multiple vendors.

Their bindery services include:

  • Booklet making
  • Collating
  • Comb binding
  • Cutting
  • Drilling
  • Folding
  • Numbering
  • Padding
  • Perfect binding
  • Plastic coil binding

This extensive range of services allows them to produce a variety of finished products, such as booklets, brochures, catalogs, greeting cards, invitations, and table tent cards, without relying on external suppliers.

By integrating cutting and finishing processes, Miro Printing & Graphics Inc. makes it easier to handle complex projects. For example, a brochure requiring cutting, scoring, and folding can move seamlessly through each step without leaving the facility. This reduces handling, minimizes the chance of damage, and ensures consistent quality throughout the production process.

Centralizing operations also streamlines timelines and eliminates the added costs of working with multiple vendors. Clients benefit from accurate delivery estimates and real-time updates on their projects.

The facility’s ability to handle custom projects goes beyond standard materials. Whether it’s specialized cutting, unique binding methods, or unusual material combinations, their in-house capabilities provide the flexibility needed for complex jobs.

Cost savings are another advantage of this integrated approach. By eliminating the need for external vendors and reducing transportation costs, clients enjoy better pricing. Additionally, the streamlined workflow minimizes setup times and material waste, leading to further savings.

The team’s expertise ensures that every finishing operation is optimized. For example, they understand how paper grain direction impacts folding, how cutting sequences affect binding alignment, and how material thickness influences die-cutting pressure. This attention to detail guarantees top-notch results for every project.

Conclusion

Post-press cutting transforms printed sheets into polished, ready-to-market products that meet exact specifications. The difference between a professional and an amateur finish often hinges on the precision and expertise applied during these final production steps.

With modern cutting technology, the possibilities in post-press operations have expanded dramatically. Programmable cutters can handle sheets as large as 57 inches, while automated systems boost both speed and consistency. These innovations make it easier to achieve intricate custom shapes, exact dimensions, and clean edges – results that once required highly specialized processes.

AI and machine learning are also making their mark by improving reliability. Predictive maintenance and workflow optimization minimize downtime and help maintain consistent quality standards.

Despite these advancements, skilled operators remain indispensable. Their understanding of material behavior, ability to fine-tune equipment, and knack for spotting potential issues ensure optimal performance. Rigorous quality control processes, including pre-production calibration, sample testing, and final inspections, further safeguard both a company’s reputation and its investments.

At Miro Printing & Graphics Inc., these technical and operational strengths come together seamlessly. Their advanced cutting systems, paired with expert oversight, deliver precise and consistent results. By offering in-house bindery and finishing services, they eliminate the headaches of coordinating multiple vendors and reduce quality risks, ensuring a smooth production process from start to finish.

As automation and integration continue to advance, the future of post-press cutting promises even greater possibilities. Enhanced customization, faster turnaround times, and a growing focus on sustainable practices are on the horizon. Providers that stay ahead by investing in cutting-edge technologies and skilled expertise will lead the way, offering the precision and creativity that modern print production demands.

FAQs

What are the benefits of digital cutting systems compared to traditional die-cutting methods?

Digital cutting systems bring a host of advantages compared to traditional die-cutting methods. One standout benefit is their ability to deliver faster turnaround times. By removing the need for physical dies, these systems are perfect for projects with tight deadlines. Plus, they significantly cut down setup time, making it easier and more affordable to handle smaller production runs.

Another major perk is their versatility. With digital cutting, designs can be adjusted directly through software – no need to create new molds or tools. This not only saves time but also minimizes material waste, offering a more cost-efficient and eco-conscious solution for various projects.

How does the cutting technique affect the quality and durability of a printed product?

The way a product is cut can significantly impact its quality and lifespan. Clean, precise cuts result in smooth edges, which not only improve the appearance but also give the product a more professional finish. On the other hand, poorly done cuts can cause uneven edges, tearing, or fraying, which can detract from both the look and durability of the final product.

Techniques like creasing or trimming can take things a step further. These methods add a refined touch and help the product hold up better during handling and everyday use. Selecting the right cutting approach ensures your printed materials not only look sharp but also last longer.

What should I consider when choosing a post-press cutting technique for my project?

When choosing a post-press cutting technique, there are several key factors to consider: the material type, design complexity, production volume, and budget. For example, if you’re working with thick or highly durable materials, you might need specialized tools. On the other hand, intricate designs often call for precision-focused methods, such as die cutting.

You should also assess the scale of your project. If you’re handling large production runs, automated options like rotary die cutting can save time and effort. For smaller batches or custom designs, flatbed cutting might be a better fit. Matching the cutting method to your project’s unique requirements is essential for achieving the best possible results.

Related posts

https://app.seobotai.com/banner/banner.js?id=689fce044be5bdddd7bb372e

Designing for Safety: Die-Cut and Laser-Cut Tips

Explore essential safety tips for die-cutting and laser-cutting, including material selection, workspace organization, and design considerations.

Die-cutting and laser-cutting are essential manufacturing processes, but they come with risks that must be managed to protect operators and equipment. Key safety concerns include fire hazards, toxic fumes, laser exposure, and mechanical injuries. Proper material selection, workspace organization, and the use of safety equipment like protective glasses, fume extractors, and fire extinguishers are critical.

Key Highlights:

  • Die-Cutting: Uses shaped steel blades for precision cuts. Lower fire risk and no emissions but requires blade maintenance.
  • Laser-Cutting: Relies on high-energy beams for intricate designs. Requires ventilation, laser-rated safety glasses, and fire management.
  • Safety Tips: Clean machines regularly, maintain clear workspaces, and use emergency stop buttons and interlocks.
  • Design Considerations: Avoid sharp internal corners, ensure proper spacing between cuts, and use holding tabs for stability.

Both methods offer unique advantages depending on material and project needs, but safety and usability must guide every step of the process.

Laser Cutting and Engraving Safety & Risks + REAL xTOOL Fire Suppression System Test!

Choosing Safe Materials for Cutting

Keeping materials safe and properly stored is essential when working with laser cutters. A well-organized approach not only reduces fire hazards but also ensures smooth operations.

How to Store and Handle Materials Safely

Start by keeping the area around the laser cutter tidy. Remove any flammable items, debris, or unnecessary clutter to minimize the risk of fire. It’s also important to clean the laser cutter itself. Pay special attention to the interior, including the cutting deck and cavity, as dust buildup can pose a fire risk and may interfere with the cutting head’s functionality. Regular maintenance can go a long way in keeping your workspace safe and efficient.

Safety Equipment and Precautions You Need

Having the right safety equipment and following essential precautions can mean the difference between a smooth project and a dangerous accident. Both die-cutting and laser-cutting operations demand specific measures to ensure operators stay safe and the workspace remains secure.

Safety Features in Cutting Machines

Modern cutting machines come equipped with a range of safety features designed to minimize risks. One of the most important is the emergency stop button. These large red buttons, placed in easily accessible locations, immediately halt all machine functions when pressed. Before starting any job, operators must familiarize themselves with the location of these buttons.

For added protection, machines often include safety interlocks, which automatically shut down operations if a protective cover or door is opened. Laser cutters, in particular, are equipped with beam enclosures to contain the laser light, reducing the risk of eye injuries from direct or reflected beams.

Advanced systems may also feature automatic fire suppression mechanisms that detect sudden temperature spikes or flames. These systems can either stop the cutting process or release fire suppressants. Another key feature is air assist, which blows compressed air at the cutting point to clear debris and lower the chance of material ignition.

Die-cutting machines incorporate safety measures like light curtains and pressure-sensitive mats, which detect hazardous movements and stop operations immediately. Additionally, blade guards and enclosed cutting areas help prevent accidental contact with sharp tools.

These built-in features, when combined with proper personal protective gear, create a robust safety system.

Protective Gear and Workspace Setup

While machines come with automated safety systems, personal protective equipment (PPE) and a well-organized workspace are equally important.

PPE is a critical first line of defense. Safety glasses are a must for both die-cutting and laser-cutting. However, laser cutting requires specialized laser safety glasses rated for the specific wavelength of the laser. Standard safety glasses won’t protect against laser radiation.

Operators should also use cut-resistant gloves when handling materials or finished products, though gloves should never be worn while operating machine controls. For die-cutting operations that produce high noise levels, hearing protection is essential.

To manage harmful vapors and particles generated during cutting, fume extractors are necessary. Make sure these systems are regularly maintained and filters are replaced according to manufacturer recommendations. Workspaces should also have adequate air circulation, with laser cutting areas requiring 6-10 air changes per hour for safety.

Fire safety is another critical aspect. Keep CO₂ fire extinguishers and fire blankets easily accessible. A well-stocked first aid kit with essentials like burn gel, bandages, and eye wash solution should also be within reach.

The layout of the workspace plays a big role in safety. Ensure there are clear pathways around all equipment, with at least 3 feet of clearance on all sides. Use non-slip flooring to prevent falls and provide adequate lighting – at least 500 lux at work surfaces – so operators can see clearly. Organize tools and materials in designated storage areas to reduce clutter and avoid tripping hazards.

Finally, make sure to post warning signs and labels to mark laser radiation zones, high-voltage areas, and emergency procedures. Implement lockout/tagout procedures to ensure machines stay safely shut down during maintenance or when multiple operators are working nearby.

sbb-itb-ce53437

How to Design for Safety and Usability

Careful design choices are key to creating die-cut and laser-cut products that are both safe to manufacture and easy to use. A well-thought-out design not only minimizes production risks but also ensures a seamless user experience.

Design Rules for Safe Cutting

When it comes to die-cutting and laser-cutting, sharp internal corners can be a serious problem. Tight angles create stress points that may cause materials to tear unexpectedly, leading to equipment jams or dangerous flying debris. To avoid this, use a minimum radius of 0.125 inches for internal corners. This adjustment helps cutting tools move smoothly and reduces material stress.

Another important guideline is maintaining at least a 0.25-inch gap between cut elements. This spacing prevents tools from accidentally bridging cuts, which can lead to blade deflection in die-cutting or beam reflection problems in laser cutting.

For designs with large unsupported areas, stability is crucial. These sections can flutter or shift during cutting, causing inaccuracies or hazards. A practical solution is adding holding tabs – temporary connections approximately 0.125 inches wide. These tabs keep the material stable during cutting and can be easily removed afterward.

The direction of cuts relative to material grain also matters. For paper and cardboard, aligning major cuts parallel to the grain reduces the risk of tearing, as cross-grain cuts require more force. For fabric, consider the weave direction and stretch properties to ensure clean cuts and maintain material integrity.

Pay special attention to perforation patterns. A standard perforation spacing of 0.125 inches, with 0.0625 inches left uncut between perforations, strikes a good balance between tearability and structural strength. Avoid placing perforations near edges, as these areas are more prone to failure during handling.

By following these precise guidelines, you can enhance both the safety of the manufacturing process and the reliability of the final product. But safety isn’t the only concern – products also need to be user-friendly.

Making Products User-Friendly Through Design

Good design doesn’t stop at safety; it should also make products easy and intuitive to use. One critical aspect is edge finishing. Instead of sharp 90-degree angles, use slightly rounded edges with a radius of about 0.03125 inches. This small adjustment eliminates sharp edges while maintaining the product’s sleek appearance.

Visual cues and orientation markers are another way to ensure ease of use. Subtle features like arrows or asymmetrical elements can naturally guide users on how to handle or use the product correctly. This is especially helpful for items with functional parts like tabs, folds, or moving components.

For better handling, include thumb notches or grip areas that are at least 0.75 inches wide. Adding textured surfaces in these areas can further improve grip and prevent slipping.

Complex assembly processes can be simplified with built-in instructions and guides. Use score lines, perforations, and fold indicators to show users how to assemble or fold the product without the need for separate instructions. Differentiating mountain and valley folds with distinct line styles makes it easier for users to understand three-dimensional assembly.

Don’t overlook the finishing details. Smooth transitions at joints and seams are essential for both safety and comfort. In multi-layer designs, ensure that all layers are aligned properly and that no sharp edges from inner layers stick out. These small details prevent snags and cuts, creating a better user experience.

Lastly, consider functional testing during the design phase. Prototypes should be tested in real-world scenarios to ensure the product performs well for a variety of users, including those with limited dexterity or other physical challenges. Features like easy-grip tabs, large finger holes, and simple folding mechanisms can make your products accessible to more people.

For frequently used products, think about durability and wear patterns. Reinforce high-stress areas, such as fold lines, with double-thickness material or strategically placed structural elements. This proactive approach helps prevent failures that could lead to safety issues during use.

Die-Cutting vs. Laser-Cutting: Safety and Usability Comparison

Die-cutting and laser-cutting come with distinct features that influence safety, ease of use, and overall production quality. Understanding these differences can help you refine your approach to selecting the right cutting method for your project.

Safety and Usability Overview

Die-cutting relies on mechanical force, using steel rule dies or rotary cutters to cut materials. This method is consistent and doesn’t generate heat, making it ideal for materials sensitive to temperature, like paper or foam. It also avoids producing chemical byproducts or emissions, ensuring a cleaner process.

Laser-cutting, on the other hand, uses concentrated light beams to melt, burn, or vaporize materials. While this method offers unmatched precision, it comes with unique safety challenges, such as managing heat, light exposure, and fumes.

The choice between these methods often depends on the materials, production scale, and available safety measures. Die-cutting works best for softer materials and high-volume projects, while laser-cutting shines when handling harder materials like wood, acrylic, or metal with intricate detail.

Cost and Production Speed

Die-cutting typically involves higher upfront tooling costs, making it more economical for large production runs. Laser-cutting, with its lower setup costs, is better suited for smaller batches or quick-turnaround projects. For example, die-cutting requires physical dies, which can take days or weeks to prepare, whereas laser-cutting can begin immediately after file preparation, making it ideal for prototypes or rush orders.

Key Differences: Die-Cutting vs. Laser-Cutting

Factor Die-Cutting Laser-Cutting
Risk of Fire Low Moderate (depends on material)
Fume Emissions None May emit hazardous fumes
Precision Moderate High
Material Compatibility Flexible Limited by material type
Edge Quality Clean, no heat damage Smooth, may have slight discoloration
Speed Fast for high volumes Slower, but consistent
Thickness Capacity Up to 2 inches for most materials Limited to 0.75 inches for most lasers
Maintenance Regular blade replacement Requires mirror and lens cleaning
Noise Level Moderate to high Low
Power Consumption Lower Higher

Material and Edge Quality Considerations

Material thickness plays a significant role in deciding the cutting method. Die-cutting can handle materials up to 2 inches thick, such as corrugated cardboard and foam core. Laser-cutting, however, is typically limited to materials under 0.75 inches thick, though some industrial systems can cut thicker materials.

When it comes to edge quality, die-cutting delivers clean edges without heat damage, although softer materials might show slight compression marks. Laser-cutting produces smooth edges but can cause minor discoloration or melting, especially with plastics.

Operator Expertise and Environmental Impact

Both methods require skilled operators. Die-cutting involves knowledge of material feeding, die alignment, and pressure settings. Laser-cutting demands expertise in power settings, cutting speeds, and material-specific adjustments. Laser-cutting also requires additional safety precautions, including eye protection and proper ventilation.

From an environmental standpoint, die-cutting generates physical waste, which is often recyclable. Laser-cutting, however, can produce fumes, especially when using synthetic materials, necessitating proper ventilation and filtration systems.

At Miro Printing & Graphics Inc., these principles guide the selection of cutting methods to ensure safety, precision, and efficiency for your custom printing needs.

Key Points and Next Steps

Main Takeaways for Safe Design

Creating safe designs starts with smart choices – selecting the right materials, using precise cutting settings, and incorporating thoughtful design elements like rounded corners and proper spacing. These steps help reduce risks during both die-cutting and laser-cutting processes. Die-cutting, being a mechanical method, has lower risks of thermal emissions and fire. On the other hand, laser-cutting, while offering incredible precision for intricate designs, requires additional safety measures. Routine maintenance, such as replacing blades and cleaning laser components, plays a big role in keeping operations safe and efficient.

These practices are the backbone of safe cutting processes and pave the way for expert collaboration.

Getting Professional Help for Custom Printing

For better safety and top-notch results, teaming up with experienced professionals is a smart move. Miro Printing & Graphics Inc. not only offers expert advice but also operates with industrial-grade safety measures to ensure your project meets the highest safety and quality standards.

Shops like Miro Printing & Graphics Inc. are equipped with advanced systems, including cutting-edge ventilation, fire suppression setups, and precision-calibrated cutting tools. Their deep knowledge of materials is especially helpful when working with specialty substrates or unique thicknesses. Plus, their skilled team can suggest safer material options when necessary.

When you work with Miro Printing & Graphics Inc., the design consultation process includes detailed safety checks to address potential issues before production begins. If you’re in the New York or New Jersey area, their Hackensack location offers the convenience of quick turnaround times and the ability to review samples before committing to full production. With their range of post-press services, including die-cutting, they deliver a complete custom printing solution that prioritizes safety without compromising on quality.

FAQs

What safety measures should operators follow when using laser-cutting machines?

Operators need to put safety first when working with laser-cutting machines. Always stay with the machine while it’s running, and make sure the workspace is free of flammable materials to lower the risk of fire. Wearing the right safety gear – like laser safety glasses, gloves, and a respirator or mask – is crucial to protect yourself from potential dangers.

Stick to the manufacturer’s guidelines for safe operation, keep a fire extinguisher within reach, and ensure the workspace is well-ventilated to limit exposure to harmful fumes. Don’t forget to regularly inspect and maintain the machine to keep it running safely and efficiently.

Why is choosing the right material important for safe and efficient die-cutting and laser-cutting?

Selecting the right material plays a key role in making die-cutting and laser-cutting processes both safe and efficient. The material impacts everything from tool longevity to production speed and even the quality of the finished product. For example, materials like aluminum and stainless steel are great for die-cutting because they reduce tool wear and ensure precise cuts.

When it comes to laser cutting, materials such as wood, acrylic, and certain plastics are excellent options. However, materials like PVC should be avoided since they can release harmful fumes during the cutting process. Choosing the right material not only improves safety by reducing toxic emissions and mechanical hazards but also helps streamline production by cutting down on defects and downtime. Smart material choices lead to higher-quality results and a safer work environment.

What are the key design tips for creating safe and user-friendly die-cut and laser-cut products?

To create die-cut and laser-cut products that are safe and user-friendly, start by selecting non-toxic, flame-resistant materials. This choice helps lower the risks of health issues and fire-related accidents. It’s also important to ensure proper ventilation during the cutting process to reduce exposure to potentially harmful fumes.

In your designs, include safety-focused elements like rounded edges to minimize the risk of injury. Add clear markings to guide safe handling, and steer clear of highly reflective surfaces that might disrupt laser operations. On top of that, always use appropriate safety gear, such as gloves and protective eyewear, and strictly adhere to operational protocols – like never leaving the cutting equipment unattended.

By addressing these safety measures, you can develop products that are practical and secure for both users and operators.

Related posts

https://app.seobotai.com/banner/banner.js?id=689ea7786208348668fb8e6e

How Water-Based Inks Improve Printing Sustainability

Explore how water-based inks enhance printing sustainability by reducing emissions, improving safety, and aiding recycling efforts.

Water-based inks are transforming printing by reducing harmful emissions, improving safety, and supporting recycling efforts. These inks use water as a solvent, avoiding toxic chemicals found in conventional inks. Here’s why they matter:

  • Lower VOCs: Minimal volatile organic compounds (VOCs) improve air quality and worker safety.
  • Cleaner Water Use: Simplified cleanup with water reduces pollution and waste.
  • Recycling-Friendly: Easier removal during recycling prevents contamination.

Switching to water-based inks can also cut costs by reducing energy use and simplifying compliance with safety standards. Their versatility makes them ideal for printing on paper, textiles, and packaging, meeting growing demands for safer, eco-conscious products. Ready to make the change? It’s a win for both your business and the planet.

Water-Based Printing, Tips and Tricks

What Are Water-Based Inks?

Water-based inks represent an evolution in printing technology by using water as the main solvent instead of chemical-based alternatives. These inks are made up of pigments or dyes suspended in water, along with eco-friendly additives that improve their performance and safety.

Unlike traditional inks, they avoid harmful components like PVC, phthalates, and high levels of VOCs (volatile organic compounds). This makes them a safer option for both workers and the environment.

When the water evaporates during the drying process, it leaves behind a durable ink layer that adheres well to different surfaces. Let’s take a closer look at their ingredients and how they differ from conventional inks.

Main Ingredients in Water-Based Inks

The composition of water-based inks is refreshingly simple. Water acts as the carrier, while pigments or dyes provide color and opacity. Additional co-solvents and additives are included to enhance their performance.

This straightforward formula reduces many of the health hazards linked to traditional printing chemicals, making these inks easier and safer to use.

How They Differ from Standard Inks

Standard solvent-based inks use organic solvents like alcohol, acetone, ethyl acetate, or toluene as their primary carriers. While these solvents evaporate during drying, they release significantly higher levels of VOCs into the air.

Water-based inks, on the other hand, dry through water evaporation. This process results in much lower VOC emissions and minimizes exposure to harmful substances in the workplace, making them a cleaner and safer alternative.

How Water-Based Inks Help the Environment

Water-based inks offer more than just a safer alternative to traditional inks – they actively address critical environmental concerns tied to air quality, water usage, and waste management. Their composition and performance make them a step forward in reducing the ecological footprint of printing.

Lower VOC Emissions

Unlike traditional inks that rely on petroleum-based solvents like ethyl acetate and toluene, which release high levels of volatile organic compounds (VOCs), water-based inks produce only minimal VOC emissions. This not only improves indoor air quality but also reduces harmful exposure for workers involved in the printing process.

Reduced Impact on Water Resources

Screen printing with water-based inks significantly lowers the risk of water pollution and cuts down on water consumption. These inks require only water for cleanup, eliminating the need for harsh chemicals and reducing disposal costs. Additionally, their ease of maintenance means less frequent cleaning, conserving water and generating less wastewater. This efficiency also supports better recycling practices, creating a ripple effect of environmental benefits.

Improved Recycling Compatibility

Water-based inks, made with natural components, are typically biodegradable and much easier to remove during the recycling process. This means less contamination of recyclable materials and a reduction in resource loss. Without toxic chemicals, heavy metals, or solvent residues, these inks align with sustainable practices and support a circular economy. As regulations like Extended Producer Responsibility (EPR) gain traction globally, the recyclability of water-based inks becomes even more relevant. By promoting resource efficiency and reducing waste, these inks play a crucial role in advancing the concept of a circular economy.

sbb-itb-ce53437

Business Benefits of Water-Based Inks

Water-based inks offer practical advantages for printers and small businesses, leading to smoother operations, simplified workflows, and cost-efficient production. Here’s how these benefits translate into real-world business value.

High-Quality Prints with Long-Lasting Results

Water-based inks produce vibrant colors and sharp details that can match, or even surpass, solvent-based alternatives. The water used in these inks helps pigments bond effectively with various materials, ensuring consistent color saturation and clarity. In textile printing, they provide a softer finish, preserving the natural feel of fabrics while delivering durable prints that can handle repeated washing and wear. This level of quality allows print shops to offer premium services, boosting customer satisfaction.

Additionally, the drying process of water-based inks is more uniform, reducing common issues like dot gain or color shifting during production. This consistency ensures reliable results across large print runs.

Cost Efficiency in Printing

Switching to water-based inks can lead to noticeable cost savings. Cleanup is easier and less expensive since water alone can clean these inks, eliminating the need for harsh chemicals. They also cure at lower temperatures, which can cut down on energy usage and reduce strain on equipment, saving money on utility bills and maintenance.

Improved workplace conditions are another plus, as these inks are less harsh on both workers and the environment. Their versatility also allows print shops to expand their service offerings, opening up new revenue opportunities.

Compatibility with a Wide Range of Materials

Water-based inks are highly versatile and work well on various substrates. For example, they perform exceptionally on uncoated papers, providing rich, even colors without issues like bleeding or feathering. In textile printing, they pair perfectly with natural fabrics like cotton and cotton blends, creating soft prints that retain the fabric’s original texture and breathability.

These inks also adhere well to packaging materials like corrugated cardboard, making them a great option for sustainable packaging solutions. In industries like food packaging or products for children, where safety is critical, water-based inks are often the preferred choice due to their ability to meet strict regulatory standards. This opens doors to additional markets for printers looking to diversify their offerings.

Local businesses, such as Miro Printing & Graphics Inc. in Hackensack, NJ, have successfully integrated water-based inks into their operations, demonstrating their commitment to high-quality and environmentally conscious printing solutions.

How to Switch to Water-Based Inks

Making the switch to water-based inks is a smart way to align with eco-conscious practices while simplifying compliance and maintaining efficient operations.

Water-based inks make it easier for businesses to adhere to strict safety and environmental regulations. Thanks to the Toxic Substances Control Act (TSCA), they require less documentation since they contain fewer regulated chemicals.

Since 2016, more than 99% of new chemicals have been governed by an EPA Significant New Use Rule (SNUR). Water-based inks often bypass these restrictions because they lack the organic solvents that typically trigger regulatory scrutiny.

For companies producing food packaging, water-based inks can meet rigorous global food safety standards, including those established by the FDA, EU Framework, Nestlé Guidance, and Swiss Ordinance. This opens doors to new markets, especially in industries with strict requirements.

Additionally, Material Safety Data Sheet (MSDS) documentation is simpler with water-based inks. Their hazard profiles show reduced risks for both workers and the environment.

Another key advantage is their low or zero VOC (volatile organic compound) emissions. This can reduce the need for complex ventilation systems, saving on air filtration costs and potentially eliminating the need for specialized equipment.

These compliance benefits make water-based inks an obvious choice for sustainable printing. A 2015 study revealed that 84% of consumers prefer products that demonstrate responsible practices, giving your business a competitive edge.

For expert advice on transitioning to water-based inks, consider reaching out to Miro Printing & Graphics Inc. With their deep expertise in sustainable printing, they can help you refine your processes to meet both regulatory demands and performance expectations.

Conclusion: Moving Forward with Eco-Friendly Printing

Water-based inks offer a range of environmental advantages, including lower VOC emissions, reduced water pollution, and better recyclability. On top of that, they deliver high-quality prints, improve durability, and help cut costs by simplifying compliance and reducing the need for extensive ventilation systems.

Beyond the environmental perks, these inks open doors to new business opportunities, particularly in industries like food packaging, where sustainability is increasingly in demand. Making the switch involves evaluating your equipment, adjusting workflows, and training your team – steps that can enhance your brand’s reputation, streamline operations, and ensure compliance with evolving regulations.

As stricter regulations emerge and consumer interest in eco-conscious practices grows, adopting water-based inks allows you to combine strong performance with a commitment to environmental responsibility. This approach ensures consistent results while contributing to a sustainable future.

At Miro Printing & Graphics Inc., a full-service print shop in Hackensack, NJ, we’re here to help you make the transition to eco-friendly printing. By choosing water-based inks, you can create a more sustainable and profitable business that not only meets current expectations but also anticipates future demands.

FAQs

What environmental advantages do water-based inks offer over traditional inks?

Switching to water-based inks offers several environmental advantages that are hard to ignore. For starters, these inks can cut volatile organic compound (VOC) emissions by up to 90%, which means less air pollution and fewer health concerns. That’s a big win for both people and the planet.

On top of that, water-based inks are both biodegradable and compostable, so they naturally break down without leaving harmful residues behind. They also come with a smaller carbon footprint, helping to reduce greenhouse gas emissions. Incorporating these inks into your printing process isn’t just a smart move – it’s a step toward more eco-conscious practices that can make a real difference.

What steps can businesses take to transition smoothly to water-based inks in printing?

To switch to water-based inks effectively, businesses should first evaluate their existing equipment and make any needed upgrades. This might involve using higher mesh-count screens, waterproof emulsions, and fine-tuning screen flooding techniques to meet the demands of water-based printing. Managing inks carefully is also key to maintaining consistent quality throughout production.

Adopting the right tools and following best practices for curing and post-exposure will enhance reliability. Additionally, introducing gradual testing and providing staff with proper training can simplify the transition, making it easier to incorporate water-based inks into your printing process smoothly.

What industries or applications benefit the most from using water-based inks?

Water-based inks have become a popular choice in industries like screen printing and packaging for good reasons. In screen printing, they deliver bold, vibrant colors and a smooth, soft finish. Plus, they’re a more eco-friendly option compared to solvent-based inks, making them appealing to businesses looking for greener solutions.

In packaging, water-based inks stand out for companies focused on lowering their carbon footprint. These inks are less toxic and easier to recycle, aligning well with sustainability goals. They’re also a great fit for printing on textiles, paper, and other biodegradable materials, especially for businesses aiming to meet eco-conscious standards. For companies committed to environmentally responsible practices, water-based inks offer a practical, greener alternative.

Related posts

https://app.seobotai.com/banner/banner.js?id=689e7ea0cce566114635528e

What Is Smyth Sewing in Book Binding?

Explore the benefits and process of Smyth sewing, a bookbinding technique known for its durability, versatility, and ability to create flat-opening books.

Smyth sewing is a bookbinding technique that uses thread to bind folded pages, creating strong, flexible books that can lie flat when open. It’s known for its durability, making it ideal for frequently used books like manuals, reference materials, and high-quality editions. Here’s why it stands out:

  • Durability: Thread binding ensures pages stay intact, even with heavy use.
  • Flat-Opening Design: Perfect for cookbooks, music sheets, or technical guides.
  • Versatility: Works for hardcovers, premium paperbacks, and journals.
  • Precision Process: Automated machines ensure consistent quality and efficiency.

This method is a top choice for projects requiring longevity and usability, such as academic texts, art books, and archival editions.

How Smyth Sewing Works

Step-by-Step Smyth Sewing Process

Smyth sewing is renowned for its durability and ability to lay flat, and it all starts with a meticulous process. It begins with signatures – folded sheets that typically contain 4, 8, 16, or 32 pages – arranged in the correct reading order.

The sewing happens along the natural fold of each signature. A specialized needle threaded with strong material passes through pre-punched holes, linking the signatures into a continuous chain that forms the foundation of the book block.

Once all the signatures are sewn together, the book block is reinforced for added strength. A layer of crash cloth (also called mull) is applied to the spine, and the edges are trimmed to create clean, even margins. The final steps involve attaching the sewn book block to hard covers or preparing it for soft cover binding.

Modern Machinery in Smyth Sewing

In professional binderies, automated sewing machines have replaced much of the traditional hand-sewing process, making it faster and more efficient. These machines can handle multiple signatures at once, feeding them through sewing stations with precision. They ensure consistent thread tension and spacing, which guarantees uniform quality throughout a production run.

Key features of these machines include automatic signature feeders that align each sheet perfectly before sewing. Multiple needles work in unison to create strong, reliable binding patterns. Some high-tech systems can produce thousands of books per hour while maintaining the craftsmanship that defines Smyth sewing.

To ensure quality, many machines are equipped with sensors that detect issues like missing signatures, misalignment, or thread breaks. If a problem arises, the machine stops immediately, preventing defective books from moving forward. This combination of automation and quality control ensures every book meets professional standards.

How Smyth Sewing Creates Durable Books

The durability of Smyth-sewn books comes from both the precision of the sewing process and the materials used. The thread plays a key role by distributing stress evenly across the entire book structure. When a Smyth-sewn book is opened, the force is spread through the continuous thread rather than concentrated at a single point, which prevents pages from loosening – even with frequent use.

The sewing also creates a flexible spine that allows the book to open and close naturally. Unlike adhesive binding, the thread allows slight movement between signatures, enabling the book to lie completely flat when opened.

The choice of thread is equally important. Binderies typically use polyester or cotton threads specifically designed for bookbinding. These threads are resistant to stretching, breaking, and long-term wear. The thickness of the thread is carefully matched to the book’s purpose: thicker threads are used for reference books that will endure heavy use, while thinner threads are chosen for books where a polished appearance is more important.

Benefits of Smyth Sewing

Durability and Long-Lasting Books

Smyth-sewn books are built to last. Thanks to the continuous thread that binds the pages, these books can handle years – even decades – of regular use without falling apart. This durability makes them a go-to choice for libraries, universities, and publishers that need books to withstand heavy use. Think about reference materials, textbooks, or archival documents – Smyth sewing ensures they hold up over time. Unlike glue-based binding methods that might weaken with changes in temperature or humidity, the thread in Smyth-sewn books stays strong, no matter the conditions. Plus, this sturdy construction naturally supports another major perk: books that open completely flat.

Books That Open Flat

One standout feature of Smyth-sewn books is their ability to lie perfectly flat when open. This isn’t just a nice touch – it’s a game-changer for anyone using cookbooks, manuals, or reference guides where both hands are often busy. The flexible spine allows the pages to move freely, ensuring the book stays open without needing to hold it down. This design also makes tasks like photocopying much easier. Musicians benefit from this feature in sheet music, as do technicians using repair guides or technical manuals. The flat-opening design isn’t just practical – it’s versatile, making Smyth-sewn books a great fit for all kinds of formats.

Works for Different Book Types

Smyth sewing works across a wide range of book formats, from sturdy hardcovers to sleek premium paperbacks and journals. Hardcover books, in particular, benefit from the strong connection between the text block and the rigid cover, which keeps the book intact even with added weight. For coffee table books or art publications, the thread binding evenly distributes stress, preventing sagging or separation that could damage heavy paper stock or large images. Journals and notebooks also shine with Smyth sewing, as the flat-opening design makes writing more comfortable and ensures the pages stay secure, even with frequent use. Whether it’s a hefty art book or a daily journal, Smyth sewing delivers durability and functionality across the board.

When to Use Smyth Sewing

Common Projects for Smyth Sewing

Smyth sewing is a go-to choice for projects that demand durability and the ability to lay flat when open. Think of academic texts, art books, music books, technical manuals, and architectural publications – these all benefit from the sturdy and practical design Smyth sewing provides.

This binding method is also a favorite in professional and technical fields. For example, research labs often use Smyth-sewn notebooks for documenting intellectual property and filing patents. Why? Because the binding makes tampering nearly impossible, ensuring the integrity of sensitive information.

Archival editions, library collections, and custom projects like commemorative books or family histories are also ideal candidates for Smyth sewing. When preservation and longevity are top priorities, this binding method truly shines.

These varied uses demonstrate why Smyth sewing is a smart choice for anyone seeking strength and reliability in their finished product.

Why Choose Smyth Sewing for Your Project

Smyth sewing isn’t just about durability – it’s also about delivering long-term value and a polished, professional look.

Although the upfront cost may be higher, the durability of Smyth-sewn bindings means fewer repairs and replacements, especially in high-use scenarios. This makes it a cost-effective option over time while also enhancing the overall quality of the project.

Another standout feature is its tamper-evident design, which is critical for specialized uses. Research institutions, legal firms, and companies managing sensitive documents depend on this feature to ensure the integrity of their records.

For books with a high page count, Smyth sewing is especially effective. Its thread-based construction evenly distributes the weight of thick text blocks, preventing issues like loose or falling pages that can occur with adhesive-based methods. This makes it an excellent choice for heavy-duty applications where reliability is key.

sbb-itb-ce53437

Smyth Sewing Services at Miro Printing & Graphics Inc.

Complete Bookbinding Solutions

At Miro Printing & Graphics Inc. in Hackensack, NJ, we take pride in offering a full range of bookbinding services, with a strong emphasis on the durability and precision of Smyth sewing. Our bindery is equipped to handle everything from printing to finishing, ensuring your projects are crafted to last and look professional. We seamlessly combine traditional techniques with modern technology to deliver high-quality results for clients throughout New Jersey and beyond. Our services include booklet making, collating, cutting, creasing and scoring, folding, and a variety of binding options such as perfect binding and plastic coil binding.

What makes our process stand out? Everything is done under one roof. From the moment your project is printed to the final binding and finishing touches, there’s no need to coordinate with multiple vendors. This not only ensures consistent quality but also eliminates delays, giving you faster turnaround times and a hassle-free experience.

Custom Service and Expert Help

At Miro Printing & Graphics Inc., we understand that every binding project is unique. That’s why we tailor our services to meet your specific needs, whether you’re creating an exclusive art book or producing a large batch of technical manuals. With the precision of Smyth sewing as our cornerstone, we work closely with you to bring your vision to life.

Our team considers all the details – page count, paper weight, and budget – to recommend the best binding solution for your project. We also provide expert advice on paper types, cover materials, and finishing options. This personalized guidance helps you avoid unnecessary expenses and ensures that the final product matches your expectations in both form and function.

Combined Printing and Binding Services

One of the biggest advantages of choosing Miro Printing & Graphics Inc. is our ability to handle both printing and binding in one location. Whether you need digital or offset printing, we manage the entire process, eliminating common issues like color mismatches, paper grain misalignment, or scheduling conflicts.

This integrated workflow streamlines production, giving you a single point of contact for design, printing, and binding. For time-sensitive projects, this approach is a game-changer. Our bindery team can start working on completed sections while other parts are still being printed, cutting down on production time and ensuring your project is ready when you need it.

Smyth Book Sewing

Why Smyth Sewing Is the Best Choice

Smyth sewing has earned its reputation as the top choice for library-quality bookbinding, and for good reason. Its needle-and-thread construction offers exceptional durability, making it ideal for books that need to withstand heavy use over time. Plus, this method allows books to open completely flat, making them far more practical for a variety of uses.

What sets modern Smyth sewing apart is the incorporation of advanced automation. Today’s machines come equipped with sensors to catch missed signatures, broken threads, or damaged needles. This ensures minimal errors and consistently high-quality results. With such precision, you can trust that every book produced meets the highest professional standards.

Another standout feature of Smyth sewing is its versatility. It works seamlessly with both softcover and hardcover books, offering options to suit different needs. For projects requiring extra durability, hardcover binding takes it a step further, without compromising the superior quality that Smyth sewing guarantees.

At Miro Printing & Graphics Inc., we take this method to the next level by blending traditional craftsmanship with cutting-edge technology. From the initial design to the final product, every step of your project is handled with precision and care. When durability and quality are non-negotiable, Smyth sewing is the smartest investment you can make for your publication.

FAQs

Smyth sewing is an excellent option for projects that demand strength and frequent use, such as hardcover books, journals, sketchbooks, or art and photography books. One of its standout features is its ability to let books lay completely flat when opened, which is perfect for designs where usability and visual appeal are key.

This method is often chosen because it provides outstanding durability and a long lifespan when compared to other binding techniques. Smyth-sewn books hold up well against wear and tear, making them a dependable choice for high-quality publications or books meant for heavy, repeated use.

How do automated machines improve the Smyth sewing bookbinding process?

Automated machines have become indispensable in the Smyth sewing bookbinding process, significantly boosting both precision and efficiency. These machines deliver accurate, durable stitching that enhances the strength and lifespan of bound books. This is particularly important for projects like textbooks or archival materials, where durability is a top priority.

By automating the sewing process, the need for extensive manual labor is reduced, and the likelihood of errors drops significantly. The result? Faster production times and consistently high-quality outcomes. This blend of speed, accuracy, and dependability makes automated Smyth sewing a go-to solution for today’s bookbinding demands.

What are the benefits of using Smyth sewing for books that need to lay flat, and who can benefit from it?

Smyth sewing is a bookbinding method that lets books open completely flat, offering a practical and convenient design. This quality is particularly handy for books that get a lot of use or need to stay open for long periods, like cookbooks, sketchbooks, or technical manuals.

By allowing the book to lay flat, this technique not only improves readability and ease of use but also reduces wear on the binding, ensuring the book lasts longer. It’s a great option for professionals, students, artists, or anyone who appreciates durable, well-made books.

Related posts

https://app.seobotai.com/banner/banner.js?id=689d2cdd8204a37d5f9935d0

Large Format Print Finishing Options Explained

Explore essential finishing options for large format prints that enhance durability and visual appeal, ensuring professional results for any project.

Large format printing creates high-quality, oversized visuals like banners, posters, and signs. However, finishing techniques are what truly make these prints durable and visually impactful. Finishing protects prints from UV rays, moisture, and wear, while improving their appearance with options like lamination, mounting, and specialty coatings. Whether you’re creating indoor displays, outdoor signage, or event materials, choosing the right finish ensures your prints last longer and look professional.

Key Finishing Options:

  • Lamination: Adds a protective film. Gloss for vibrant colors, matte for reduced glare.
  • Mounting: Provides sturdy backing. Foam board for lightweight use, PVC or aluminum for durability.
  • Varnishes & Coatings: Protects and enhances prints. UV coatings are ideal for sun-exposed areas.
  • Die Cutting: Custom shapes for creative designs like decals or branded cutouts.
  • Specialty Inks & Textures: Metallic or fluorescent inks and textured materials for standout effects.

How to Choose:

  1. Purpose: Indoor or outdoor use? Temporary or permanent?
  2. Durability Needs: Consider UV resistance, scratch protection, and weatherproofing.
  3. Budget & Timeline: Balance cost with production time and project requirements.

For precise, high-quality results, Miro Printing & Graphics Inc. offers in-house finishing services, ensuring every detail is handled efficiently and professionally.

What Are The Different Finishing Options Available For Large Format Prints? – Graphic Design Nerd

Graphic Design Nerd

Main Finishing Options for Large Format Prints

When it comes to large format prints, the finishing touches can make all the difference. These techniques not only protect your prints but also elevate their visual appeal, helping them stand out in any setting.

Laminating

Laminating adds a protective film over your prints, shielding them from moisture, UV rays, and physical damage. It also boosts their longevity and enhances their overall look.

  • Gloss lamination creates a shiny finish that makes colors pop and adds depth to images. It’s a go-to choice for indoor displays, trade show graphics, and retail signage where you want vibrant visuals. Plus, it’s easy to clean – perfect for menu boards in restaurants.
  • Matte lamination offers a sleek, non-reflective finish that reduces glare and gives off a professional vibe. It’s ideal for office wall graphics, educational posters, or any area with bright lighting. Many also appreciate its soft, tactile feel.
  • Specialty films bring even more options. Anti-graffiti laminates protect outdoor signage from vandalism, textured films mimic materials like canvas or linen, and some laminates even feature antimicrobial properties, making them great for healthcare settings or high-touch surfaces.

Lamination is just one option – mounting is another way to enhance durability and presentation.

Mounting

Mounting transforms prints into sturdy, rigid displays that are easy to hang or stand on their own. The right mounting material depends on your needs, budget, and where the print will be used.

  • Foam board is a lightweight, cost-effective choice for indoor displays. It’s great for temporary signage, presentations, or posters that don’t need to endure tough conditions. Foam board is available in various thicknesses, typically ranging from 3/16 inch to 1 inch.
  • Gator board steps up the durability game. With a foam core and wood fiber veneer, it resists warping and denting better than standard foam board. This makes it a favorite for photography exhibits and professional displays that need to travel or last longer.
  • PVC and aluminum composite panels offer unmatched durability and weather resistance. Perfect for outdoor signage and architectural displays, these materials handle harsh conditions with ease. While pricier, they’re built to last for years.

Varnishes and Coatings

Varnishes and coatings provide an additional layer of protection while enhancing the visual appeal of your prints. These liquid finishes form a protective film over the surface, with different types offering unique benefits.

  • Aqueous coatings are water-based and provide basic protection against scuffs and fingerprints. They dry quickly and are an eco-friendly choice for indoor prints like point-of-purchase displays or interactive exhibits.
  • UV coatings cure under ultraviolet light, creating a tougher, more durable finish. Available in gloss, satin, or matte, they’re perfect for high-traffic areas where prints need extra protection against scratches.
  • Spot varnishes let you highlight specific areas of your print, such as logos, headlines, or key images. This technique adds contrast and draws attention to important details, giving your materials a premium, polished look.

Die Cutting and Custom Shapes

Why stick to standard rectangles when you can create custom shapes that align with your brand or vision? Die cutting allows for endless creative possibilities.

  • Contour cutting trims prints to match the outline of your design, making it ideal for vehicle decals, window clings, or floor graphics that need precise shapes.
  • Kiss cutting cuts through the top layer of material while leaving the backing intact, which is great for stickers, labels, or multi-part designs where pieces need to be applied individually.
  • Perforating and scoring add fold lines or tear-away sections without cutting all the way through. These techniques are perfect for interactive displays, coupons, or foldable presentations.

Pairing these custom shapes with specialty inks can take your prints to the next level.

Specialty Inks and Textures

Specialty inks and textured materials can turn ordinary prints into unforgettable visual and tactile experiences.

  • White ink printing allows vibrant colors to stand out on dark or transparent materials, making it a great choice for window graphics, backlit displays, or prints on colored substrates.
  • Metallic and fluorescent inks add shimmer and boldness that standard inks can’t achieve. Metallics bring depth and elegance, while fluorescents grab attention with their glowing effect – perfect for event graphics or retail displays.
  • Textured films and substrates add a physical dimension to your prints. Canvas-like finishes are great for art reproductions, while leather or fabric textures work beautifully for luxury branding. Some substrates even mimic wood, stone, or metal, making them ideal for architectural mockups or high-end product displays.

How to Choose the Right Finishing Option

Picking the right finish for your large format print isn’t just about looks – it’s also about ensuring durability. With so many finishing options out there, narrowing down your choice can feel like a challenge. The trick is to focus on what your project truly needs and break the decision into simple steps.

What to Consider

Start with the purpose of your print. Indoor uses, like office decor or trade show displays, typically need finishes that enhance appearance and offer basic protection. Outdoor prints, however, demand tougher materials – think weather-resistant finishes and UV-protective laminations to keep colors vibrant despite sun and rain exposure.

Temporary banners can stick to simpler finishes, but permanent storefront displays need sturdier options. For areas with heavy foot traffic, scratch-resistant coatings and durable mounting materials are a smart choice to maintain a polished look over time.

Also, double-check that your chosen finish works well with the substrate you’re using. Mismatched finishes can cause issues like warping or discoloration.

Think about where and how the print will be installed. Lightweight finishes make hanging easier, rigid supports work well for freestanding displays, and low-glare finishes are ideal for brightly lit spaces. Balancing these factors ensures your print performs well without breaking the bank.

Budget and Timeline Planning

Once you know what your project needs, factor in your budget and timeline. Cost-effective options like standard lamination or foam board mounting are quick and affordable. But if you’re considering premium finishes – such as specialty coatings, custom die cuts, or high-end mounting materials – expect higher costs and longer production times.

Durability matters, especially for outdoor signage or prints in high-traffic areas. Spending a little more upfront on a durable finish can save you from frequent replacements down the line.

If you’re producing multiple prints, bundling them into one project can help cut costs. Bulk orders spread out preparation expenses, making them more economical overall.

Keep in mind that specialty techniques or materials may require extra lead time. For instance, custom elements or rare materials might need to be ordered in advance. It’s always a good idea to build in a buffer period for unexpected delays, especially if you’re experimenting with a new finishing method.

Lastly, while automated processes can help keep costs and timelines in check, custom or hand-applied finishes often come with higher labor and equipment costs. Plan for these potential extras by adding some wiggle room to both your budget and schedule.

sbb-itb-ce53437

Finishing Techniques Comparison

Choosing the right finishing technique can make or break your project’s success. Each method offers its own advantages and compromises, so understanding how they compare is key to making informed decisions that align with your goals.

Finishing Methods Comparison Table

Finishing Method Protection Level Cost Appearance Turnaround Time Best Use Cases
Laminating (Matte) High UV and scratch protection Low to Medium Reduces glare, professional look 1-2 days Indoor displays, office signage, trade shows
Laminating (Gloss) High UV and scratch protection Low to Medium Vibrant colors, high shine 1-2 days Retail displays, posters, high-impact visuals
Foam Board Mounting Basic protection from bending Low Clean, flat presentation Same day to 1 day Temporary displays, presentations, lightweight signage
Rigid Board Mounting Excellent durability, weatherproof Medium to High Professional, sturdy appearance 2-3 days Outdoor signage, permanent installations, high-traffic areas
UV Coating Superior fade resistance Medium Enhanced color vibrancy 2-4 days Outdoor applications, long-term displays, sun-exposed areas
Aqueous Coating Moderate protection, fingerprint resistance Low to Medium Subtle enhancement, smooth finish 1-2 days Indoor prints, frequently handled materials, brochures
Die Cutting Depends on base material High Custom shapes, unique presentation 3-5 days Custom displays, creative installations, branded cutouts
Specialty Inks (Metallic) Standard protection High Eye-catching, premium look 3-7 days Luxury brands, special events, high-end retail
Textured Finishes Variable based on texture type Medium to High Unique tactile experience 2-5 days Art reproductions, premium displays, sensory marketing

This table serves as a handy guide to match your project’s needs with the most suitable finishing method. For budget-conscious projects, options like matte or gloss lamination and foam board mounting are both reliable and quick, making them great for indoor applications.

If you’re looking for a balance between durability and visual appeal, mid-range finishes like rigid board mounting or UV coatings are excellent choices. These methods offer added protection and a polished look without breaking the bank.

For projects where making a bold statement is essential, premium finishes such as metallic specialty inks or custom die cutting are worth the higher cost and longer production time. These techniques are perfect for luxury branding or when visual impact is a top priority.

Turnaround times vary based on the complexity of the finish. Simpler methods are faster, while more intricate or customized finishes take longer. This is especially important to consider when you’re working with tight deadlines or juggling multiple project elements.

Finally, think about the environment where your prints will be displayed. Opt for protection levels that meet your needs without overcomplicating or overspending. This comparison framework simplifies the decision-making process, helping you achieve durable and striking results tailored to your specific project.

Large Format Finishing Services at Miro Printing & Graphics Inc.

At Miro Printing & Graphics Inc., large format finishing is more than just a process – it’s a commitment to delivering top-notch quality. With a focus on precision and attention to detail, their in-house services ensure every project is completed to perfection.

In-House Finishing Services

Located in Hackensack, NJ, Miro Printing & Graphics Inc. operates a fully equipped in-house bindery. This setup gives them complete control over both the quality and turnaround times for large format finishing. Your prints stay on-site from start to finish, ensuring consistent results every step of the way.

Their bindery services cover a wide range of finishing techniques:

  • Die Cutting: Perfect for creating custom shapes that add a unique touch to your displays. Whether it’s signage cutouts, branded display elements, or intricate installation pieces, their precision equipment handles the job with ease.
  • Cutting and Creasing: Ensures clean edges and flawless folds for banners, multi-panel displays, and signage. This prevents cracking and guarantees a polished, professional look.
  • Drilling: Ideal for creating precise openings for hardware or mounting systems. This eliminates the need for post-print modifications, saving time and effort.
  • Micro-Perforation: Adds functionality with tear-away sections for coupons, contact details, or interactive elements – perfect for trade shows, promotional materials, or educational displays.
  • Specialized Binding: Options like comb binding and plastic coil binding are available for oversized materials such as architectural drawings, engineering plans, or catalogs. These methods combine durability with ease of use, making them ideal for presentation books or portfolios.

Custom Project Support

For projects that require a little extra, Miro Printing & Graphics Inc. goes beyond standard finishing services to provide tailored solutions. By combining their expertise in specialty coatings and die cutting, they craft custom finishing techniques to meet specific needs for display and durability.

Their team works closely with clients to understand project goals and recommend the best finishing options. This hands-on approach ensures every detail is addressed, delivering results that are both durable and visually striking. By integrating design and layout services, potential issues can be identified and resolved before printing begins, saving time and avoiding costly reprints.

To simplify logistics, Miro also offers mailing and fulfillment services. Whether you need large format prints delivered to multiple locations or incorporated into a marketing campaign, they handle everything from start to finish. This streamlined process eliminates the hassle of coordinating with multiple vendors and ensures consistent quality throughout.

Direct communication with the production team further enhances the experience. When adjustments or questions arise, you’ll work directly with the experts managing your project, ensuring every detail is just right.

Clients frequently praise this personalized approach. As one customer shared:

"Work quality is terrific, the staff is warm and helpful, I highly recommend them for any of your printing needs!"
– Julieth R.

Another client highlighted their reliability:

"Mike and his team at Miro have delivered stars, comet, and galaxy size projects for Lycored. No matter how little or large, no matter what the deadline, I sleep at night knowing Miro is on it. Truly, a gem printer shop and more in New Jersey."
– LycoRed T.

This dedication to quality and customization is what sets Miro apart. Whether you need standard finishing or a unique solution, their team is ready to bring your vision to life with precision and care. From start to finish, they ensure your large format prints stand out in the best way possible.

Conclusion

Choosing the right finish for large format prints is essential to ensure durability, visual appeal, and overall performance. As outlined earlier, factors like the environment play a key role in this decision. For indoor use, matte finishes are perfect for eliminating glare, while gloss finishes work best outdoors, enhancing color vibrancy when placed thoughtfully to reduce reflections. If longevity is a priority, UV laminate is an excellent option, helping most prints maintain their color for over 10 years without fading.

The right finishing also adds practical benefits, such as anti-slip properties, better readability, and greater resistance to wear – protecting your investment over time. Whether you’re aiming for a sleek, frameless look with reverse vinyl mounted on clear acrylic or prefer the classic touch of traditional framing with glass or PETG covers, the right choice ensures your print stands the test of time.

Working with Miro Printing & Graphics Inc. simplifies this entire process. Their in-house bindery services and direct collaboration with production teams mean every detail is handled seamlessly. From specialized die cutting to mailing and fulfillment, they manage everything under one roof, eliminating the hassle of coordinating with multiple vendors.

FAQs

What’s the best way to choose a lamination option for my large format print project?

When deciding on the best lamination for your large format print project, a few key considerations come into play. Start with the finish. If you’re aiming for a glare-free, understated look, go with matte. For bold, vibrant colors that pop, gloss is the way to go. And if you’re looking for a middle ground, satin provides a nice balance between subdued and shiny.

Next, think about durability. Thicker laminates – like those 5 mil or more – offer stronger protection, making them ideal for prints that need extra safeguarding. On the other hand, thinner laminates (around 3 mil) are easier to handle, especially if folding or flexibility is important.

Lastly, don’t overlook environmental conditions. If your print will face heat or moisture, choose a laminate designed to handle those challenges. For materials sensitive to heat, cold lamination is a safer bet. But if your prints are more robust, hot lamination can deliver excellent results. By weighing these factors, you’ll land on the lamination that perfectly suits your project.

What should I consider when selecting mounting materials for outdoor signs?

When selecting materials for mounting outdoor signs, it’s crucial to prioritize durability and resistance to environmental challenges like weather, corrosion, and physical wear. Materials such as stainless steel, aluminum, and reinforced plastics are excellent choices because they hold up well against rain, wind, and UV exposure.

Equally important is choosing a mounting method that works seamlessly with the surface where the sign will be installed. Opt for weather-resistant fasteners, sturdy brackets, and secure anchoring to prevent the sign from loosening or sustaining damage over time. By focusing on these details, you can ensure your outdoor signage stays firmly in place and stands the test of time.

How do specialty inks and textures make large format prints more impactful?

Specialty inks and textures can take your large format prints to the next level by adding colorful brilliance, dimension, and a tactile edge that ensures they grab attention. For instance, metallic and pearlescent inks reflect light beautifully, producing striking, attention-grabbing effects. Meanwhile, textured finishes add a layer of elegance and a premium feel. These details not only make your prints visually appealing but also draw people in, whether they’re viewing from afar or examining up close.

From indoor displays to outdoor signage, these design elements can make your prints more memorable and engaging, leaving a lasting impression on your audience.

Related posts

https://app.seobotai.com/banner/banner.js?id=689d1cb08204a37d5f9918c9

3D Printing Trends in Commercial Printing

Explore how 3D printing is revolutionizing the commercial printing industry by enhancing customization, reducing waste, and creating new business opportunities.

3D printing is transforming the commercial printing industry. Instead of competing with offset and digital printing, it complements them, creating new opportunities for businesses. Over the past three years, its adoption has surged, enabling print shops to handle custom projects, prototypes, and dimensional objects with ease. This shift is reshaping how businesses approach packaging, marketing materials, and production workflows.

Key Takeaways:

  • 3D Printing Integration: Print shops are combining 3D printing with offset and digital methods to offer hybrid solutions like custom packaging and tactile marketing materials.
  • Benefits: Reduced waste, faster prototyping, and increased flexibility for small runs.
  • Challenges: Material compatibility, slower production speeds, and the need for cross-trained staff.
  • Future Trends: Automation, multi-material systems, and AI-driven quality control are making 3D printing more accessible and efficient.

Why it matters: Businesses that integrate 3D printing can offer more customized, high-value services, improving client retention and expanding their market reach.

How 3D Printing is Changing Businesses: From Our HQ to Real-World Applications

The commercial printing industry is undergoing three key transformations that are redefining how print shops operate and deliver value to their customers. These shifts go beyond mere technological updates – they are creating fresh business opportunities and altering traditional workflows.

3D Printing Becomes Standard Equipment

In the United States, 3D printers have become indispensable tools for commercial printing businesses, much like digital printing once transitioned from a niche option to a standard practice. These machines fill service gaps by enabling the production of prototypes, custom fixtures, and dimensional marketing materials – things traditional printing methods can’t achieve.

Many print shops start small, using desktop 3D printers to produce prototypes and gauge market interest. As demand grows, they often invest in industrial-grade 3D printers, scaling their capabilities without risking significant upfront costs.

New software solutions are also bridging the gap between 3D and traditional printing systems, streamlining job management and reducing the learning curve for operators. This integration is paving the way for a seamless blend of 3D printing with more conventional methods.

Combined Printing Technologies

The combination of 3D printing with offset or digital printing is unlocking new possibilities for hybrid products that neither technology could produce alone. For instance, custom packaging can feature printed graphics alongside 3D-printed structural elements, while promotional materials can combine vivid visuals with tactile, raised details that stand out.

Advancements in software and standardized file formats have largely resolved the technical hurdles of merging these technologies. Print shops can now switch seamlessly between production methods within a single project, ensuring each component is crafted using the most effective technique.

Quality control processes have also evolved to address mixed media workflows, with checks for color consistency, fit, and durability. Beyond product innovation, these combined methods are offering notable advantages in reducing environmental impact.

Environmental Benefits

3D printing’s additive nature significantly reduces material waste, unlike traditional subtractive manufacturing methods. Its on-demand production model eliminates the need for excessive inventory, while the use of biodegradable and recycled materials further lowers its environmental footprint. Additionally, energy-efficient machines and localized production for smaller print runs help cut carbon emissions, making 3D printing a greener choice for commercial printing businesses.

How 3D Printing Works with Existing Printing Methods

Blending 3D printing with commercial printing processes enhances traditional offset and digital workflows without replacing them. This combination allows businesses to take on projects that might otherwise be too complex or expensive using conventional methods alone. The integration focuses on two key areas: improving traditional prints and addressing challenges in hybrid workflows.

Supporting Offset and Digital Printing

3D printing takes flat printed materials to the next level by adding depth and dimension. While traditional offset printing delivers sharp graphics and text on materials like paper and cardboard, 3D printing introduces structural elements, textures, and functional components that elevate the final product.

Take custom packaging, for example. A cosmetics company might use offset printing to create vibrant labels and eye-catching packaging designs, then incorporate 3D-printed elements – like custom-shaped caps or textured surfaces – to enhance both functionality and shelf appeal.

Marketing materials also benefit from this synergy. Trade show displays can pair digitally printed visuals with 3D-printed structural components, making them easier to assemble and transport. Prototyping is another area where the integration shines. Designers can now combine printed graphics with 3D elements, allowing clients to visualize and test designs before committing to full-scale production.

Workflow Problems and Solutions

Despite its advantages, combining these methods introduces some unique challenges. One major issue is material compatibility. Adhesives, inks, and substrates designed for conventional printing don’t always work well with 3D-printed materials. To address this, many print shops have implemented standardized material testing. These tests help determine the best combinations of inks, adhesives, and 3D printing filaments, ensuring smoother project setups and consistent results.

Another challenge is coordinating equipment. Offset presses can churn out thousands of pieces per hour, but 3D printers often take hours to produce even a small batch. Initially, this timing mismatch caused delays and scheduling headaches. To solve this, production schedules have been restructured so that 3D printing runs simultaneously with traditional printing. Digital inventory systems now synchronize the production of printed and 3D components for seamless assembly. In some cases, shops have added multiple smaller 3D printers to distribute workloads and minimize delays.

Quality control has also evolved to meet the demands of hybrid products. Traditional quality checks focus on aspects like color accuracy and print defects, but 3D printing requires additional checks for dimensional accuracy, surface finish, and mechanical strength. Many shops have set up hybrid quality control stations equipped with tools for both color measurement and precision testing.

Training staff has been another critical step. Cross-training programs now teach operators the ins and outs of both traditional and 3D printing processes. This helps teams identify potential issues early and make informed decisions about production timelines and sequencing. Investing in training ensures high-quality results while meeting tight deadlines.

File management systems have adapted to handle the complexities of hybrid projects. Modern workflow software now integrates 2D designs with 3D models, automatically generating production schedules that maximize equipment efficiency. These systems also track material use across both printing methods, improving cost estimates and inventory management.

Real Applications and Business Impact

3D printing has become a game-changer for commercial printing operations, not just as a technical innovation but as a proven way to boost revenue. Local print service providers, like Miro Printing & Graphics Inc., are increasingly adopting this technology to streamline processes and offer creative solutions.

Custom Packaging Solutions

One of the standout uses of 3D printing is in packaging. This technology has made it easier – and faster – for brands to create prototypes, helping them test packaging ideas before investing in expensive tooling or committing to large-scale production.

For example, cosmetics companies are using 3D printing to add unique textures, custom-shaped closures, and intricate details to their packaging. These features not only enhance the sensory appeal of their products but also allow for cost-effective production of limited editions or seasonal campaigns.

The speed of prototyping is another major advantage. What used to take weeks can now be done in days, enabling designers to present physical prototypes during meetings. This accelerates the approval process and reduces the number of revisions needed.

Beyond aesthetics, 3D printing supports structural innovations in packaging. It allows for the creation of custom inserts, complex internal supports, and protective elements tailored to the exact dimensions of a product. This is especially useful for industries like electronics, where durable and precise packaging is critical. These solutions not only protect the product but also help reduce material waste.

Marketing and Promotional Items

When it comes to marketing, 3D printing opens up exciting possibilities. Dimensional promotional items – like custom giveaways at trade shows – grab attention without requiring high minimum orders. This flexibility allows businesses to create more targeted campaigns that resonate with specific audiences.

Interactive marketing pieces are another area where 3D printing shines. Business cards with 3D elements, dimensional direct mail pieces, and tactile product samples stand out from the crowd and often spark conversations. These unique pieces can generate buzz on social media and through word-of-mouth, giving brands an edge in competitive markets.

In B2B environments, 3D-printed models and product demonstrations make complex ideas easier to grasp. For instance, architectural firms and product designers are using 3D-printed prototypes to deliver presentations that leave a lasting impression.

But 3D printing isn’t just about wowing customers – it also has practical benefits behind the scenes.

Production Support Tools

On the production floor, 3D printing is transforming workflows by enabling the creation of custom tools. Whether it’s jigs, fixtures, cutting guides, or folding tools, these personalized solutions improve precision, reduce waste, and save time on repetitive tasks.

It’s also a game-changer for equipment maintenance. Instead of waiting for replacement parts or paying for costly service calls, print shops can produce custom components, protective covers, or operational aids in-house. This reduces downtime and cuts maintenance costs, helping businesses get more life out of their existing machinery.

Material handling is another area where 3D printing proves its worth. Custom trays, sorting devices, and transport fixtures simplify processes and reduce the risk of damage during handling. While these might seem like small improvements, they add up to significant gains in overall productivity.

sbb-itb-ce53437

3D Printing vs. Standard Printing Methods

Choosing between 3D printing and traditional methods like offset or digital printing requires a closer look at how they differ. Each has its strengths, depending on the needs of a project.

The biggest difference lies in cost and setup. Traditional offset printing involves a hefty upfront investment, with time-consuming processes like creating plates and setting up machines before production even begins. However, once set up, it can churn out thousands of units per hour efficiently. On the other hand, 3D printing skips the extensive setup, making it more accessible for smaller runs, but the per-unit cost tends to be higher.

Speed is another key factor. 3D printing shines in rapid prototyping, while traditional printing dominates when it comes to high-volume production. That said, advancements in 3D printing are closing the gap. For example, the SUP3R system recently demonstrated the ability to print 12 samples in just 15 minutes – cutting production time in half compared to conventional setups.

For larger orders, traditional offset printing becomes more economical once production surpasses 500 units. This makes it the go-to choice for large-scale commercial jobs.

Side-by-Side Comparison

Factor 3D Printing Traditional Methods (Offset/Digital)
Setup Time Quick (minutes to hours) Longer (days to weeks for tooling)
Per-Unit Cost Higher, relatively steady across volumes Decreases significantly with larger orders
Customization Highly flexible designs Limited by fixed tooling requirements
Production Speed Best for small runs; slower for mass production Extremely fast for large volumes
Material Options Limited but expanding Wide variety of substrates, including specialty materials
Quality Consistency Can vary based on machine settings Very consistent once calibrated
Minimum Order Cost-effective for single units or small batches Economical only at higher volumes
Design Changes Instant updates without retooling Requires new setup, adding time and cost

This comparison highlights how 3D printing is ideal for custom, small-scale projects, while traditional methods excel in large-scale, standardized production.

Material variety is another area where traditional printing has the edge. It offers a broad selection, from different paper weights to specialty materials like foils and plastics. While 3D printing materials are expanding quickly, they still lag in some specialized applications.

A hybrid approach is becoming more common as businesses realize they don’t have to stick with just one method. For example, 3D printing might be used for intricate custom components, while traditional printing handles the high-volume, standardized parts. This blend allows companies to leverage the strengths of both technologies.

Automation also plays a role. Traditional printing has long benefited from mature systems, while 3D printing is catching up with AI-driven optimizations and 24/7 operation through printing farms. These advancements are helping to reduce the speed gap, though traditional methods still lead in large-scale efficiency.

Ultimately, the choice depends on the project. 3D printing is perfect for prototypes, custom packaging inserts, and promotional items with intricate details in small runs. Traditional methods remain unbeatable for high-volume jobs, standard packaging, and projects requiring specific materials or finishes.

The landscape is evolving, though. New technologies like Carbon’s DLS, HP’s Multi Jet Fusion, and Desktop Metal’s Production System are reshaping large-scale 3D printing. These innovations may soon bring the best of both worlds, blending the flexibility of 3D printing with the efficiency of traditional methods.

What’s Next for 3D Printing in Commercial Printing

The commercial printing industry is on the brink of transformation as 3D printing technology becomes more advanced. Efforts in research and development are now centered on merging 3D printing with traditional printing methods. Investments in automation and new materials are driving this change, with the goal of making 3D printing a standard option alongside conventional techniques. This shift is fueled by improvements in technology and the growing demand for faster, more customizable production options.

Automation and Digital Workflows

Automation is playing a huge role in shaping the future of commercial printing. Smart workflow systems now automatically assign tasks to 3D printers, digital presses, or offset equipment based on the job’s complexity, size, and deadlines. This ensures efficiency and better resource allocation.

Unmanned, 24/7 operations are becoming a reality. Automated material handling systems allow printing facilities to run continuously, which is especially crucial for time-sensitive projects where traditional setups might cause delays.

AI-powered quality control is another game-changer. These systems monitor both 3D printing and conventional processes in real time, predicting potential issues and making adjustments to maintain consistent quality while reducing waste.

Digital file preparation has also evolved. Modern software can now analyze incoming jobs and suggest the best combination of printing methods. For instance, a packaging project might use offset printing for the base design while relying on 3D printing for custom inserts.

Real-time inventory management systems are streamlining operations further by tracking material usage across different printing technologies. This helps optimize ordering and reduces downtime, which is especially important for 3D printing materials that often have unique storage needs compared to traditional substrates.

Together, these advancements in automation and workflows are laying the groundwork for exciting developments in materials and processes.

New Materials and Process Development

The range of materials compatible with 3D printing is expanding rapidly. Multi-material printing systems are making it possible to work with materials commonly used in commercial printing, like specialty papers and flexible substrates. This allows for seamless integration of 3D printed elements with traditional printed components.

Conductive inks and smart materials are unlocking new possibilities, such as creating interactive packaging and promotional items that go far beyond what standard printing can achieve.

There’s also a push toward more sustainable options. Biodegradable and recycled materials are being developed to match the durability and appearance of traditional materials while offering the design flexibility that 3D printing provides. This is becoming increasingly important as environmental concerns grow.

Efforts to improve speed and efficiency are ongoing. Emerging technologies aim to rival or even surpass the production speeds of traditional printing, particularly for short-run jobs where setup times have historically given conventional methods an edge.

Meanwhile, cost reductions in both materials and equipment are making 3D printing more accessible for commercial applications. Lower costs are helping to expand its use in areas where it was previously considered too expensive.

Another exciting innovation is the development of hybrid printing heads. These systems can switch between different material types in a single job, streamlining processes that combine traditional and 3D printed elements.

Lastly, scalability improvements are addressing one of the biggest hurdles for 3D printing. New systems designed specifically for commercial use can handle larger volumes without losing the customization benefits that make 3D printing so appealing. These solutions are being integrated directly into existing workflows, making them more practical for everyday use.

Companies like Miro Printing & Graphics Inc. in Hackensack, NJ are well-positioned to take advantage of these advancements. By embracing automation and new materials, they can meet changing market demands and provide more tailored printing solutions. These innovations are solidifying 3D printing as a key component of the commercial printing industry.

Conclusion

The commercial printing industry stands at a transformative moment as 3D printing evolves from being a niche technology to a crucial addition to traditional methods. Studies highlight that 3D printing shines brightest when paired with offset and digital printing techniques. This combination offers businesses a chance to cater to the rising demand for personalized, on-demand products while tapping into specialized market segments.

To stay competitive in this shifting landscape, companies must rethink their strategies. By doing so, they can seize new market opportunities while mitigating risks tied to these industry changes.

As highlighted throughout, 3D printing is no longer optional – it’s a key player in the commercial printing toolkit. Blending traditional and 3D printing methods fosters both innovation and efficiency. Companies like Miro Printing & Graphics Inc. showcase how this integrated approach can position businesses for long-term success in an increasingly competitive market.

FAQs

How does 3D printing enhance traditional printing methods in commercial use?

3D printing takes traditional printing methods to the next level by making it possible to create detailed molds, prototypes, and casting patterns. These additions not only streamline manufacturing processes but also allow for greater flexibility in design. It’s particularly useful for producing intricate, high-quality components that would otherwise be challenging or expensive to make using conventional methods.

This technology has unlocked new opportunities for businesses like Miro Printing & Graphics Inc. By blending the accuracy of traditional printing with the capabilities of 3D printing, they can now offer a broader range of services. Whether it’s custom-designed projects or advanced manufacturing solutions, this combination helps them cater to a wide variety of client demands.

What challenges do print shops face when incorporating 3D printing into their current workflows?

Integrating 3D printing into existing workflows isn’t always straightforward for print shops. One of the main hurdles is technical compatibility. Combining traditional methods with advanced 3D printing often demands specialized software and equipment, which can complicate the process.

Another challenge lies in maintaining consistent quality. Achieving uniform results becomes tricky, particularly when working with intricate or highly detailed designs that push the limits of the technology.

On top of that, material limitations and restrictions on print sizes can pose obstacles for certain projects. These constraints require print shops to carefully adjust and refine their workflows to ensure everything runs smoothly and efficiently while meeting client needs.

How does 3D printing promote sustainability in the commercial printing industry?

3D printing is transforming the commercial printing industry by drastically cutting down on material waste – by as much as 90% compared to conventional methods. Even better, it enables the use of recyclable and environmentally friendly materials, contributing to a circular economy where resources are reused rather than discarded.

This technology also simplifies production processes, which means less energy is consumed and fewer emissions are generated. By reducing the reliance on heavy machining and long-distance transportation, 3D printing helps shrink the overall carbon footprint, making it a more environmentally conscious option for modern manufacturing.

Related posts

https://app.seobotai.com/banner/banner.js?id=689d138d8204a37d5f991083

Heat-Activated vs. Cold Laminations

Explore the differences between heat-activated and cold lamination to find the best method for your project needs.

When choosing between heat-activated and cold lamination, the decision boils down to your project’s needs:

  • Heat-Activated Lamination: Uses heat to bond film, offering a strong, durable, and glossy finish. Best for high-volume jobs and materials that can withstand heat, like posters, business cards, or manuals.
  • Cold Lamination: Relies on pressure-sensitive adhesives, making it ideal for heat-sensitive items like photos or thermal paper. It’s quicker to start, safer, and better for smaller or delicate projects.

Key Differences:

  • Heat Lamination: Stronger bond, lower film cost, glossy finish, but requires warm-up time and isn’t suitable for heat-sensitive materials.
  • Cold Lamination: Safer for delicate items, no warm-up needed, but has higher film costs and a weaker bond.

Quick Comparison:

Feature Heat-Activated Lamination Cold Lamination
Process Heat and pressure Pressure only
Setup Time Requires warm-up Instant
Bond Strength Strong and durable Weaker
Finish Glossy and clear Matte or textured
Material Suitability Not for heat-sensitive items Perfect for delicate items
Cost Higher upfront equipment cost Higher film cost

Choose heat lamination for durability and large-scale projects, while cold lamination works best for quick, delicate, or heat-sensitive tasks.

Cold Vs Hot Lamination Machine: Which Is More Effective?

Heat-Activated Lamination

Heat-activated lamination relies on heat and pressure to activate adhesives, offering clear and durable protection. It’s a great choice for materials that face frequent handling or need to last a long time. Below, we’ll break down how this process works, its best applications, and its advantages and drawbacks.

How Heat-Activated Lamination Works

This method uses thermal laminators equipped with heated rollers or shoes to apply both heat and pressure. The laminating film typically consists of a polyester base coated with an adhesive resin layer. As the material passes through the laminator, temperatures between 210°F and 240°F melt the adhesive, allowing it to bond firmly to the document. The polyester layer then acts as a protective shield.

For best results, make sure the laminator is fully heated before starting. Always load the film with the adhesive side facing away from the rollers to avoid damaging the equipment.

There are two main types of laminating films used with hot laminators: standard films for general purposes and low-melt films designed for materials that require lower processing temperatures.

Best Uses for Heat-Activated Lamination

This type of lamination is ideal for high-volume projects that demand durability. It works well with paper and cardstock that can withstand high temperatures. Common uses include:

  • Business materials: Training manuals, reference guides, posters, and signage.
  • Publications: Magazine covers, inside pages, and advertising inserts, offering protection against tearing, creasing, and moisture while enhancing color vibrancy .
  • Commercial and educational items: Menu covers, ID badges, reference charts, and other frequently handled documents.

Heat-Activated Lamination Pros and Cons

Heat-activated lamination has several advantages, particularly for professional settings.

Benefits:

  • Provides a strong, permanent bond and excellent protection.
  • Enhances image clarity and offers various finish options, including glossy, matte, satin, and soft-touch surfaces.
  • More cost-effective for large-scale projects compared to cold lamination.
  • Versatile enough to handle different material types and thicknesses, from thin sheets to heavier cardstock.

"Hot laminators are exceptional machines for laminating pressure-sensitive materials with a crystal-clear finish." – Martin Yale Machines

Drawbacks:

  • High temperatures can damage materials like photo prints, water-based inks, or archival documents.
  • Requires a warm-up period, which can slow down the process when quick turnaround is needed. Cold lamination might be a better fit in such scenarios.
  • The initial cost of thermal laminators is higher, though lower film costs can balance this over time.
  • A steady power supply is necessary, making it less portable compared to cold lamination.

While heat-activated lamination excels in durability and clarity, it isn’t suitable for all materials or situations. Up next, we’ll dive into cold lamination to see how it compares.

Cold Lamination

Cold lamination takes a gentler route to protecting documents by using pressure instead of heat to create a protective layer. Unlike heat lamination, this method is ideal for delicate materials or when you need quick results. Let’s break down how it works and where it shines.

How Cold Lamination Works

This process uses a pressure-sensitive adhesive to bond a clear protective film to your document – no heat involved. The film, typically made of transparent PVC with an adhesive coating, is protected by a release liner until you’re ready to use it. When the material passes through a cold laminator, pressure activates the adhesive, securing the film to the surface instantly.

For smaller tasks, it can be done manually, but larger projects often require a laminating machine. To get the best outcome, make sure the document surface is clean and apply even pressure to avoid bubbles or wrinkles.

Best Uses for Cold Lamination

Cold lamination is perfect for materials that could be damaged by heat, such as photographs, thermal paper receipts, or delicate artwork. It’s also great for projects where speed is key, as there’s no waiting for equipment to heat up.

Here are some common applications:

  • Protecting important documents like certificates and reference materials.
  • Preserving photographs and fine prints.
  • Laminating business items like menus, price lists, and promotional materials.
  • Creating durable signage and labels for both indoor and outdoor use.
  • Enhancing classroom posters and instructional charts for educational purposes.

This method is especially handy for quick, on-the-spot projects that need to be completed without delay.

Cold Lamination Pros and Cons

Cold lamination has its advantages, particularly for specific applications, but it’s not without its challenges.

Benefits:

  • Safe for delicate materials: Since no heat is used, sensitive items like photos, thermal receipts, and artwork remain unharmed.
  • Immediate results: No warm-up time means you can start laminating right away, and the finished product is ready to handle immediately.
  • Cost-effective equipment: Cold laminators tend to be more affordable than heated ones, making them a great option for small businesses or schools.
  • User-friendly: The simple process requires minimal setup and eliminates risks like burns or overheating.
  • Portable: Many cold laminators don’t need electricity, making them a convenient choice for fieldwork or areas without reliable power.
  • Cutting flexibility: You can cut through laminated materials while keeping the edges sealed.

Drawbacks:

  • Higher material costs: Cold lamination films are generally pricier than thermal options, which can add up for larger projects.
  • Less durable bond: The adhesive bond may not be as strong or long-lasting as heat lamination, especially for items that are frequently handled.
  • Finish limitations: The finish is usually matte or slightly textured, lacking the glossy clarity that heat lamination can achieve.
  • Thickness challenges: It doesn’t work as well with very thick or uneven materials.
  • Adhesive challenges: A strong adhesive improves bonding but makes repositioning difficult if errors occur during application.

Choosing between cold and heat lamination depends on the material and the project’s needs. Cold lamination is the go-to for sensitive items and quick turnaround times, while heat lamination often provides a more durable finish for heavily used items. Up next, we’ll dive into a direct comparison of these two methods.

sbb-itb-ce53437

Heat-Activated vs. Cold Lamination Comparison

Here’s a side-by-side look at how heat-activated and cold lamination stack up against each other.

Comparison Table

Feature Heat-Activated Lamination Cold Lamination
Process Uses heat to melt adhesive and bond film to material Relies on pressure-sensitive adhesive without heat
Equipment Cost Roll laminators start around $1,200, with commercial models exceeding $20,000 Generally more affordable equipment
Film Cost Lower-cost films Higher-cost films
Setup Time Requires a warm-up period Ready to use immediately
Speed Faster processing, ideal for high-volume jobs Slower processing
Bond Strength Strong and durable bond Weaker bond overall
Finish Quality Glossy and clear finish Matte or slightly textured finish
Material Compatibility Unsuitable for heat-sensitive materials Perfect for heat-sensitive items like photos and inkjet prints
Safety Requires electricity, with potential burn risks No electricity needed, safer to operate
Best Applications High-volume printing and durable documents Outdoor signage, delicate materials, and quick projects

Key Factors to Consider

The table highlights the major differences, but let’s break down a few key points to help you decide which method works best for your needs.

Material Sensitivity
If you’re laminating heat-sensitive items like photographs or inkjet prints, cold lamination is the safer choice as it avoids potential damage from heat. However, if your materials can handle heat, either method could work.

Project Volume
For large-scale operations, heat lamination usually makes more sense. It’s faster and uses lower-cost films, making it more cost-effective for high-volume jobs. On the other hand, if you’re handling smaller batches or occasional projects, cold lamination’s lower equipment costs and instant setup might be a better fit.

Durability Needs
If you’re working on items that will face frequent handling, heat lamination’s stronger bond is a better option. Cold lamination is more suited for temporary or lightly used items.

Time Constraints
Cold lamination is ready to go right away since it doesn’t require any warm-up time. While heat lamination takes longer to get started, it processes faster once warmed up, which can be a big advantage in busy settings.

Finish Preferences
Heat lamination produces a glossy, polished look that’s great for professional documents. Cold lamination, on the other hand, offers a matte finish that works well for certain design styles but may not deliver the same level of shine.

Outdoor Use
For outdoor projects like banners or vehicle wraps, cold lamination is the better choice. It works well with vinyl-based media and holds up in exterior conditions.

Ultimately, the best method depends on your specific needs – whether it’s the type of material, the volume of work, or the desired finish. Use these insights to guide your decision.

Choosing the Right Lamination Method

Selecting the right lamination method depends on the specific needs of your project. To make the best choice, it’s important to weigh several key factors.

Decision-Making Factors

  • Material Sensitivity: For delicate items like photographs, thermal paper, or inkjet prints, cold lamination is a safer option since it avoids heat damage. If your materials can handle heat, either method could work.
  • Durability Needs: Heat lamination forms a stronger bond, making it ideal for items that will be handled frequently. Cold lamination, on the other hand, provides a lighter bond, better suited for display items or materials with minimal handling.
  • Finish Preferences: Heat lamination produces a sleek, high-gloss finish, while cold lamination often results in a matte surface that minimizes glare – perfect for outdoor signage or items viewed under bright lighting.
  • Project Size and Budget: For large-scale projects, heat lamination is more efficient once the machine is warmed up and can be cost-effective for regular use. Cold lamination is better for occasional, smaller-scale projects due to its lower upfront costs.
  • Safety Considerations: Cold lamination eliminates the risk of burns, making it a safer option. If you opt for heat lamination, proper safety training and precautions are essential.
  • Equipment Maintenance: Cold laminators are easier to maintain and require less upkeep. Heat laminators, while effective, may involve higher maintenance costs and more frequent servicing.

By carefully evaluating these factors, you can make an informed decision that aligns with your project’s needs.

How Miro Printing & Graphics Inc. Can Help

At Miro Printing & Graphics Inc., we understand that choosing the right lamination method is about more than just technical specifications – it’s about achieving the perfect balance of quality, budget, and timing.

Our team has extensive experience with both heat-activated and cold lamination techniques. Whether you’re looking for durable materials for high-traffic use, weather-resistant outdoor signage, or gentle handling for delicate photographs, we’ll help you find the best solution.

We use top-tier equipment for both methods to ensure precise results that meet your exact specifications. This attention to detail is especially important for branding materials, where the finish and color accuracy can directly influence your company’s image. Plus, we offer a variety of custom finishes and specialty effects to meet your unique needs. Let us help you bring your vision to life with the perfect lamination method.

Conclusion

To wrap things up, the choice between heat-activated and cold lamination boils down to your material’s needs and the project’s demands. Heat-activated lamination relies on a heat-melting adhesive, creating a strong and durable bond. This makes it perfect for items that will endure frequent handling or exposure to tough conditions. On the other hand, cold lamination uses a pressure-activated adhesive, making it the go-to option for heat-sensitive materials or when you need quick processing.

"The primary difference between hot vs. cold lamination depends on how the plastic is applied to the document by the laminating machine." – Martin Yale Machines

For delicate items like photographs, thermal paper, or certain inkjet prints, cold lamination is the safer choice. Meanwhile, heat lamination is better suited for sturdier materials, offering a high-gloss finish that stands out, while cold lamination provides a matte look that reduces glare in bright settings.

Cost considerations also play a role. Cold lamination is more affordable upfront and requires minimal maintenance, making it ideal for smaller projects. Heat lamination, despite its higher initial costs and longer setup time, becomes more economical for larger volumes.

With lamination used in 80% of premium packaging worldwide, choosing the right method can directly influence the quality and longevity of your project. Factors like technical requirements, environmental conditions, and the intended purpose of the laminated material will help you decide which approach aligns best with your goals.

FAQs

What should I consider when choosing between heat-activated and cold lamination for my project?

When weighing the choice between heat-activated and cold lamination, here are some important points to keep in mind:

  • Material sensitivity: Heat-activated lamination involves high temperatures, making it a solid choice for sturdy materials. However, if you’re working with heat-sensitive items like photographs, vinyl, or certain types of ink, cold lamination is the safer option.
  • Project size and durability: Heat lamination excels in handling large-scale projects, delivering a polished and long-lasting finish. Cold lamination, meanwhile, offers more flexibility and works well for smaller tasks or delicate materials.
  • Ease of use: Cold lamination stands out for its simplicity and safety. Since it doesn’t require heating equipment, it’s a convenient choice for quick or DIY projects.

By considering the specific needs of your project, such as material type and desired finish, you can choose the method that delivers the best outcome.

What are the cost differences between heat-activated and cold lamination, and how do they affect long-term budgets?

The cost differences between heat-activated and cold lamination boil down to the equipment and materials involved. Cold laminators are typically less expensive upfront since they don’t include heating components. However, the films they use are often more expensive. On the other hand, heat-activated laminators come with a higher initial price tag due to their more advanced machinery, but their materials – like thermal pouches and films – tend to be cheaper.

When considering long-term expenses, it really depends on how you plan to use the laminator. Cold lamination may lead to higher material costs over time but offers lower equipment costs, making it a practical choice for occasional use or small-scale projects. In contrast, heat-activated laminators are better suited for high-volume tasks. Their lower material costs and quicker processing speeds can translate into noticeable savings over time.

When should I choose cold lamination instead of heat-activated lamination?

Cold lamination works perfectly for heat-sensitive materials like photographs, inkjet prints, or stickers. Since it doesn’t use heat, you avoid problems like warping, melting, or fading colors, making it a safer option for delicate items.

It’s also a time-saver, especially if you’re on a tight schedule. Unlike heat lamination, there’s no need to wait for the machine to warm up. This means you can get your project done faster without risking damage to your materials – ideal for quick, small-scale tasks.

Related posts

https://app.seobotai.com/banner/banner.js?id=688992490e97e74a2fac42b6