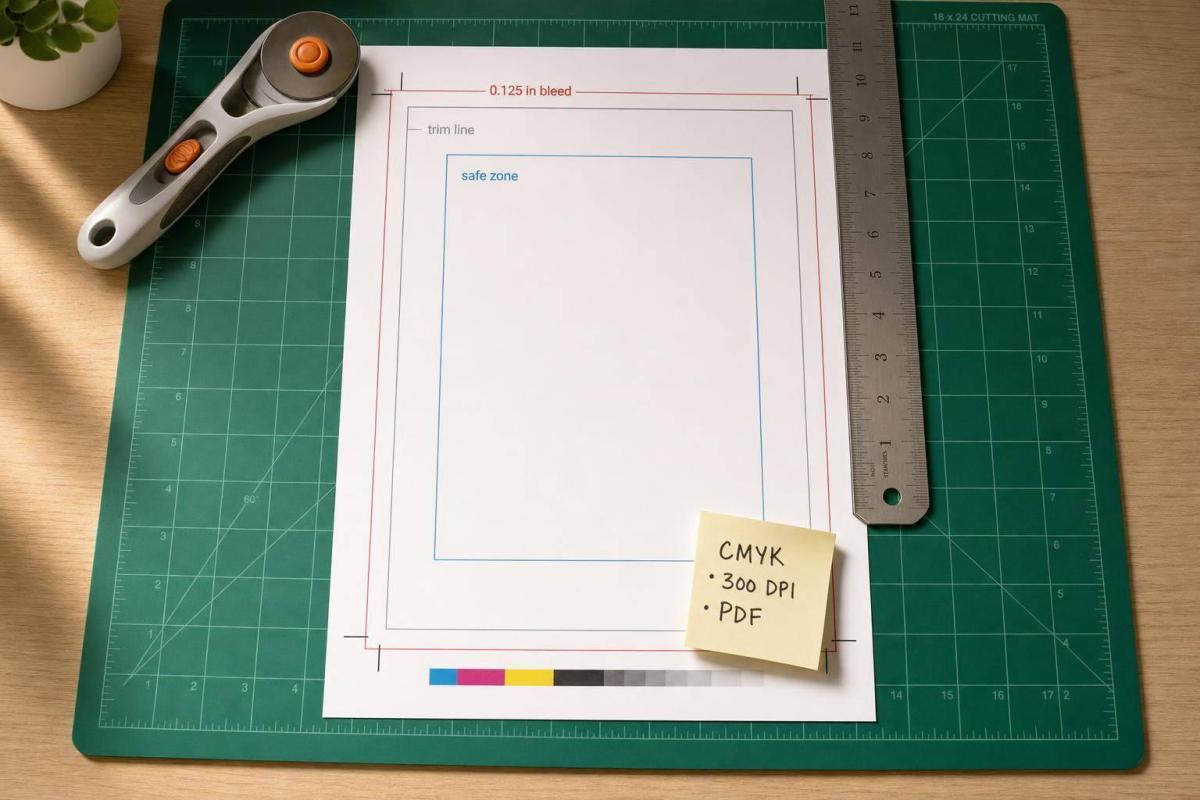
If your file is off by just 1/16 in, the finished piece can show white edges or cut-off text. That’s why I set up every print file with the right trim size, bleed, and safe zone from the start.
Here’s the short version:
- Bleed = extra image or color that extends 0.125 in past the final cut on each side
- Trim = the final finished size
- Safe zone = where I keep text, logos, QR codes, and other must-keep items
- Margins = layout spacing for design, not a print spec
A few fast examples:
- A 3.5 in × 2 in business card should be built at 3.75 in × 2.25 in
- An 8.5 in × 11 in flyer should be built at 8.75 in × 11.25 in
- Large pieces like posters and banners often need 0.25 in to 1 in bleed, based on finishing
I also check for the file problems that lead to reprints and extra cost:
- missing bleed
- text too close to the edge
- wrong page size
- RGB color instead of CMYK
- low-resolution images
- no room for folds, gutters, hems, or grommets
Bottom line: I build the document at the final trim size, extend edge artwork past the cut, keep key content inside the safe area, and export a print-ready PDF with the right settings. That simple setup helps avoid print issues on business cards, postcards, flyers, brochures, booklets, catalogs, posters, and banners.
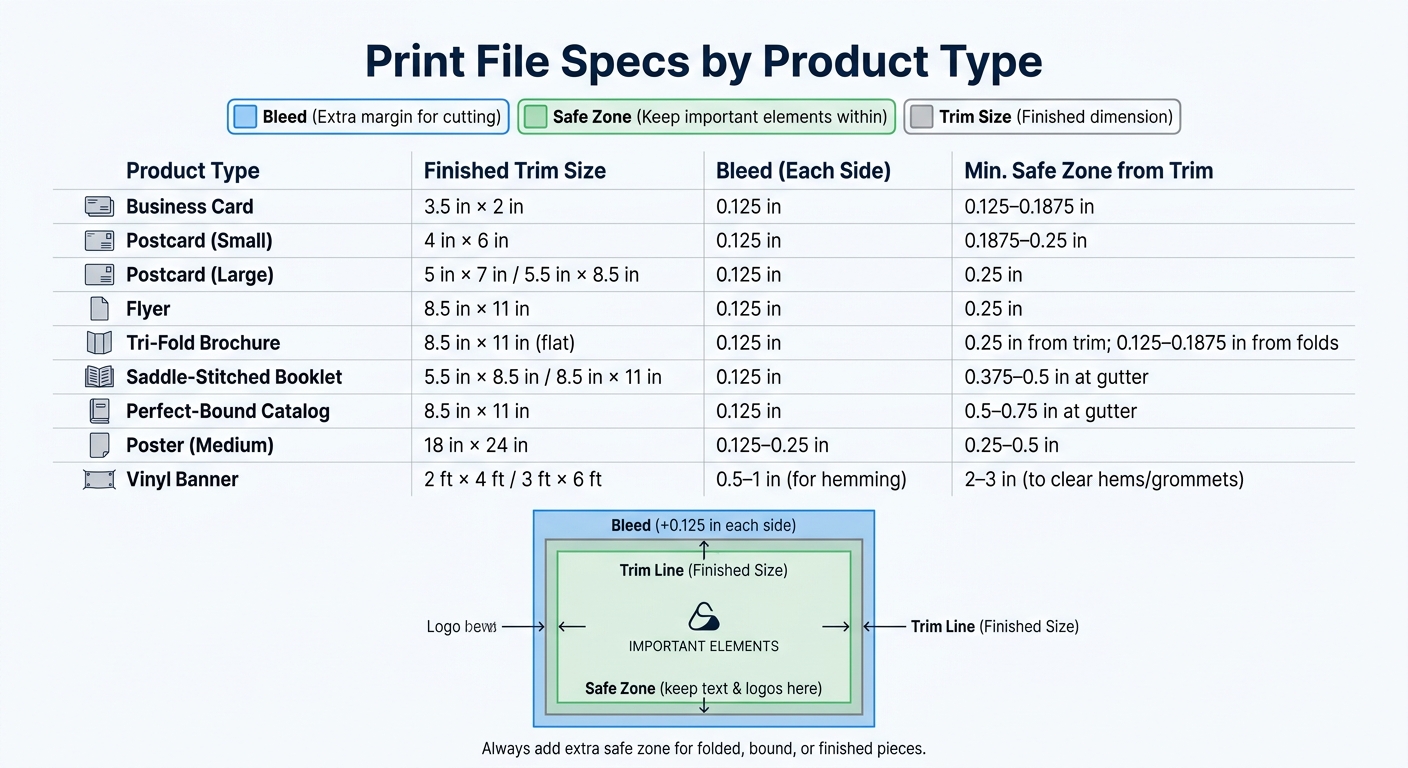
Print File Specs by Product: Bleed, Trim & Safe Zone Guide
Bleed, Trim, Safe Zone, and Margins: The Standard Rules
How Each Print Zone Works
Here’s how those terms connect to the actual file size and the way a piece gets cut. Each zone plays a different part in print production.
| Zone | Where It Sits | What Goes There | Production Result |
|---|---|---|---|
| Bleed | Outside the trim line | Background color, images, fills meant to reach the edge | Gets cut off – keep nonessential artwork only |
| Trim line | Edge of the finished piece | Defines the final cut size | The cutter aims here; slight shifts are normal |
| Safe zone | Inside the trim line | Text, logos, contact info, barcodes, key visuals | Keep text and logos inside the trim |
| Margins | Inside the page | Layout guides for visual balance and readability | Not a production spec – a design decision |
Use these rules when setting up bleed and safe zone for each piece.
Bleed is needed any time artwork, color, photos, or patterns are supposed to run all the way to the edge of the finished piece. If the design stays away from the edge or uses a built-in border, bleed is often not needed. That said, many printers still like files set up with bleed when the piece will be trimmed or finished by machine, because it gives the cutter a little more room for error.
Standard U.S. Measurements for Common Print Jobs
These zones affect two things: how big the file needs to be and how far key content should sit from the edge. The common standard is 0.125 in bleed on each side and at least 0.125 in safe zone inside the trim. Document size = trim size + bleed on all sides.
A simple example: a standard 8.5 × 11 in flyer becomes 8.75 × 11.25 in after bleed is added.
Bigger pieces usually need more space. For posters, banners, and other large-format prints, 0.25 in bleed or more is common, and some guidelines suggest 0.5 in per side for pieces larger than 18 × 24 in. Safe zones should also be wider on large-format jobs, since those pieces go through more handling during printing, mounting, and finishing.
Pay extra attention to areas near:
- binding
- grommets
- hems
- folds
These measurements are the starting point for file setup and PDF export.
sbb-itb-ce53437
How to Set Up Print Files Correctly
Document Setup in Adobe InDesign, Illustrator, and Photoshop
Once you know your bleed and trim specs, set them up before you start designing. That saves time and helps you avoid ugly surprises at print time.
Start with the final trim size. Then add bleed outside the trim and safe-zone guides inside it. The trim size is your base. Everything else works off that.
Each app handles this a bit differently:
| Software | Where Trim Is Defined | Where Bleed Is Set | How Safe Zone Guides Are Created |
|---|---|---|---|
| InDesign | File → New → Document (Width/Height fields) | Bleed and Slug section in the same dialog | Margins field in New Document dialog, or Layout → Create Guides |
| Illustrator | Artboard size in File → New | Bleed fields in File → New, or File → Document Setup | Rulers + manually dragged guides placed inside the artboard edges |
| Photoshop | Canvas size at trim + bleed in File → New (no native bleed field) | Built into the canvas – create at trim size plus 0.125 in bleed on all sides | View → New Guide to place trim and safe zone lines manually |
For a 3.5 × 2 in business card, InDesign and Illustrator should be set to exactly 3.5 × 2 in, with 0.125 in bleed added in the bleed field. In Photoshop, build the canvas at 3.75 × 2.25 in at 300 dpi, then mark the trim with guides.
Across all three programs, keep text and logos inside the safe zone. That’s the part people often skip, and it’s where trouble starts.
Export Settings for a Print-Ready PDF
After the layout is ready, export the PDF with the bleed intact. In InDesign, go to File → Export → Adobe PDF (Print) and use a preset like Press Quality or PDF/X-1a. In the Marks and Bleeds panel, check Use Document Bleed Settings so the 0.125 in bleed you set up makes it into the final PDF.
Add crop marks only if the printer asks for them.
In Illustrator, it works much the same way: File → Save As → Adobe PDF, then check Use Document Bleed Settings and add Trim Marks only if requested.
In Photoshop, the bleed is already part of the canvas. Export through File → Save As → Photoshop PDF with high-quality print settings. You don’t need any extra bleed options there.
One last thing: never fake bleed by scaling artwork or making the page bigger. Let the bleed field handle it. That’s the clean way to do it.
Applying Bleed and Trim Standards to Common Products
Business Cards, Postcards, Flyers, and Brochures
The core rule stays the same across print pieces: extend bleed past the cut line, and keep anything important inside the safe zone. What changes is how much room each format needs.
For business cards with a finished size of 3.5 in × 2 in, any background color, pattern, or photo should run all the way to the bleed edge. That means your file should be 3.75 in × 2.25 in. Keep text 0.125–0.1875 in inside the trim so it doesn’t look cramped or get clipped.
For postcards, use the same 0.125 in bleed. A standard 4 in × 6 in postcard should be built at 4.25 in × 6.25 in. It’s smart to give addresses and call-to-action text a bit more breathing room, so use safe zone margins of 0.1875–0.25 in.
For flyers sized 8.5 in × 11 in, add 0.125 in bleed on every side and keep text 0.25 in from the trim. If the page has dense copy or legal disclaimers, move that margin closer to 0.5 in. It reads better, and it gives you more room for small trim shifts.
Tri-fold brochures need more care. The flat size is still 8.5 in × 11 in with 0.125 in bleed, but the panel widths may need slight changes so the fold closes the way it should. Keep text 0.25 in from all trim edges and 0.125–0.1875 in from fold lines on both sides. If one image runs across a fold, let it continue through. But don’t place a logo, a face, or small text right on that fold line. That’s asking for trouble.
Booklets, Catalogs, Posters, and Banners
Once a piece gets folded, stitched, glued, or hung, the safe zone usually needs more room.
Saddle-stitched booklets still use 0.125 in bleed at the trim edges, but the inside margin needs extra space. Because the pages nest inside each other, the inner sheets creep outward a bit. A safe zone of 0.375–0.5 in at the gutter helps protect page numbers and body copy after trimming.
Perfect-bound catalogs need even more room at the spine. Plan for gutter margins of 0.5–0.75 in or more. Full-bleed spreads should be built as two separate pages, and all key content should sit well away from the spine. If text or other key elements drift into the gutter, some of it can disappear into the glue area or get bent into the page curve.
Use the table below as a starting point. Then add more space if the piece includes folds, binding, hems, or grommets.
| Product type | Typical finished size | Recommended bleed (each side) | Minimum safe zone from trim |
|---|---|---|---|
| Business card | 3.5 in × 2 in | 0.125 in | 0.125–0.1875 in |
| Postcard (small) | 4 in × 6 in | 0.125 in | 0.1875–0.25 in |
| Postcard (large) | 5 in × 7 in; 5.5 in × 8.5 in | 0.125 in | 0.25 in |
| Flyer | 8.5 in × 11 in | 0.125 in | 0.25 in |
| Tri-fold brochure | 8.5 in × 11 in (flat) | 0.125 in | 0.25 in from trim; 0.125–0.1875 in from folds |
| Saddle-stitched booklet | 5.5 in × 8.5 in; 8.5 in × 11 in | 0.125 in | 0.375–0.5 in at gutter |
| Perfect-bound catalog | 8.5 in × 11 in | 0.125 in | 0.5–0.75 in at gutter |
| Poster (medium) | 18 in × 24 in | 0.125–0.25 in | 0.25–0.5 in |
| Banner (vinyl) | 2 ft × 4 ft; 3 ft × 6 ft | 0.5–1 in (for hemming) | 2–3 in (to clear hems/grommets) |
Banners are their own beast. Since they’re often finished with hems, grommets, or pole pockets, the safe zone gets much larger. Keep logos and text 2–3 in from the finished edge on large outdoor banners. That extra room doesn’t just clear the hardware. It also helps with viewing distance, since text pushed too close to the edge is harder to read from across a room or a parking lot.
How Finishing Services Change File Requirements
Finishing affects the file setup, not just what happens after printing. Postpress work adds a little movement to the final piece, and those small shifts matter.
Bindery work can introduce up to roughly 3/16 in of trimming variation, which is why a 0.25 in safe zone is often recommended. Cutting, folding, and binding can all shift things a bit.
Scoring matters most with heavier cardstocks. On heavy stock, keep text and fine details 0.1875–0.25 in from the fold. If you don’t, the fold can crack through thin lines or make small type harder to read.
Perforations need space too. A bindery guide recommends keeping at least 0.25 in between a perforation and any nearby fold or finishing detail to help prevent early tearing. If you’re setting up a tear-off coupon or reply card, that space needs to be there.
Match the file to the finishing method before export. A print file that ignores the bindery step can look fine on screen and still fail once it hits the shop floor.
Common File Errors to Avoid and a Final Submission Checklist
Missing Bleed, Unsafe Text Placement, and Incorrect File Size
Once trim, bleed, and finishing specs are set, do one last pass. This is where a lot of reprints start. In most cases, the problem isn’t the design itself. It’s a small setup mistake that could have been caught before export.
If full-bleed artwork stops right at the trim line, you can end up with thin white edges after cutting. Extend that artwork 0.125 in past the trim.
Text and logos need breathing room too. Keep them 0.125–0.25 in inside the trim so they don’t get clipped.
Use this quick preflight table before you export:
| Issue | Likely Print Impact | How to Fix It | Involves |
|---|---|---|---|
| Missing bleed on full-bleed artwork | White slivers or unprinted edges after trimming | Extend backgrounds and images beyond the trim by at least 0.125 in | Bleed, trim |
| Text or logos too close to trim | Content clipped during cutting | Move critical elements at least 0.125–0.25 in inside the trim | Safe zone, margins, trim |
| Wrong page size | Piece prints at the wrong size or with borders | Set document to final trim size plus bleed before designing | Trim, bleed |
| Mixed or incorrect units | Conversion errors from mixed units | Use inches for U.S. print files and verify dimensions before export | Trim, bleed, margins |
| Incorrect export settings | File may be rejected or output incorrectly | Export a print-ready PDF with bleed and requested marks | Bleed, trim |
| RGB color, low-res images, or missing fonts | Color shifts, blurry output, or font substitution | Convert to CMYK, embed fonts, and ensure images are 300 DPI at final size | Press-critical |
Final Checklist Before Uploading or Sending a File
Before you send a file to print, check these five items:
- Trim size confirmed – The document is set to the final finished size, not the bleed-adjusted size.
- Bleed verified – All artwork that touches the edge extends at least 0.125 in past the trim on every side.
- Critical content inside the safe zone – Text, logos, QR codes, and page numbers sit at least 0.125–0.25 in from the trim, with extra room for bound or folded pieces.
- Finishing allowances reviewed – Folds, gutters, and binding allowances are built into the layout.
- Print-ready PDF exported correctly – Export a print-ready PDF with bleed, embedded fonts, CMYK color, and 300 DPI images.
If the printer asks for crop marks, turn them on during export. If not, leave them off.
When all five checks are clear, the file is ready for press.
Conclusion: The Standards That Protect Print Quality
Build the document at the final trim size. Add the right bleed outside that size. Keep key content inside the safe zone. Then make sure the setup fits the product and its finishing method.
Whether you’re sending files to a local shop like Miro Printing & Graphics Inc. in Hackensack, NJ, or prepping artwork for any commercial press run, accurate file setup helps protect the final printed piece.
The Ultimate Bleeds and Crop Marks Video for Graphic Designers-Illustrator, InDesign, and Photoshop
FAQs
When is bleed required?
Bleed is needed any time colors, images, or graphics run all the way to the edge of the final trim size. A 0.125-inch (1/8-inch) bleed gives the printer a little extra room, which helps avoid unwanted white edges if the paper shifts slightly during trimming.
By extending the artwork into this extra area, you’re far more likely to get a clean finish at the edge of the page.
How much safe space should I leave for text?
Leave at least 0.25 inches of safe space inside the trim line. That buffer helps keep text away from the final cut.
For bound pieces like booklets or catalogs, bump the inner margin up to 0.375 to 0.5 inches to make room for binding. Keep all key text, logos, and graphics inside that space so nothing gets clipped by accident.
What changes for folded, bound, or large-format pieces?
For bound materials, give the inside edge a bit more room near the binding. Set the inner margins to 0.375 to 0.5 inches so page movement during production doesn’t crowd the content. Some binding styles, including perfect binding and Wire-O, may call for inner margins up to 0.6 inches.
For large-format pieces like banners and posters, use larger overall margins – usually 1.5 to 2 inches. That extra space helps protect text and other key elements during installation.
Related Blog Posts
- Checklist for Print-Ready Files: Bleed, Trim, Safe Zone
- How to Set Up Artboards for Printing
- How to Create Print-Ready Artwork
- Ultimate Guide to Magazine Printing Services
https://app.seobotai.com/banner/banner.js?id=6a7bca6edc1e9c396e6c3648

