Can Agricultural Residue Paper Replace Wood Pulp?

Examines when crop residues (bagasse, straw, corn stover) can replace wood pulp—performance, costs, supply limits, and best uses.

Short answer: not fully, not yet. From what I see in the article, agricultural residue paper works best today as a partial replacement or blend in U.S. commercial printing and packaging.

If you want the fast takeaway, here it is:

  • Lower impact is possible when mills use local crop waste like bagasse, wheat straw, rice straw, and corn stover
  • Print quality is often fine for office paper, inserts, booklets, and light packaging
  • Wood pulp still wins for premium color work, long press runs, and steady sheet quality
  • Cost and supply are the main roadblocks because residue fiber is seasonal, bulky, and harder to store and move
  • In the U.S., most mills are still built around wood-based systems, so a full swap is not common today

A few details stand out right away. Bagasse has about 48.8% cellulose and about 20.2% lignin, which makes it one of the easier crop fibers to pulp. But wheat and rice straw can bring high silica, which can create mill processing issues. And because straw bales carry less usable fiber per truckload than wood chips, freight cost per ton can go up.
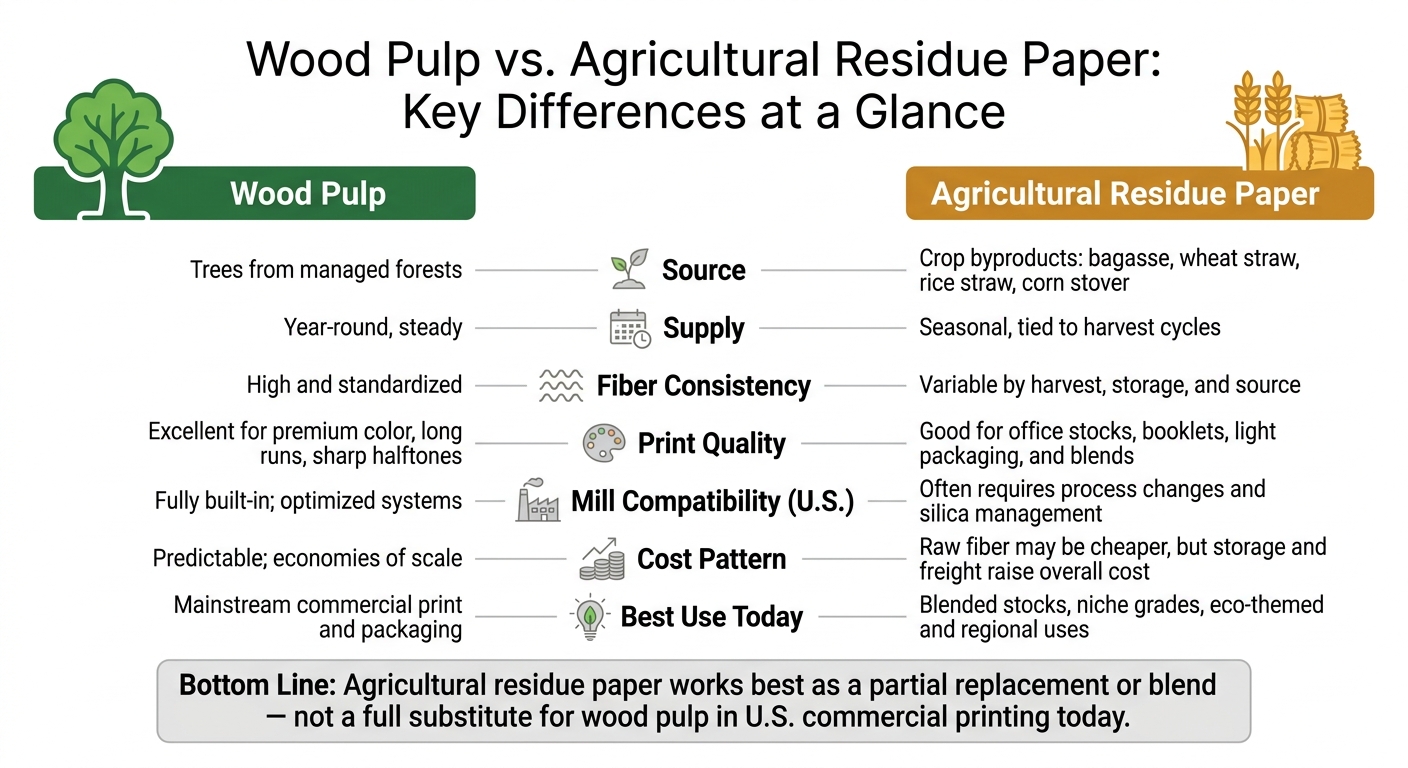
Wood Pulp vs. Agricultural Residue Paper: Key Differences at a Glance

Wood Pulp vs. Agricultural Residue Paper: Key Differences at a Glance

Quick Comparison

Criteria Wood Pulp Agricultural Residue Paper
Source Trees from managed forests Crop leftovers like straw and bagasse
Supply Year-round Seasonal
Fiber consistency More uniform More variable
Print quality Better for premium jobs Better for routine jobs and blends
Mill fit in the U.S. Already built in Often needs process changes
Cost pattern More predictable Raw fiber may be cheap, but storage and freight add cost
Best use today Mainstream commercial print and packaging Blended stocks, niche grades, regional uses

So if you’re choosing paper for brochures, direct mail, booklets, or packaging, I’d treat residue paper as a smart option for some jobs – but not a blanket replacement for wood pulp.

Wood Pulp vs. Agricultural Residue Paper: Definitions and Key Differences

Before weighing the tradeoffs, it helps to know what each fiber source actually is. At the core, this comes down to one issue: can residue fiber match wood pulp for consistency, scale, and print results?

Feature Wood Pulp Agricultural Residue Paper
Source Material Hardwood and softwood from managed forests Crop byproducts such as bagasse, wheat straw, rice straw, and corn stover
Fiber Consistency High and standardized Variable, depending on harvest, storage, and source
Pulping Process Kraft or sulfite methods that use heat and chemicals Modified methods such as soda-oxygen pulping

Wood pulp’s biggest strength is consistency. Residue paper’s biggest hurdle is variability. And for commercial printing, that gap matters.

How Wood Pulp Became the Standard

Wood pulp comes from managed forests and is processed mainly through the Kraft pulping process, which uses heat and chemicals to break down lignin and separate cellulose fibers. That steady process is a big reason wood pulp became the default choice for commercial print buyers.

In practice, it delivers dependable results across coated and uncoated printing papers, book papers, and heavy packaging boards. When buyers want paper that behaves the same way from run to run, wood pulp is usually the safe bet.

What Agricultural Residue Paper Is

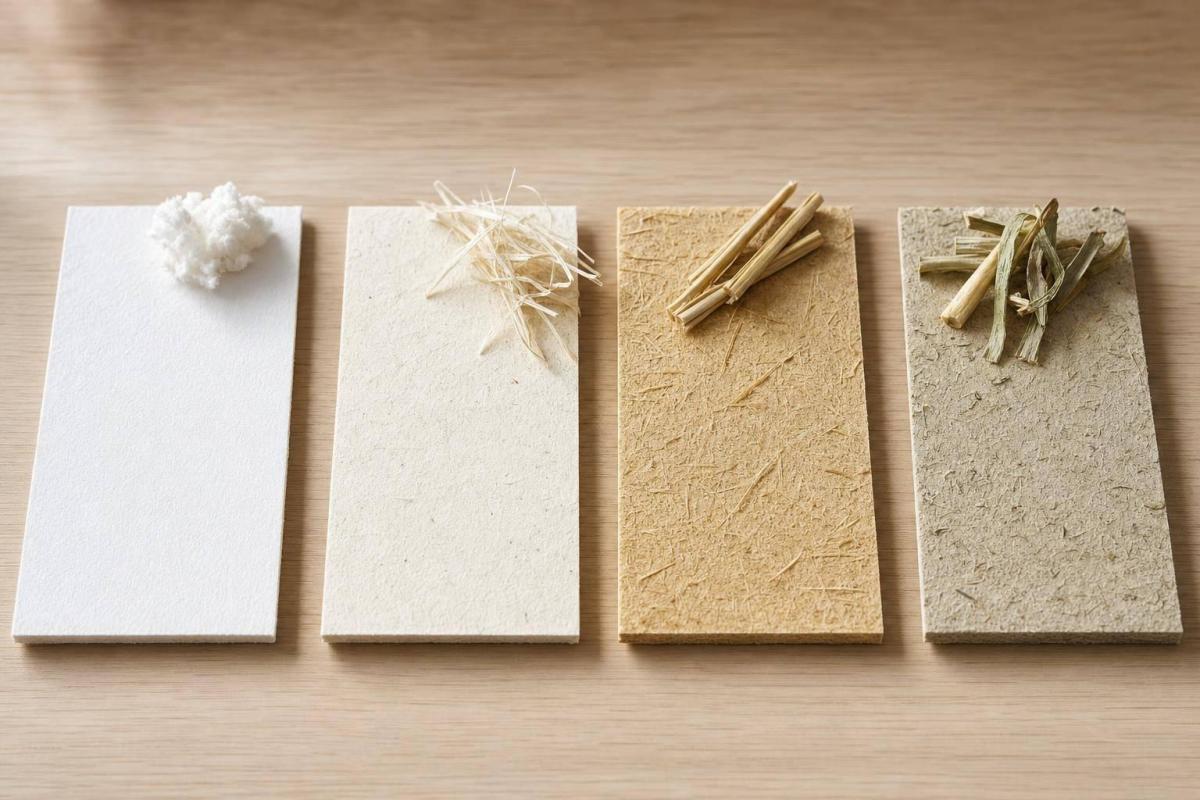
Agricultural residue paper uses fibers left behind after harvest, including bagasse, wheat straw, rice straw, and corn stover. But these materials aren’t all the same. Treating them like one category can hide some big differences.

Bagasse stands out because it has relatively low lignin content – around 20.2% – and high cellulose at roughly 48.8%. That makes it easier to pulp and a better fit for writing and printing grades.

Rice and wheat straw bring a different challenge: higher silica content, which makes chemical recovery harder in standard pulping systems. Mills can work around that with modified pulping methods, but there’s a catch. Fiber quality is less steady because residue composition shifts with harvest conditions, storage, and source.

That’s the main drawback: residue fiber is less consistent than wood pulp. And that difference shapes both environmental performance and the limits of print production.

Environmental Comparison: Agricultural Residues vs. Wood Pulp

Those material differences matter most once the focus moves from fiber quality to environmental impact. Residue paper can lower impact, but the upside depends a lot on supply chain conditions. So yes, residue paper can be a lower-impact input in many cases, but it isn’t a one-size-fits-all swap for wood pulp.

Where Residue Paper Can Cut Environmental Impact

Using crop residues keeps those fibers out of open burning and landfill streams. Research notes that non-wood fibers can help meet demand while reducing pulping pollution. Lower-temperature pulping can also cut energy use and waste.

Put simply, residue paper can reduce impact. But the size of that drop depends on practical details like how far the feedstock travels, how long it sits in storage, and which pulping method is used.

Where the Environmental Tradeoffs Still Apply

Storage is the first limit. Residues spoil fast, which shortens processing windows and adds logistics cost.

Transport is the second issue. These materials are bulky, and they’re heavy to move compared with the amount of usable fiber they deliver. That means hauling large volumes from field to mill can push up transportation energy use and carbon emissions. Rice and wheat straw also make chemical recovery and effluent management harder.

So while residue paper can reduce pressure on forests and avoid burning-related emissions, those gains can fade if the feedstock has to travel long distances, sits too long before processing, or goes through a less suitable pulping system. The case looks strong in the right supply chain, but it doesn’t automatically prove full replacement.

Environmental gains matter only if the stock can still run reliably on press.

Residue paper can do the job in a lot of print categories. But the big question is simple: can it stand up to wood pulp at every quality level?

Where Agricultural Residue Paper Holds Up Well

Agricultural residue paper works well for everyday print use. Think office printing, internal reports, notepads, and simple brochures.

Bleached bagasse pulp can reach brightness levels and fiber dimensions close to hardwood-based pulp, which makes it a fit for writing and printing grades. In practice, that means it can work well for:

  • office stocks
  • letterhead
  • envelopes
  • instructional booklets
  • light packaging

It often performs best in blends that help with strength and press runnability. So yes, residue paper is workable for routine jobs. That does not mean it’s automatically the right pick for premium color pieces.

Why Premium Print Jobs Still Often Need Wood Fiber or Blends

Higher-end print jobs tend to expose the weak spots.

Residue fibers are often shorter and less uniform. That can make the sheet rougher, increase ink absorption, lower opacity, and slow drying. For catalogs, presentation folders, and heavy solid-color work, wood-pulp stocks or engineered blends still tend to print in a more predictable way.

That matters on press. A stock may look fine on paper, then struggle when you need dense color, clean edges, and steady results across a long run. And even if the sheet performs well enough, sourcing and price still shape whether it can go head-to-head with wood pulp.

Property Typical Wood-Pulp Paper Typical Agricultural Residue Paper
Strength (tensile/tear) High; long fibers support demanding print and packaging uses Moderate; adequate for office and light printing when optimized or blended
Brightness and Opacity Generally high brightness and good opacity, especially in premium grades Slightly lower brightness; opacity can vary by residue type and process
Surface Quality/Smoothness Smooth, well-formed; supports fine halftones and sharp text More variable; rougher surface on uncoated grades; adequate for text
Ink Penetration/Holdout Controlled porosity; good holdout yields dense color and crisp dots Higher absorbency on some grades; ink penetrates more, reducing edge sharpness
Press Runnability/Machine Efficiency Highly optimized; stable, low dusting, reliable across long runs Acceptable when well-processed; better suited to short and medium runs
Offset Printing Suitability Excellent across economy to premium job types Suitable for simple text and graphics; more limited for image-heavy work
Digital Printing Suitability Very good with toner and inkjet in dedicated digital grades Reasonable for office and light commercial digital; needs calibration for high-end color

What This Means for U.S. Commercial Print Buyers

For U.S. print buyers, residue-based papers make sense for routine work like interior pages, office stocks, and eco-themed content. But when a piece needs sharp color, high opacity, or strong fold resistance, wood-pulp or blended stocks still tend to be the safer choice.

The next issue is whether those print advantages still make sense once you look at cost and supply chain conditions.

Economic Feasibility and the Direct Answer

Why Supply Chains Make Full Replacement Difficult

Performance isn’t the only thing that matters here. Supply and cost are what decide whether residue paper can grow beyond a niche.

Agricultural residues are seasonal. Wheat straw, rice straw, and bagasse show up in heavy volumes around harvest, not all year like wood chips from managed forestry. So if a mill wants a steady fiber stream, it has to collect, bale, and store a lot of material in a short period. That gets expensive fast. Baled straw also has lower bulk density than wood chips, which means more truckloads for each usable ton and higher freight costs per delivered ton. On top of that, stored bales can lose material over time.

The challenges don’t stop at the mill gate. Many agricultural residues, especially cereal straws, contain a lot of silica. That can lead to scaling and fouling in recovery boilers built around wood chemistry. Dealing with that may call for extra cleaning steps, changes to chemical recovery, and sometimes major capital spending. That’s a big reason mills often blend residue fiber with wood pulp instead of trying to swap wood out completely.

Factor Wood Pulp Agricultural Residue Fiber
Raw material supply Steady, year-round from managed forestry Seasonal; tied to crop harvest cycles
Storage & handling Dense chips; established mill practices Low-density bales; risk of material loss
Transport logistics Optimized per ton; lower freight cost More truckloads per ton; higher per-ton cost
Fit with existing mill systems Existing systems built for wood chemistry May need silica management and process changes
Production cost Predictable; benefits from economies of scale Potentially lower raw material cost, but logistics and retrofitting raise overall cost

Where Agricultural Residue Paper Makes Business Sense

The strongest business case shows up when buyers are willing to pay a modest premium because the paper choice itself adds meaning. Good examples include branded stationery, packaging inserts for natural food or wellness products, and short-run promotional pieces.

In those cases, residue-blend papers work best when the sustainability story helps explain the added cost. Put simply: use residue blends when that story can support a higher paper price.

That makes this as much an economic question as a technical one.

Conclusion: Can Agricultural Residue Paper Replace Wood Pulp?

The direct answer is: not fully, not yet – at least not for most U.S. commercial printing. Agricultural residue paper can replace some wood pulp in certain grades and markets, and it offers real environmental and economic gains where local crop supply is strong and mills are designed or adapted for non-wood fiber.

In the U.S., large integrated wood pulp supply chains are already mature, and most mills are tuned for wood. So residue fiber makes more sense as a supplemental source: useful in blended stocks, select specialty papers, and certain regional uses, but not set up to displace wood pulp across mainstream commercial printing today.

FAQs

How much wood pulp can residue fiber realistically replace today?

Agricultural residue fibers like corn maize, bamboo, hemp, and sugarcane can cut dependence on standard wood pulp.

The exact replacement rates aren’t specified. Even so, current industry progress shows that these plant-based fibers can serve as effective, low-impact substrates for many kinds of printing projects.

Which print jobs are best suited for agricultural residue paper?

Agricultural residue paper is a tree-free paper option made from leftover farm materials, and it works as a flexible substitute for wood pulp paper. It’s a strong fit for offset printing projects.

It works well for marketing collateral, packaging, and internal communications, while also supporting more responsible business practices.

What would need to change for wider U.S. adoption?

Broader U.S. use of paper made from agricultural residue will depend on better recycling and manufacturing methods that can bring down costs and improve performance. It also hinges on a steadier supply chain and print quality that stays consistent from job to job.

There’s a business mindset piece here too. Many companies still focus on upfront price, but long-term impact matters as well. Miro Printing & Graphics Inc. helps clients weigh substrate options based on each project’s needs and their sustainability goals.

Related Blog Posts

https://app.seobotai.com/banner/banner.js?id=6a7e5ccbdc1e9c396e6c44ae

Are UV-Curable Inks Better for the Planet?

UV-curable inks cut VOCs, reduce make-ready waste, and save energy with UV-LED curing—yet may hinder recycling and require careful handling.

Yes – often. From what I see in the article, UV-curable inks are usually the better pick when you want lower VOC emissions, less print waste, and fast curing that cuts damaged runs.

Here’s the short version:

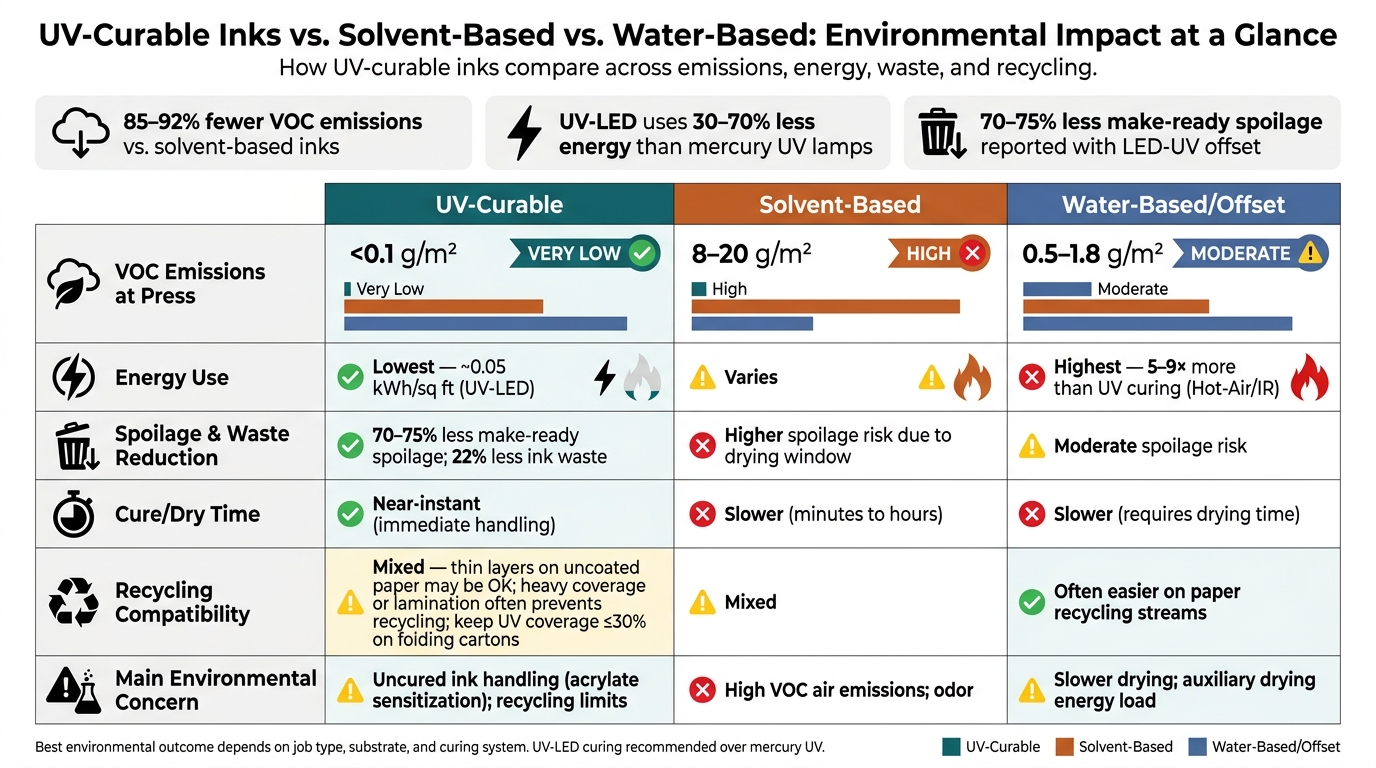
  • Air emissions: UV-curable inks can bring press VOCs down to below 0.1 g/m², versus 8–20 g/m² for solvent-based inks.
  • Power use: UV-LED curing can use 30% to 70% less energy than mercury UV, and hot-air/IR drying can use 5 to 9 times more energy than UV curing.
  • Waste: Some shops have reported 70% to 75% less make-ready spoilage, and one study found 22% less ink waste in UV/flexo work.
  • Limits: Uncured UV ink can irritate skin and eyes, and cured UV ink can make paper recycling harder, especially with heavy coverage or lamination.

So if you’re asking, “Are UV-curable inks better for the planet?” my answer is: often yes at the press, but not in every end-of-life case. The biggest gains show up in emissions and production waste. The main weak spots are worker handling and recycling.

UV-Curable vs. Solvent-Based vs. Water-Based Inks: Environmental Impact Comparison

UV-Curable vs. Solvent-Based vs. Water-Based Inks: Environmental Impact Comparison

Quick Comparison

Factor UV-Curable Solvent-Based Water-Based / Offset
VOCs at press Very low High Low to mid
Dry/cure time Near-instant Slower Slower
Spoilage risk Low Higher Mid
Power use Low with UV-LED Varies Often needs heated/air drying
Recycling Mixed Mixed Often easier on paper streams
Main concern Uncured ink handling, recycling limits Air emissions Slower drying, added drying load

If I had to sum it up in one line: UV-curable inks help most when clean air, less spoilage, and long print life matter more than easy recycling.

How UV-Curable Inks Can Cut Emissions and Printing Waste

Lower VOC Emissions and Less Solvent Loss

UV-curable inks can cut press emissions in a big way. The reason is simple: they cure through polymerization, so very little is released during printing.

With UV-LED systems, press-side VOC output can come in at below 0.1 g/m², compared with 8–20 g/m² for solvent-based inks and 0.5–1.8 g/m² for conventional water-based or offset inks. Put plainly, that’s about an 85% to 92% drop compared with solvent-based processes.

For U.S. print shops, that gap can matter beyond the pressroom. Lower emissions can help a facility stay under thresholds that trigger major-source air permits under EPA and state Clean Air Act rules. That can mean less record-keeping and reporting.

There’s also the day-to-day shop-floor side of it. Lower solvent loss usually means less odor and less vapor exposure for workers. In occupied spaces, that can make a noticeable difference. And because UV inks cure so fast, they also cut spoilage during production.

Less Spoilage, Fewer Reprints, and Cleaner Production

Fast cure changes the workflow. Solvent- and water-based prints may smudge or block while they dry, and that wait can last minutes or even hours. UV-cured prints, by contrast, are stable almost at once, so crews can handle and finish them right away.

That leads to fewer damaged runs and less material going in the trash. One LED-UV offset installation reported 70% to 75% less make-ready spoilage, and a 2023 Pira International study found 22% less ink waste in UV/flexo printing. Fewer reprints also mean less paper and vinyl waste.

The table below shows where UV-curable inks have the edge and where the trade-offs still sit.

Comparison Table: UV-Curable vs. Solvent-Based vs. Conventional Water-Based Inks

Attribute UV-Curable Solvent-Based Conventional Water-Based / Offset
VOC emissions at press Near-zero (<0.1 g/m²) High (8–20 g/m²) Moderate (0.5–1.8 g/m²)
Odor during printing Low Medium to high Low to moderate
Ink loss to evaporation Minimal – most ink stays on substrate Significant – solvents evaporate Moderate – some water and other volatiles evaporate
Spoilage risk during drying Low – instant cure, immediate handling Higher – drying time creates a damage window Moderate – slower drying increases handling risk
Key trade-offs Needs UV curing equipment; uncured ink requires careful handling; recycling compatibility varies. Higher emissions and odor. Slower drying; may need auxiliary chemicals.

Energy Use and the Role of UV-LED Curing

When Instant Curing Can Lower Electricity Use

After emissions and waste, energy use is the next big piece of the puzzle. And here, the curing system matters a lot.

Thermal drying systems – like hot-air ovens and infrared dryers – can use five to nine times more energy than UV curing in similar processes.

That gap gets easier to see on long, continuous jobs. UV-LED systems don’t need warm-up or cool-down time, so they avoid the extra power draw that comes with stopping and starting. On shorter runs, they still cut energy use, but some of that gain can get eaten up by press power and HVAC demand.

Why UV-LED Is Usually the Better Choice for Reducing Impact

Mercury vapor UV lamps can cure well, but they come with baggage. They need warm-up time, they run hot, and they’re often left on through the whole shift. UV-LED systems skip those problems.

Studies show UV-LED uses about 30% to 70% less energy than mercury UV. Part of the reason is simple efficiency. Mercury lamps turn less than 10% of input power into usable UV curing energy. UV-LED systems convert over 30% of input power into UV output.

That also means less wasted heat. And less heat doesn’t just help the curing unit itself. It can also cut HVAC load and reduce heat stress on sensitive substrates.

Lamp life is another big difference. Mercury arc lamps usually last 500–3,000 hours. UV-LED units often reach 20,000 hours or more. Fewer replacements can mean less downtime and less material headed for disposal.

Then there’s mercury itself. Conventional UV lamps contain mercury, so disposal and accidental breakage may call for special waste handling. UV-LED systems contain no mercury and do not generate ozone, which makes waste handling and ventilation simpler.

Comparison Table: UV-LED, Mercury UV, and Hot-Air / IR Drying

The side-by-side view makes the tradeoffs pretty clear.

Attribute UV-LED Mercury UV Hot-Air / IR Drying
Energy use Lowest – ~0.05 kWh/sq ft Moderate to high – ~0.18 kWh/sq ft Highest – 5–9× more than UV curing
Heat output Very low – most energy goes to UV emission High – significant infrared waste heat Very high – heat is the primary drying mechanism
Lamp / system life Often 20,000 hours or more 500–3,000 hours No lamps; heating elements vary
Mercury content None Yes – requires specialized disposal None
Ozone generation None Yes – requires extraction ventilation None
Instant on/off Yes – no warm-up needed No – requires warm-up; often left running No – ovens need time to reach temperature

Where the Benefits Have Limits

UV-curable inks can cut emissions and waste, but there’s no free lunch. The main trade-offs show up in handling, recycling, and disposal.

Handling Uncured Ink and Workplace Safety

The first limit comes before the ink is even cured. Uncured UV inks can irritate the skin and eyes, and they can lead to permanent acrylate sensitization.

That means safety steps matter. Use chemical-resistant gloves, eye protection, protective clothing, ventilation, and UV shielding. UV printing gets rid of the solvent fumes common in other systems, but it brings its own set of chemical and UV exposure risks.

Recycling and End-of-Life Performance Can Vary

The next issue starts after the piece is printed. Once cured, UV inks form a hard film that’s tougher to break apart during repulping and deinking.

INGEDE research found that most conventional UV-curing inks leave too many ink particles in recovered paper to meet good recyclability criteria. In plain terms, the more UV ink on the sheet, the harder the recycling job becomes. That’s a bigger problem on folding cartons and laminated materials.

Design-for-recycling guidance says UV coverage on folding cartons meant for recycling streams should stay at about 30% or less of the surface. And when a UV-printed piece is also film-laminated, recyclability is often only partial. In many cases, those items end up in landfill or go to disposal through energy recovery.

Pros and Cons Table: Gains and Trade-Offs

The table below separates the main gains from the limits that still remain.

Factor Benefit Potential Concern
Worker exposure Eliminates solvent fumes common in conventional systems. Acrylates and photoinitiators can cause sensitization, and UV radiation requires shielding.
Recyclability Thin UV layers on uncoated paper can sometimes perform adequately in repulping. Heavy coatings, laminates, and plastic substrates often complicate or prevent recycling.
Equipment UV-LED systems have long lamp life and no mercury. Mercury UV lamps bring disposal and maintenance concerns, and all UV systems need shielding and training.

What This Means for Print Buyers and Commercial Projects

Projects Where UV-Curable Inks Are a Good Fit

For print buyers, the big question is simple: where does UV durability cut waste over the life of the job?

UV-curable inks make the most sense for high-wear projects where longer life means fewer replacements. That includes outdoor signage, labels, point-of-purchase displays, trade show graphics, and vehicle decals. On rigid materials like corrugated plastic, foam board, and coated metals, UV inks create a tough, scratch-resistant film that stands up to moisture, temperature swings, and heavy handling. That can mean less replacement waste over time.

Another plus: instant curing lets jobs move straight to finishing. In plain English, that can help reduce delays and reprints.

What to Verify Before Ordering

If you want both print performance and a lower-impact job, check two things before you approve it.

  • Ask which curing system the print shop uses and whether UV-LED is available, since it often uses less energy and runs cooler.
  • Ask whether lamination or heavy coatings could make the chosen substrate harder to recycle.

Conclusion: Are UV-Curable Inks Better for the Planet?

Yes – UV-curable inks are often a better choice for the planet when low VOCs, less spoilage, and longer-lasting prints matter most. That said, the best setup depends on the job, the substrate, and the curing system.

For businesses and organizations in the Hackensack, NJ area, Miro Printing & Graphics Inc. offers large-format printing, digital printing, in-house bindery, and design services for projects with different durability and turnaround needs.

FAQs

Are UV-curable inks always the greenest option?

Not always. UV-curable inks are often a better option than many older ink types because they’re solvent-free, produce no VOCs, and can cut down on ink use.

That said, ink is only one piece of the puzzle. A greener print project also depends on the substrate you choose, such as FSC-certified or recycled paper. Miro Printing & Graphics Inc. looks at the full project this way to support sustainability goals.

Why can UV-printed materials be harder to recycle?

UV-curable inks are often seen as a cleaner option because they cure instantly and contain no volatile organic compounds.

Some printed materials are tougher to recycle, especially when they use multi-layer structures. That said, UV-cured prints are often easier to recycle than many other options. They usually need fewer additives and can move through standard recycling systems more easily.

Is UV-LED curing better than mercury UV?

Yes. UV-LED curing is generally a better option than old-school mercury UV. It uses less energy and avoids volatile organic compounds (VOCs).

It also helps speed up production. Printed materials can be handled right away, while still getting high-quality, durable finishes.

Related Blog Posts

https://app.seobotai.com/banner/banner.js?id=6a7281eca5e4d9396b8a07b4

Lamination Standards vs. Environmental Laws

How print shops balance lamination performance with U.S. environmental rules on VOCs, formaldehyde, recyclability, and adhesives.

Lamination in print shops is shaped by two main forces: industry standards that ensure product quality and durability, and U.S. environmental laws that regulate emissions, chemical usage, and waste. Striking a balance between these frameworks is critical for businesses to deliver reliable products while staying compliant with regulations.

Key Points:

  • Lamination Standards: Focus on material durability, adhesion strength, and performance. Standards like peel force testing and chemical bond verification ensure consistent results.
  • Environmental Laws: Federal rules, such as the Clean Air Act and TSCA, aim to reduce emissions (e.g., VOCs, formaldehyde) and manage hazardous waste. State laws like California’s SB 54 and SB 343 push for recyclability and reduced plastic use.
  • Challenges for Print Shops: Balancing high-performance materials with legal requirements. Solvent-based adhesives offer strong bonds but emit VOCs, while water-based options are safer but may impact curing times.
  • Solutions: Eco-friendly practices, such as water-based adhesives, dry lamination, and biodegradable films like PLA, can help meet both quality and legal standards.

Quick Comparison:

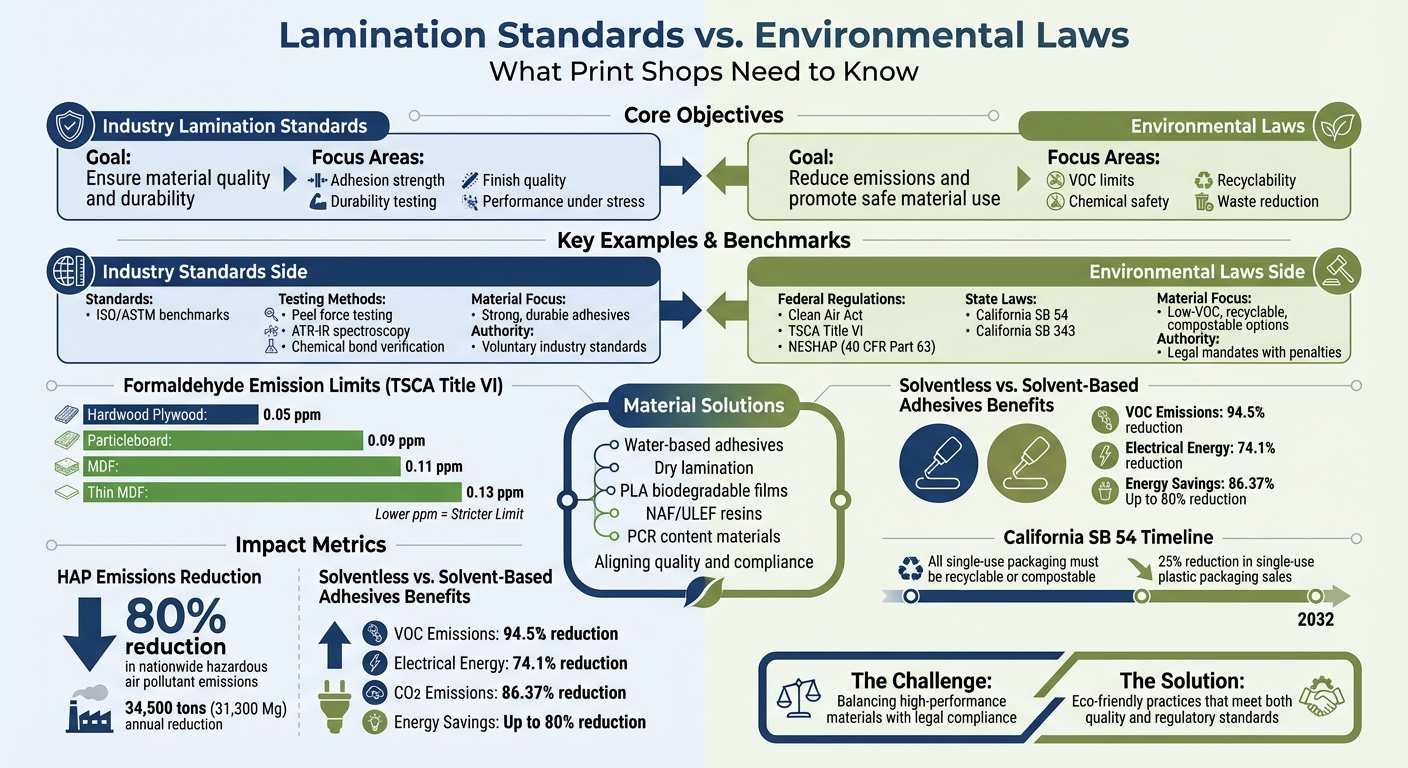
Aspect Lamination Standards Environmental Laws
Goal Ensure material quality and durability Reduce emissions and promote safe material use
Focus Adhesion strength, durability, finish quality VOC limits, chemical safety, recyclability
Examples ISO/ASTM benchmarks, peel force testing Clean Air Act, TSCA Title VI, SB 54, SB 343
Impact on Materials Requires strong, durable adhesives Pushes for low-VOC, recyclable, or compostable options

Understanding these frameworks helps print shops navigate complex decisions, ensuring compliance without compromising product reliability.

Lamination Standards vs Environmental Laws: Key Differences for Print Shops

Lamination Standards vs Environmental Laws: Key Differences for Print Shops

Lam’On: On a Mission to Make the Printing Industry More Eco-Friendly

Industry Lamination Standards for Print Finishing

Industry lamination standards lay out the technical guidelines that ensure laminated products perform consistently across different uses. Below, we’ll dive into the material and performance criteria that are essential for print finishing.

Material Requirements

Standards dictate the use of 1-component, 2-component, or thermal adhesives, depending on the type of substrate and ink. For example, adhesives must work seamlessly with "duct-fresh" offset inks to avoid delayed delamination issues.

One key measure of bond strength is peel force, which evaluates how well the film adheres to the substrate. Research from Fogra highlights that peel force tends to increase over five months after production. Interestingly, while thermal lamination often achieves higher peel forces compared to 1-component and 2-component dispersion laminations, this doesn’t always mean better performance under stress. Thermal laminations, despite their stronger initial peel forces, are more prone to delamination in certain conditions.

Ink coverage also plays a major role. High ink coverage can lower peel force in dispersion lamination but may enhance it in thermal lamination. For 2-component adhesives, standards emphasize proper dosing of curing agents. Techniques like ATR-IR spectroscopy are used to verify the chemical bonds formed, ensuring durability over time. These material specifications will later be compared with environmental criteria to explore areas of overlap and potential conflict.

Performance and Safety Requirements

Performance standards focus on how laminated materials handle real-world stresses. Laminates must endure mechanical creasing, folding, sealing, and exposure to thermal stress. As Fogra notes:

The trend towards duct-fresh offset printing inks, single-component laminating adhesives and short production times repeatedly gives rise to quality problems in film lamination – especially when the film lamination is subjected to mechanical or thermal process stresses.

Mechanical deformation is a key factor in performance:

The occurrence of delamination was dependent on the geometry of the mechanical deformation.

To address these challenges, advanced testing methods go beyond basic tape tests. Laboratory-scale devices, like flexographic and gravure proofing machines, replicate production-level lamination and stress scenarios to better evaluate performance.

On the safety side, TSCA Title VI enforces strict limits on formaldehyde emissions for composite wood cores and adhesives used in laminated products. The permissible levels are as follows:

  • 0.05 ppm for hardwood plywood
  • 0.09 ppm for particleboard
  • 0.11 ppm for medium-density fiberboard (MDF)
  • 0.13 ppm for thin MDF

Furthermore, process parameters like temperature and pressure must be fine-tuned for each adhesive and substrate pairing. This ensures proper bonding without damaging materials, while also meeting emission and safety standards. These technical requirements provide a solid foundation for comparing current practices with evolving environmental regulations.

Environmental Laws Affecting Lamination

In the U.S., environmental laws play a crucial role in shaping how lamination materials and processes are chosen and used. While technical standards focus on performance, these regulations aim to reduce health risks and environmental harm. They directly impact the adhesives, films, and substrates print shops can use, often requiring significant changes to production methods.

VOC Regulations

The Environmental Protection Agency (EPA) enforces strict limits on volatile organic compounds (VOCs) in printing and lamination adhesives. To comply, manufacturers often need to switch to water-based or low-VOC adhesives, which help reduce air pollution. For print shops, this means carefully reviewing adhesive suppliers and potentially transitioning to formulations that meet both federal and state VOC limits. However, these changes can affect drying times and bonding performance, requiring adjustments to maintain product quality. Beyond VOCs, the Toxic Substances Control Act (TSCA) introduces additional guidelines on chemical emissions.

TSCA Requirements

The Toxic Substances Control Act (TSCA) Title VI focuses on reducing formaldehyde emissions in composite wood products used in lamination. Materials like hardwood plywood, MDF, or particleboard cores must meet stringent emission standards. This has led to the increased use of No-Added Formaldehyde-Based (NAF) and Ultra Low-Emitting Formaldehyde (ULEF) resins. Recent proposals, such as incorporating ISO 12460-2:2024 as a testing standard, further align U.S. practices with international protocols. Print shops working with laminated materials must ensure their core components comply with these regulations. Meanwhile, emerging laws targeting plastic waste and recycling are pushing the industry to rethink how laminated products are disposed of at the end of their lifecycle.

Plastic Waste and Recycling Laws

Unlike material performance standards, these laws prioritize the recyclability and environmental impact of laminated products. For example, California’s SB 54 mandates that by 2032, all single-use packaging must be either recyclable or compostable, with a 25% reduction in single-use plastic packaging sales. This marks a significant departure from traditional lamination practices, which often overlook recyclability. Additionally, states like California, Washington, and New Jersey now require specific percentages of Post-Consumer Recycled (PCR) content in plastic products.

California’s SB 343 further tightens regulations by restricting the use of recycling symbols. Under this law, the familiar "chasing arrows" symbol can only appear on materials that meet strict state-defined recyclability standards. While a legal challenge was filed in March 2026 against SB 343, citing First Amendment concerns, these laws are already steering the industry toward recyclable films and away from multi-layer plastics that are difficult to process. This shift underscores the growing emphasis on sustainability in material selection for lamination.

Lamination Standards vs. Environmental Laws: Side-by-Side Comparison

Comparison Table

When it comes to lamination, industry standards and environmental laws have distinct priorities. Standards center on performance – ensuring materials are durable, bond effectively, and meet customer needs. On the other hand, environmental laws focus on public health, aiming to reduce toxic emissions and promote safe recycling practices. Here’s a breakdown of these differences:

Feature U.S. Environmental Laws (NESHAP/CAA) Industry Lamination Standards
Primary Objective Minimize hazardous emissions and protect public health. Guarantee material durability, bond strength, and safety.
Material Requirements Restrictions on HAPs like Toluene and Formaldehyde. Specifications for film thickness, clarity, and adhesion.
Compliance Metric 80% reduction in nationwide HAP emissions. Meeting performance benchmarks (e.g., ISO/ASTM).
Legal Authority Clean Air Act; 40 CFR Part 63 Subpart JJJJ. Voluntary industry standards or customer requirements.

The EPA’s NESHAP regulations specifically target harmful chemicals such as toluene, methanol, xylenes, phenol, formaldehyde, and ethyl benzene. These rules apply to facilities producing industrial laminates, flexible packaging, and pressure-sensitive tapes. According to the EPA, "The final standards will eliminate approximately 80 percent of nationwide HAP emissions from facilities that coat paper and other web substrates". This translates to an annual reduction of about 34,500 tons (31,300 Mg) of hazardous air pollutants.

This comparison highlights the trade-offs manufacturers face when choosing adhesives and materials.

How They Affect Material Choices

The differences between these standards and regulations push print shops to rethink adhesive formulations to balance high performance with strict environmental rules. Solvent-based lamination, while meeting performance criteria, comes with high VOC emissions and energy-intensive drying processes. On the flip side, solventless and water-based adhesives offer significant environmental benefits – they reduce VOC emissions by over 94.5%, cut electrical energy use by 74.1%, and lower CO2 emissions by 86.37% compared to traditional methods.

That said, the switch isn’t always simple. Water-based adhesives, for example, may require longer curing times or fail to achieve the immediate peel strength of solvent-based options. Print shops must juggle these challenges, ensuring they meet both regulatory requirements and quality standards. The key lies in finding a balance that maintains product integrity while staying compliant with environmental laws.

Where Standards and Laws Align or Conflict

Building on earlier comparisons, this section dives into how standards and laws either work together or clash when applied in practice. For print shops, understanding these dynamics is key to balancing product quality with compliance responsibilities.

Where They Align

Lamination standards and environmental laws are increasingly aligning around the principles of a circular economy. Both industry groups and regulators emphasize recyclability and the use of post-consumer recycled (PCR) content in packaging. For example, EU regulations require all plastic packaging to be designed for recycling and to meet specific recycled content quotas by 2030.

Another area of alignment is the shared goal of eliminating harmful substances. Environmental laws and safety standards often work hand-in-hand to restrict or ban additives like per- and polyfluoroalkyl substances (PFAS), polystyrene, polyvinyl chloride (PVC), and primary aromatic amines (PAA). Organizations such as RecyClass and CosPaTox are stepping in to provide guidelines that help print shops meet recyclability requirements without compromising product safety or performance. As Dr. Axel Weiss, Director Marketing Adhesives at BASF, explains:

With our solutions, you can avoid harmful substances like PAA that are created during the recycling process. Our adhesives enable debonding PET/PE, fully compostable packaging and much more.

While these areas of convergence are promising, print shops still face significant challenges where standards and laws diverge.

Where They Conflict

Conflicts between standards and laws often force print shops into tough decisions about materials and processes. Traditional laminates like PE or PET are valued for their moisture barriers, grease resistance, and glossy finishes, all of which meet industry expectations. However, these same materials make paperboard non-recyclable in standard recycling streams. This creates a dilemma: prioritize performance or recyclability?

Labeling regulations add another layer of complexity. Industry standards commonly use "chasing arrows" to signal recyclability, but laws like California’s SB 343 restrict these symbols unless the material is actively recycled by programs serving at least 60% of the population. A laminate might meet technical recyclability standards but still fail to qualify for such labeling under state law.

Reusability mandates further complicate the picture. The EU’s Packaging and Packaging Waste Regulation (PPWR) requires 40% of transport packaging to be reusable within a reuse system by 2030. However, repeated cleaning and sanitation cycles can weaken laminated materials, potentially causing them to fall short of durability standards. Adding to the uncertainty, the European Commission plans to release a report on Substances of Concern (SoC) by 2026, which is expected to introduce new restrictions that could further limit material options.

What This Means for Print Shops

Print shops face the challenge of balancing operational efficiency with meeting environmental regulations. These demands influence everything from the materials they use to how workflows are structured. As Gary Jones, a respected voice in the industry, explains:

The challenge is understanding the specific requirements as they apply to your operation and taking specific steps to ensure compliance.

To tackle these hurdles, print shops can implement eco-conscious practices and maintain strict compliance protocols.

Adopting Eco-Friendly Practices

One way to reduce environmental impact is by switching to water-based or solvent-free adhesives, which lower VOC emissions without sacrificing bond strength. These adhesives match the performance of traditional solvent-based options while creating a safer work environment and simplifying compliance. For shops using specialty finishes like embossing or foil stamping, adhesives must also endure high pressures and temperatures (usually between 140°F and 176°F) to avoid issues like delamination.

Another innovative option is pre-coated (dry) lamination, where adhesives are applied and dried during film production rather than on-site. This method minimizes solvent emissions and streamlines operations. For those aiming to eliminate plastic lamination altogether, Polylactic Acid (PLA) films offer a biodegradable solution. Made from renewable resources like corn starch, PLA films provide excellent transparency and meet food safety standards, rivaling traditional PET films. Matt Hazel, Senior Director of Supply Chain Management at The Bernard Group, highlights the growing interest in sustainable options:

We’ve seen customer demand grow as we educate people on the fact that there are green alternatives to just about every non-sustainable material.

While adopting greener practices can improve sustainability, staying compliant with regulations is equally critical.

Staying Compliant

Print shops must carefully monitor their waste output and emissions. Using Safety Data Sheets (SDSs) helps track these metrics, ensuring proper classification of hazardous waste and compliance with EPA standards. Shops are categorized as Very Small, Small, or Large Quantity Generators based on their monthly hazardous waste output, such as cleaning solvents. This classification determines the specific rules they must follow. For example, the reporting threshold for Persistent Bioaccumulative and Toxic chemicals, like lead, can be as low as 100 pounds.

While federal EPA guidelines set a baseline, state and local regulations often impose stricter limits. With growing concerns around air quality, emission thresholds have tightened, requiring even smaller shops to secure air permits.

Benefits of In-House Services

Managing lamination and other processes in-house provides print shops with greater control over compliance and quality. For instance, Miro Printing & Graphics Inc. in Hackensack, NJ, demonstrates how in-house operations allow for direct oversight of material certifications and emissions tracking. In-house bindery services also enable precise management of steps like powder removal, preventing issues such as air bubbles or weak adhesion.

Additionally, in-house workflows support "instant lamination" processes, where adhesive application, drying, and pressing happen in one seamless step. This not only boosts efficiency but also ensures compliance with standards like TSCA Title VI for composite wood cores. By keeping these processes under their own roof, print shops can adapt more quickly to regulatory changes and meet growing customer demands for sustainable materials.

Conclusion: Meeting Standards While Protecting the Environment

Print shops can maintain high-quality output while being mindful of environmental responsibilities by aligning industry practices with environmental regulations. As John Hammel, Senior Director of Hardwood and Laminate at Mannington, explains:

Laminates are inherently eco-friendly, largely composed of natural, renewable, and sustainably harvested materials.

The key lies in choosing materials that meet both performance benchmarks and legal requirements. For instance, TSCA Title VI–certified products – such as hardwood plywood (0.05 ppm), particleboard (0.09 ppm), and MDF (0.11 ppm) – often come with third-party certifications like Greenguard Gold or FloorScore, ensuring compliance and quality .

Key Takeaways

Adopting eco-conscious practices, such as solvent-less lamination, can significantly cut energy use – by as much as 80% – while enabling advanced machinery to produce 20–25% of their own energy. Doug Jackson, CEO of Cali, highlights the health advantages of these innovations:

Today’s laminates are safer from a health standpoint thanks to eco-friendly adhesives yielding a low-VOC product.

FAQs

Which lamination choice is easiest to keep compliant in the U.S.?

To ensure compliance in the U.S., select laminates that align with recognized industry standards and meet environmental regulations. Focus on laminates certified by NALFA (North American Laminate Flooring Association) for performance and durability. Additionally, choose products that comply with CARB (California Air Resources Board) or EPA TSCA Title VI requirements, which regulate formaldehyde emissions. These certifications help you meet safety and environmental standards across all states.

How do I verify an adhesive or laminate meets VOC and TSCA limits?

To ensure compliance, use approved test methods – such as ASTM standards – to measure the VOC content of your product. Compare the results against the limits set by local regulations, like those outlined by SCAQMD (South Coast Air Quality Management District).

For TSCA compliance, carefully review the product’s chemical composition alongside the documentation provided by the manufacturer. This will help verify that it meets the requirements of the Toxic Substances Control Act.

By following these steps, you can confirm that your adhesive or laminate aligns with both VOC and TSCA standards.

Can laminated paper products be recyclable or compostable?

Laminated paper products can occasionally be recycled or composted, but it largely depends on the type of lamination used. For example, single-sided coatings might still allow for recycling, whereas double-sided laminations typically make recycling impossible. When it comes to composting, most laminated products containing plastic are not suitable. Plastics don’t decompose in composting environments and can contaminate the compost. While certain laminated papers might work for recycling, those with plastic laminations are usually unsuitable for either recycling or composting.

Related Blog Posts

https://app.seobotai.com/banner/banner.js?id=69dd6fe409e6c77f4f7ae12b

Ultimate Guide to Eco-Friendly Binding for All Prints

Compare sustainable binding options—saddle stitch, PUR, thread-sewn, spiral, and Wire-O—to match page count, durability, and recyclability for any print project.

Eco-friendly binding methods prioritize materials and processes that reduce waste, improve recyclability, and lower resource usage. Common techniques include using recycled or biodegradable materials, energy-efficient adhesives, and plastic-free options like metal wires or cotton threads. Here’s what you need to know:

  • Recyclable Materials: Options like FSC-certified paper, recycled plastic spirals, and magnetic steel wire simplify the recycling process.
  • Low-Impact Adhesives: PUR binding uses 70% less glue than traditional EVA adhesives and operates at lower temperatures, saving energy.
  • Plastic-Free Options: Singer-sewn and thread-sewn bindings eliminate adhesives entirely, relying on biodegradable threads.
  • Mechanical Bindings: Spiral and Wire-O bindings avoid adhesives, using recyclable metal coils for durability and ease of recycling.

Each method suits different projects. Saddle stitching works for lightweight booklets, while PUR binding handles thicker publications. For premium finishes, thread-sewn binding offers durability and biodegradability. Mechanical options like spiral and Wire-O are ideal for larger documents needing flexibility and strength. Choosing the right method depends on page count, durability needs, and recycling goals.

Environmentally Friendly Book

Eco-Friendly Binding for Small to Medium Prints

When it comes to smaller print projects like booklets, brochures, catalogs, or training manuals, choosing an eco-friendly binding method can make a big difference. These options aim to combine durability, cost-effectiveness, and environmental responsibility. The trick is to select the binding type that best suits your page count and how the final product will be used.

Saddle Stitch and Loop Stitch

Saddle stitching is a simple yet effective method that uses steel wire staples to hold folded pages together along the spine. Since it doesn’t rely on adhesives, it minimizes material use and simplifies recycling. The metal staples are magnetic, so they can be easily removed during the recycling process.

"Saddle-stitching is… the most sustainable binding option. It uses no glue – and the metal fastenings which attach the pages together can be easily removed by a magnet during recycling." – Park Communications Ltd

Loop stitching works similarly but forms wire loops along the spine, allowing the booklet to fit into a 3-ring binder without the need for punched holes. Both methods are budget-friendly and offer quick production times, making them excellent for short deadlines. If you need something more durable, you might want to consider PUR binding.

PUR Binding for Durability

For thicker materials like catalogs or booklets with a square spine, PUR (Polyurethane Reactive) binding is a solid choice. Unlike standard EVA glues, PUR uses less adhesive and operates at lower temperatures, reducing waste and energy use during production. It’s also about 50% stronger than traditional perfect binding adhesives, making it ideal for publications that will see frequent handling.

Another advantage of PUR is its thermosetting property. Unlike thermoplastic glues, it doesn’t remelt during recycling. Instead, it can be filtered out as a solid and used for carbon-neutral power generation. Its flexibility also allows books to open flat without damaging the spine. For a fully biodegradable alternative, you might want to look into singer-sewn or thread-sewn binding.

Singer Sewn and Thread-Sewn Binding

Thread-sewn binding methods take sustainability a step further by using textile threads, often made from biodegradable cotton, to stitch pages together. Singer-sewn binding eliminates adhesives entirely, relying on extra stitching for added strength. This approach creates a 100% biodegradable product, making it ideal for premium brochures, art catalogs, and other high-end materials.

Thread-sewn binding also provides excellent lay-flat functionality, allowing the pages to open fully without stressing the spine. While these options tend to be more expensive and may require specialized equipment, they deliver unmatched quality and environmental benefits for small to medium print runs.

Eco-Friendly Binding for Large Prints

When dealing with oversized books, thick reports, or large-format documents, it’s essential to pick binding methods that meet both physical durability and eco-conscious standards. Mechanical bindings like spiral and Wire‑O stand out because they don’t rely on heated adhesives, making them more energy-efficient compared to glue-based options. These methods strike a balance between sturdiness and environmentally friendly practices.

Spiral Binding with Recycled Coils

Spiral binding uses a continuous coil threaded through pre-punched holes, allowing pages to rotate a full 360° and lay completely flat. This makes it perfect for large manuals, cookbooks, or reports that need to stay open while in use. It’s also highly versatile, accommodating documents up to 2 3/4 inches thick, which is more than most binding methods can handle.

Opting for metal coils instead of PVC plastic significantly enhances recyclability. Metal spiral coils can be easily separated using magnets, and recycled steel options further help in reducing environmental impact.

Wire‑O Binding for Professional Results

Wire‑O binding, on the other hand, delivers a sleek, professional appearance. It uses a double-loop metal wire, completely avoiding plastic and adhesives, which simplifies the recycling process.

"Metal-based binding (Wire‑O mechanical binding and wire saddle stitching) use no glues and are entirely plastic free unlike plastic coil mechanical binding." – Kase Printing

While Wire‑O binding can handle stacks up to 1 1/4 inches thick – less than spiral binding – it’s more than adequate for most professional presentations and reports. Its durability ensures documents last longer, reducing the need for reprints and saving resources over time. Just keep in mind that designs should include a binding margin to maintain a clean, professional look.

How to Choose the Right Eco-Friendly Binding

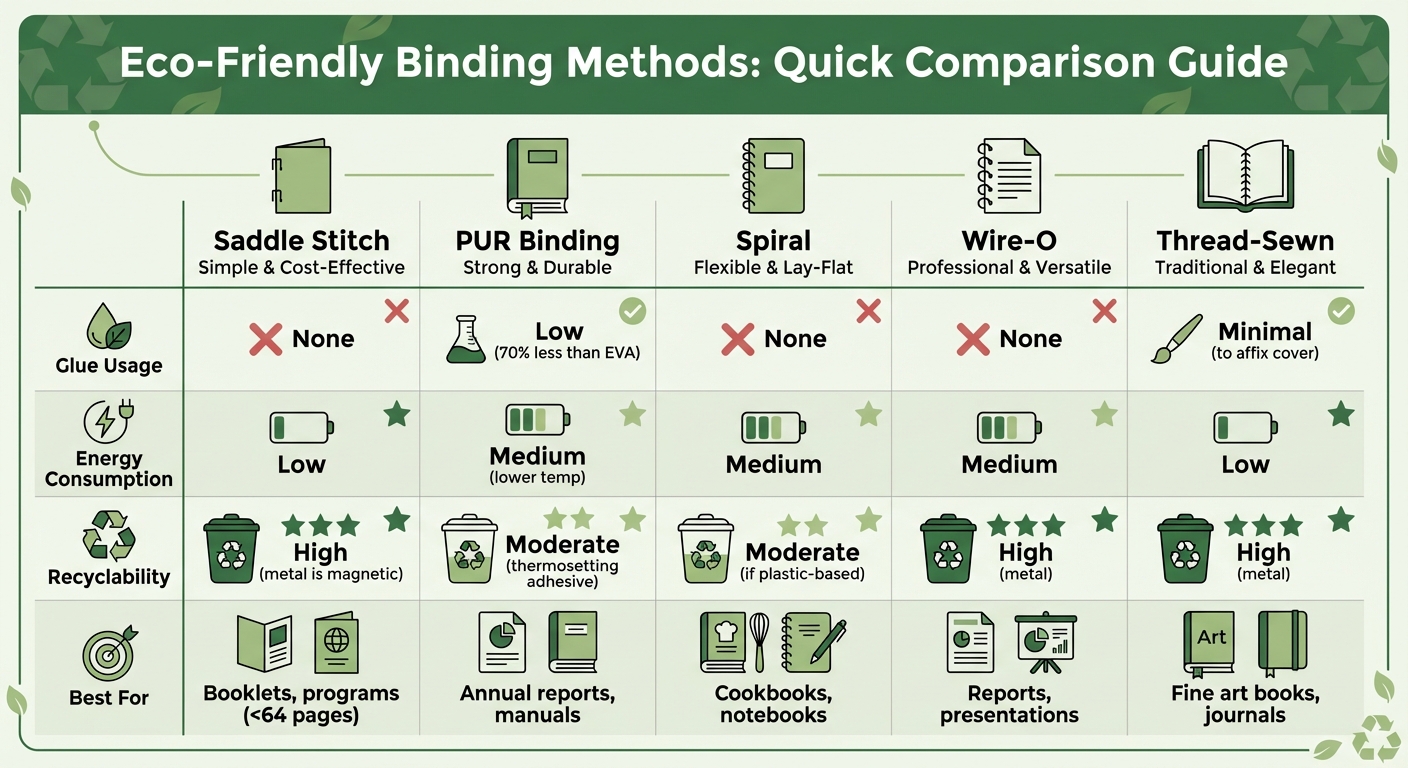
Eco-Friendly Binding Methods Comparison: Features, Recyclability & Best Uses

Eco-Friendly Binding Methods Comparison: Features, Recyclability & Best Uses

Factors to Consider

When picking a binding method, think about what works best for your project’s specific needs. For instance, saddle stitching is ideal for documents with fewer than 64 pages, while PUR binding is better suited for thicker publications starting at 40 pages.

If your project involves materials that will be handled frequently, like training manuals, PUR binding offers about 50% more strength compared to traditional methods, all while using less adhesive. It also operates at lower temperatures than EVA glue, which helps cut down on energy use. For those aiming to avoid plastic-based adhesives altogether, Singer-sewn bindings with biodegradable cotton threads provide a durable, eco-conscious option.

Recyclability is another crucial factor. Metal-based bindings, like Wire-O, can be easily separated from paper during recycling. While PUR glue is a type of plastic, its thermosetting properties simplify the recycling process because it doesn’t remelt. For books that need to lay flat, such as cookbooks or art books, bindings like thread-sewn, spiral, or Wire-O are practical and also make recycling easier.

Finally, keep your budget in mind. Saddle stitching is the most cost-effective choice for simple booklets or newsletters. While PUR binding is pricier than standard perfect binding, its durability can save money over time by reducing the need for reprints. On the other hand, Singer-sewn bindings are generally more expensive due to their specialized production but are perfect for artisan projects that emphasize a plastic-free finish.

Comparison of Binding Methods

Binding Method Glue Usage Energy Consumption Recyclability Best For
Saddle Stitch None Low High (metal is magnetic) Booklets, programs (<64 pages)
PUR Binding Low (70% less than EVA) Medium (lower temp) Moderate (thermosetting adhesive) Annual reports, manuals
Spiral None Medium Moderate (if plastic-based) Cookbooks, notebooks
Wire-O None Medium High (metal) Reports, presentations
Thread-Sewn Minimal (to affix cover) Low High Fine art books, journals

Eco-Friendly Binding Services at Miro Printing & Graphics Inc.

Binding Solutions That Reduce Environmental Impact

Miro Printing & Graphics Inc., based in Hackensack, NJ, offers binding and print solutions designed with sustainability in mind. Their digital printing process is a standout feature, providing an environmentally conscious option for short to mid-sized print runs, which helps minimize waste.

For smaller projects like booklets, catalogs, and newsletters, they provide eco-conscious binding options such as coil binding made from recycled materials, perfect binding, comb binding, and booklet-making techniques like saddle stitching. Their advanced in-house bindery ensures tight quality control, allowing them to maintain high production standards throughout the process.

When it comes to larger projects, Miro Printing produces vinyl banners, poster prints, and signs using sustainable materials. Their team works closely with clients, offering guidance on eco-friendly material choices to help reduce environmental impact. This hands-on approach ensures that every project aligns with both professional standards and environmental goals.

Custom Eco Projects for Local Clients

In addition to their standard services, Miro Printing takes on custom projects with a focus on sustainability. Located at 831 Main St in Hackensack, they cater to businesses and individuals across New Jersey, New York, and Connecticut, offering tailored solutions that meet unique eco-friendly needs. One satisfied customer, Julia I., shared her experience:

"Mike and his team completed a complex job in record time at a reasonable price… I even received a video of my print sample (a mini booklet) for approval before they proceeded."

Equipped with a full in-house bindery and compatibility with top design tools like Adobe Creative Suite and Microsoft Office, Miro Printing ensures seamless project customization. Their team is available Monday through Friday, from 9:00 am to 5:00 pm, to discuss specific environmental objectives and provide print samples before moving forward with production. By partnering with clients to achieve eco-friendly goals, Miro Printing underscores its dedication to sustainability in every aspect of its work.

Conclusion

Eco-friendly binding isn’t just about reducing environmental impact – it also ensures a professional finish and responsible production practices. Techniques like saddle-stitching and Wire-O binding prove that sustainability and durability can go hand in hand. As Sarah Lee, Author at Number Analytics, highlights:

"Binding plays a vital role in print production as it determines the final product’s quality and usability".

The binding method you choose does more than meet practical requirements – it also reflects your brand’s values, showcasing a commitment to both quality and sustainability.

For businesses and individuals in New Jersey, New York, and Connecticut, Miro Printing & Graphics Inc. offers expert guidance. Located at 831 Main St in Hackensack, their team provides personalized consultations to help you find the right sustainable binding solution for your project.

Ultimately, binding is more than just a finishing touch; it’s an opportunity to minimize waste while delivering a polished, professional product. By considering factors like page count, usage, and distribution, you can select a binding method that aligns with both your needs and your environmental goals.

FAQs

Which eco-friendly binding is best for my page count?

When choosing an eco-friendly binding method, it’s essential to consider both the page count and how durable you need the project to be. For smaller projects with 8–64 pages, saddle stitch binding is a reliable option. If you’re working on larger or sturdier projects, perfect binding or post binding might be better suited. To minimize environmental impact, you can explore sustainable options like PUR adhesives or glue-free bindings.

Can bound documents be recycled without removing the binding?

When it comes to recycling bound documents, the binding itself plays a big role. If the binding is made from recyclable materials like paper or metal, you can often recycle the entire document without any extra steps.

However, bindings made from plastic, such as PUR or perfect binding, might need special attention. In these cases, you may need to remove the binding or handle it separately to ensure it’s recycled properly.

Always make sure to check your local recycling guidelines for the most accurate instructions. Different areas may have specific requirements for handling these materials.

What’s the most plastic-free binding option for a premium finish?

The binding option that minimizes plastic use while offering a premium finish utilizes biodegradable materials like FSC® Certified dyed-through Kraft paper. This paper comes with a 100% organic, plastic-free coating, combining excellent performance with a refined, sophisticated look.

Related Blog Posts

https://app.seobotai.com/banner/banner.js?id=69c0cc891b352ff267cbac32

Eco-Friendly Printing: Digital vs Flexo vs Offset

Compare energy use, startup waste, and VOCs across digital, flexo, and offset printing to choose the most sustainable method by run size and material.

Printing methods like digital, flexographic (flexo), and offset each have unique strengths when it comes to energy use and waste reduction. Here’s a quick breakdown:

  • Digital Printing: Best for short runs (100–5,000 units). Minimal setup energy, low startup waste (1–3%), and efficient curing with LED UV systems. Ideal for personalized or small-batch projects.
  • Flexographic Printing: Suited for high-volume packaging (50,000+ units). Uses water-based inks to reduce VOC emissions by 20–40%. Inline processing and LED UV curing improve energy efficiency by up to 30%.
  • Offset Printing: Great for large-scale projects like books and magazines. Though setup energy is high, it becomes efficient for long runs, with lower VOC emissions (80% less than digital for mass production).

Key takeaway: Digital excels in small runs, flexo is optimal for packaging, and offset works best for large-scale production. Energy-efficient technologies like LED UV curing can reduce energy use across all methods.

Quick Comparison

Feature Digital Printing Flexographic Printing Offset Printing
Setup Energy Low High Very High
Startup Waste 1–3% 3–6% Moderate to High
Best Use Case Short runs, variable data High-volume packaging Large-scale books, magazines
Energy Efficiency 0.04–0.10 kWh/pack 0.07–0.12 kWh/pack High for long runs
VOC Emissions Low for short runs Reduced with water-based inks Lowest for mass production

Choosing the right method depends on your project size, material type, and energy goals.

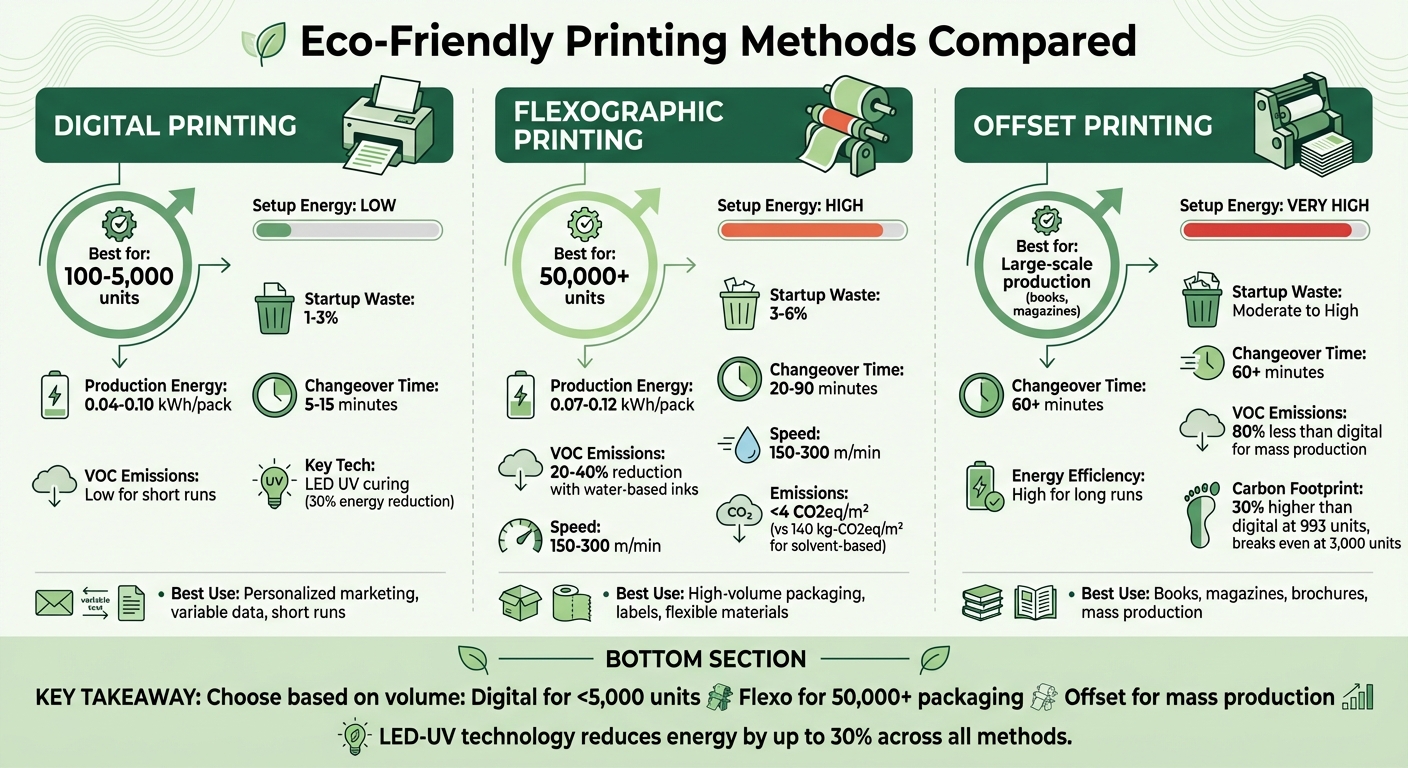
Digital vs Flexo vs Offset Printing: Energy Efficiency and Environmental Impact Comparison

Digital vs Flexo vs Offset Printing: Energy Efficiency and Environmental Impact Comparison

Digital Printing: Energy Use and Environmental Impact

Low Setup Energy and Reduced Waste

Digital printing simplifies the process by sending files directly to the substrate, skipping the need for plate creation. This streamlined approach drastically cuts down on both setup energy and waste. For example, flexographic printing can require hundreds of meters of substrate to achieve proper color and registration, while digital printing systems often stabilize with just 5–20 sheets or a few tens of meters.

Flexo printing typically generates 3–6% waste during startup, but digital printing only needs those 5–20 sheets to stabilize. This efficiency is especially noticeable in small production runs, ranging from 100 to 5,000 units, where energy consumption per pack is significantly lower – usually between 0.04–0.10 kWh. Taylor Morgan, Print Production Lead at Printrunner, highlights this advantage:

"Digital engines minimize makeready and plate waste, but the sustainability math works best when short‑run or versioned work dominates."

By removing the need for plates – and the chemicals and solvents associated with them – digital printing reduces waste and energy use even further. This waste reduction not only lowers energy consumption but also aligns with advancements in curing technology.

LED UV Curing Systems

Curing technology is another area where digital printing shines in energy efficiency. Modern digital presses often use LED UV technology, which transforms the way inks cure. Unlike traditional mercury lamps that need warm-up time and produce excessive heat, LED systems operate with instant on/off functionality and focus light in narrow bands (365–395 nm). This precise targeting reduces wasted infrared heat and cuts energy use by 50–70% compared to mercury-vapor UV lamps.

The lower heat output of LED systems opens up the possibility of printing on thin, heat-sensitive materials without requiring energy-draining cooling systems. Additionally, LED lamps are incredibly durable, lasting around 20,000 hours compared to the 1,000–2,000 hours typical of older UV lamps. They also maintain consistent performance without the gradual power loss seen in traditional systems. These advancements not only reduce operational energy costs but also align with broader efforts toward sustainability outlined earlier in the discussion.

Flexographic Printing: Energy Use and Environmental Impact

Water-Based Inks and Lower VOC Emissions

Flexographic printing stands out for its use of water-based inks, which reduce VOC emissions by 20–40% compared to solvent-based systems. This not only improves air quality but also creates a safer working environment. However, the process does require careful management of drying energy and humidity.

The environmental advantages of flexo printing go further. A study conducted between October 1 and December 4, 2023, by the Beijing Institute of Graphic Communication, led by Professor Lixin Mo, revealed impressive results. Flexographic printing using water-wash plates and water-based inks produced emissions of less than 4 CO2eq/m², a stark contrast to the 140 kg-CO2eq/m² emissions from gravure solvent-based systems. Professor Mo highlighted:

"Flexographic printing provides numerous advantages, including a more environmentally friendly approach compared to other printing technologies… and the ability to facilitate high-speed mass production."

Advancements in ink technology, paired with modern curing methods, further improve flexo’s environmental footprint. For instance, integrating LED-UV curing technology into flexo systems reduces energy consumption by up to 30% while also cutting emissions. David Lee from Focus Label Machinery Ltd shared:

"LED UV is now creating a lot of interest because it uses up to 30% less energy and has reduced impact with regards to volatile emissions."

Inline Processing Reduces Energy Consumption

Flexographic printing also benefits from streamlined workflows that save energy. Inline processing combines multiple steps – such as printing, coating, laminating, and die-cutting – into a single pass. This eliminates the need for multiple setups, significantly reducing energy waste.

The efficiency gains are notable. Flexo presses typically operate at speeds of 150–300 m/min. When paired with inline processing, these systems minimize idle time and optimize energy use per meter. In February 2023, a Pakistani packaging company reduced machine idle time by 30%, resulting in energy savings of approximately 34–39% per meter. Rodney Pennings, Sales Director at Paper Converting Machine Co, explained:

"Finding ways to produce a finished product in one pass has helped to drive down production costs and waste while helping to broaden product offerings and access to new markets."

Additionally, heat recycling systems in modern flexo presses contribute to substantial energy savings, cutting energy costs by 23% to 35%. This makes flexo particularly efficient for high-volume production runs exceeding 50,000 units.

Offset Printing: Energy Use and Environmental Impact

Higher Setup Energy for Plate Preparation

Offset printing involves a significant energy investment upfront, particularly for creating the four CMYK aluminum plates and calibrating the press system. While aluminum plates are recyclable, the energy required for their production is considerable. This high setup energy makes offset printing less efficient for smaller print runs. However, as the volume of production increases, energy consumption and emissions per unit drop dramatically. For runs exceeding 500–1,000 units, offset printing becomes more energy-efficient, reducing the overall carbon footprint per item. Interestingly, lithographic offset printing produces nearly 80% fewer Volatile Organic Compounds (VOCs) compared to digital printing when used for extended production runs.

Recent innovations, such as LED-UV curing technology, are helping offset some of these energy demands by cutting down on curing energy and reducing process-related waste.

LED-UV Technology and Water Consumption

Modern offset presses now utilize LED-UV curing systems, which have revolutionized energy efficiency. Unlike traditional mercury-vapor lamps, LED-UV systems require no warm-up time and emit far less heat. These systems can lower energy consumption by as much as 70%, with overall press energy usage dropping by up to 30%. Additionally, LED lamps boast a lifespan of approximately 20,000 hours, compared to the 1,000–2,000 hours typical of older UV lamps. Their instant on/off functionality also allows presses to handle thicker ink layers – like metallic finishes – without smudging, thanks to faster curing speeds.

Beyond energy savings, water management is a key factor in offset printing efficiency. Water is used on the plate roller to ensure it adheres only to non-image areas, repelling oil-based inks and directing them precisely to the image areas. Many operations now use digital plate processing with water or digital imaging, eliminating the need for harmful developer chemicals. This shift not only reduces environmental impact but also cuts down on water and energy waste. Furthermore, standardizing press settings during startup helps minimize both water and substrate waste.

Energy Efficiency Comparison: Digital vs Flexo vs Offset

Side-by-Side Comparison Table

When deciding on the most sustainable printing method, energy efficiency plays a crucial role. Each method has its own advantages depending on the project size and specific requirements.

Digital printing is ideal for short runs, using 0.04–0.10 kWh per pack when workflows are optimized. Flexographic printing, while slightly more energy-intensive at 0.07–0.12 kWh per pack with traditional UV curing, benefits from high-speed production (150–300 meters per minute) once the press is fully operational. Offset printing, on the other hand, consumes the most energy during setup due to plate preparation and refrigeration systems. However, its cost per unit becomes much lower for high-volume projects. The table below highlights these differences.

"Sustainability isn’t a single metric. kWh per pack, VOCs from inks/cleaning, scrap rates during changeovers, and compliance… all factor in." – Madison Cole, Senior Packaging & Labeling Strategist, OnlineLabels

Feature Digital Printing Flexographic Printing Offset Printing
Setup Energy Low (No plate creation) High (Plate mounting & calibration) Very High (Complex plate preparation)
Production Energy 0.04–0.10 kWh/pack 0.07–0.12 kWh/pack High (Plate preparation & refrigeration)
Startup Waste 1–3% 3–6% Moderate to High
Changeover Time 5–15 minutes 20–90 minutes 60+ minutes
VOC Emissions Low for short runs; higher for long runs Reduced 20–40% with water-based inks Lowest for mass production
Best Application 100–5,000 units, variable data 50,000+ units, labels, packaging Mass production books, magazines

These figures highlight how production volume is a key factor in determining the most sustainable choice. For example, a life cycle assessment comparing the HP Indigo 7000 Digital Press to offset printing for 8-page brochures revealed a 30% lower carbon footprint for digital printing at the economic breakeven point of 993 brochures. However, the environmental breakeven point, where the overall impact of both methods aligns, wasn’t reached until producing approximately 3,000 brochures – 2.4 to 4.1 times higher than the economic breakeven. This emphasizes the need to weigh both economic and environmental factors when selecting a printing method.

How to Choose the Right Printing Method

Key Factors to Consider

When selecting a printing method, aligning your production needs with energy and cost efficiencies is crucial. Based on the energy comparison table, project volume is the most important consideration. For short runs (100–5,000 units), digital printing stands out due to its minimal startup waste (1–3%) and the absence of plate requirements, which enhances efficiency. On the other hand, once production exceeds 50,000 units, flexographic printing becomes more economical. Its lower energy consumption per unit (0.001–0.004 kWh per label) and reduced running costs outweigh its higher initial waste. For extremely large-scale projects, offset printing shines, as its per-unit costs drop significantly, making it a go-to for high-volume commercial needs despite the higher setup energy and waste.

The material type also plays a significant role. Flexographic printing works well for flexible packaging, labels, corrugated boxes, and foil substrates, especially with water-based inks that can cut VOC emissions by 20–40%. Digital printing performs best on standard materials like paper, certain films, and labels, though it may struggle with specialty substrates. Offset printing remains the benchmark for high-quality paper products, including books, brochures, and magazines.

Budget considerations require balancing setup and per-unit costs. Digital printing eliminates plate expenses, making it ideal for smaller runs, though its per-unit costs rise for larger volumes. Flexographic and offset methods involve higher upfront costs for plates and setup but deliver significant savings once production scales up. For example, the economic break-even point for offset printing occurs at around 993 8-page brochures, while the environmental break-even is closer to 3,000 units. This makes digital printing a greener option for mid-range volumes.

By evaluating these factors, you can determine which method best fits your specific project needs.

Method Recommendations by Project Type

Based on volume, material, and budget, here’s how to match the printing method to your project:

  • Digital printing is perfect for short-run projects like personalized marketing campaigns, variable data printing, or multi-SKU jobs. With a quick changeover time of 5–15 minutes and almost no makeready waste, it’s ideal for runs under 3,000 units. Opting for LED-UV curing can also lower energy use by about 30% compared to traditional systems.
  • Flexographic printing is best suited for packaging projects over 50,000 units, especially for flexible materials or labels. Its use of reusable polymer plates and water-based inks supports sustainability goals in medium- to long-run production. While changeover takes 20–60 minutes and startup waste ranges from 3–6%, its high-speed output (150–300 meters per minute) ensures cost and energy efficiency at scale.
  • Offset printing excels in large-scale commercial projects like books, magazines, and brochures. Its higher setup energy and plate preparation waste become justifiable when spread across tens of thousands of copies, making it the most economical choice for massive volumes.

Conclusion

Making Energy-Efficient Printing Choices

Selecting the best printing method comes down to your project’s scale and environmental goals. For smaller runs, digital printing shines by reducing setup waste and energy use. If you’re producing over 50,000 units of packaging or labels, flexographic printing – especially with water-based inks that lower VOC emissions by 20–40% – is a solid choice for efficiency. On the other hand, offset printing, while energy-heavy during setup, becomes more cost-effective and energy-efficient for large commercial runs, as the setup energy is spread across higher volumes. Studies show that digital printing’s carbon footprint is about 30% lower than offset printing for runs up to 3,000 units, but offset takes the lead for larger projects.

Modern LED-UV systems can cut energy use by up to 30% across all three printing methods. Additionally, water-based ink systems offer another layer of sustainability. For instance, flexographic printing with water-wash plates can achieve emissions as low as 4 CO₂eq/m², a stark contrast to the 140 kg-CO₂eq/m² associated with solvent-based options.

"Sustainability isn’t a single metric. kWh per pack, VOCs from inks/cleaning, scrap rates during changeovers, and compliance… all factor in."
– Madison Cole, Senior Packaging & Labeling Strategist, OnlineLabels

For flexible packaging, combining UV-LED systems with flexographic processes delivers an effective mix of speed and eco-friendliness.

Ultimately, the right printing method depends on your project’s volume and sustainability priorities. For short-term marketing campaigns, digital printing’s low waste makes it ideal. For high-volume packaging, flexography’s efficiency can outweigh its upfront setup costs. Carefully consider your typical run lengths, materials, and budget to strike the best balance between environmental impact and cost.

For tailored advice on eco-conscious printing solutions, reach out to Miro Printing & Graphics Inc.

FAQs

How do I estimate my print run’s carbon footprint?

To figure out the carbon footprint of your print run, you can use tools that assess the impact based on factors like paper type, weight, and volume. Standards such as ISO 16759:2013 offer a framework for calculating carbon footprints using Life Cycle Assessment (LCA). Additionally, practical calculators provided by industry organizations can help you evaluate the emissions tied to your printing processes and make choices that are more environmentally conscious.

What does LED-UV curing change for sustainability?

LED-UV curing offers a greener alternative by cutting out mercury and ozone emissions completely. Plus, it slashes energy use by as much as 85% compared to traditional mercury-based UV curing methods. This makes it a much more eco-friendly option, reducing its overall impact on the environment.

Are water-based inks always the greenest option?

Water-based inks might seem like a greener option at first glance, but that’s not always the case. Drying them can use up a lot of energy, and their environmental impact can vary based on how they’re formulated and applied. Whether they’re a better choice depends heavily on the specific printing method and situation.

Related Blog Posts

https://app.seobotai.com/banner/banner.js?id=69982f42efc60cc2af088eeb

How to Allocate Direct Mail Budgets for ROI

Learn how to split direct mail budgets across postage, printing, design, and lists; target, personalize, test and measure to boost response rates and ROI.

Direct mail campaigns can deliver an impressive 112% ROI, outperforming many digital methods. To achieve this, it’s vital to allocate your budget effectively and focus on key areas like postage, printing, design, and mailing lists. Here’s what you need to know:

  • Postage: Often the largest expense, ranging from $0.31 to $0.58 per piece. Marketing Mail is cheaper but slower, while First-Class Mail is faster but costs more.
  • Printing: Costs vary by format, from $0.05 to $1.00 per piece, depending on materials and methods (digital vs. offset printing).
  • Design: Professional services cost $150 to $1,000 per project, but templates or in-house work can lower expenses.
  • Mailing Lists: High-quality lists cost $0.03 to $0.30 per record and determine up to 40% of your campaign’s success.

Targeting the right audience, such as repeat customers or those undergoing life changes, boosts response rates. Personalization – like using names or tailored offers – can increase engagement by up to 500%. Testing small batches before scaling ensures better results and minimizes risks.

To measure success, track metrics like ROI, response rates, and cost per acquisition (CPA). Tools like QR codes or unique URLs help connect offline campaigns to online conversions. By carefully managing costs and analyzing performance, direct mail can become a reliable revenue driver.

Direct Mail Strategies to Boost ROI & Cut Costs

Breaking Down Direct Mail Costs

To manage your budget effectively, it’s essential to know exactly where your money is going. Postage often takes the largest chunk, sometimes surpassing what you spend on printing. Beyond that, you’ll need to factor in costs for design, production, and mailing lists. Let’s break it down.

On average, marketers spend between $0.65 and $3.00 per piece for a complete direct mail campaign.

Printing and Production Expenses

Printing costs can vary widely. For instance, postcards typically cost $0.03 to $0.08 per piece, brochures range from $0.06 to $0.18 per piece, and personalized envelope packages can climb to $0.17 to $0.50 or more. Overall, printing expenses usually fall between $0.05 and $1.00 per piece, depending on factors like paper weight, color options, finishing touches, volume, and the printing method used.

  • Digital printing is ideal for smaller print runs and allows for cost-effective personalization through Variable Data Printing (VDP).
  • Offset printing, on the other hand, becomes more cost-efficient for large-scale campaigns, though it requires a higher upfront investment in printing plates.

Printing larger quantities in a single run can significantly reduce your per-piece costs by spreading setup expenses across the total volume.

Postage Expenses

Postage is almost always the biggest expense in any direct mail campaign. Keith Goodman, VP of Corporate Marketing & Sales at Modern Postcard, puts it plainly:

"In almost every campaign, the cost-per-piece of the printing will be a smaller percentage of the overall cost than the postage".

For delivery, Marketing Mail rates start at around $0.31 per piece and take 10–15 business days. If you need faster delivery, First-Class Mail costs between $0.40 and $0.58 per piece, with delivery times of 3–5 business days.

If timing isn’t critical, Marketing Mail can save you a significant amount. To keep costs low, ensure your mailpieces weigh less than 3.3 oz and meet standard USPS dimensions, such as 6"x9" postcards. This helps you avoid extra per-pound surcharges or costly "flat" fees.

Design and Mailing List Expenses

Design and mailing lists are other key contributors to your budget:

  • Design Costs: Professional design services range from $100 to $300 per hour or $150 to $1,000 per project, depending on the complexity. You can save by using pre-made templates or handling design in-house, but weigh these savings against the time and quality needed for your campaign.
  • Mailing List Costs: Consumer mailing lists generally cost between $0.03 and $0.10 per record, while specialty lists targeting specific behaviors can cost $0.30 or more per record. Given that the quality of your list determines about 40% of your campaign’s success, investing in a high-quality list is crucial. To cut waste and take advantage of USPS automation discounts, ensure your list is CASS-certified and updated through NCOA.

Targeting the Right Audience

Once you’ve got a handle on direct mail costs, the next step is making sure your message lands in the hands of the people most likely to respond.

Focus your resources on those who are most likely to engage. For example, house lists – your current and past customers – typically achieve a 9% response rate, compared to just 5% for prospect lists. That difference can significantly impact your campaign’s overall profitability.

Finding Your Most Profitable Segments

Your existing customers are a goldmine. They’re already familiar with your brand and have made purchases, making them far more likely to buy again than someone who’s never interacted with your business. Dive into your customer data to identify key groups like repeat buyers, recent purchasers, or those with a high lifetime value (LTV). These segments often justify a larger share of your budget because they’re more likely to convert.

Life events also present prime opportunities. People going through major changes – like moving, getting married, or having a baby – are often ready to make new purchasing decisions. Campaigns that tie into these events can see a 200% boost in performance compared to standard campaigns. By combining behavioral data (like browsing history or past purchases) with demographic details like age or income, you can refine your targeting even further.

Using Personalization to Increase Returns

Personalization doesn’t have to break the bank, thanks to tools like Variable Data Printing (VDP). This technology allows you to customize images, offers, and messages for each recipient without racking up significant costs. Even small touches, like adding a recipient’s name, can increase response rates by 135%. Including additional personal details can push those rates up to 500%.

Take thredUP as an example. They saw a 25% increase in order rates by using personalized HTML retention postcards aimed at customers who were at risk of disengaging. Anthony Marino, President of thredUP, shared:

"We’ve seen a 25% increase in order rate from the customers we target with Lob campaigns."

You can also integrate personalized QR codes or unique URLs (pURLs) to track individual responses. This not only connects your direct mail efforts to online activity but also gives you precise data to measure performance.

Dividing Your Budget Across Campaign Components

Direct Mail Budget Allocation Breakdown by Campaign Size

Direct Mail Budget Allocation Breakdown by Campaign Size

Once you’ve analyzed costs, the next step is dividing your budget wisely to get the best return on investment. Typically, you’ll need to allocate funds across production, postage, design, and data services.

Direct mail campaigns generally involve four main expense categories: creative design, production and printing, mailing and postage, and list and data services. Here’s a typical budget allocation:

  • 40-50% for production and printing
  • 30-40% for postage
  • 10-20% for design and list acquisition

Creative and strategy services usually account for about 10% of the overall budget.

Budget allocation can shift depending on campaign volume. Let’s look at an example:

Campaign Component 6,000 Postcards 20,000 Letters 40,000 Letters
Mailing List $900 (19%) $3,000 (16%) $6,000 (23%)
Design $605 (13%) $726 (4%) $726 (3%)
Printing $540 (12%) $1,400 (8%) $2,400 (9%)
Postage/Mailing $2,580 (56%) $13,400 (72%) $17,200 (65%)
Total Cost $4,625 $18,526 $26,326

Notice how design costs shrink as a percentage of the total budget when volume increases. For instance, in a 500,000-piece letter campaign, the cost per unit drops to between $0.44 and $0.50, thanks to bulk discounts and production efficiencies.

After dividing your budget, it’s crucial to test your approach before fully scaling the campaign.

Testing and Adjusting Your Budget

Testing is a key step before committing to a large-scale campaign. Set aside a portion of your budget to experiment with different creative elements, offers, and formats. While testing can result in higher costs per piece for smaller batches, it’s a smart investment to validate your strategy.

Alan Sherman, VP of Marketing Strategy at IWCO Direct, highlights the importance of bold testing:

"We find that ‘bolder’ testing, such as changing package format, leads to greater lifts in response vs. smaller iterative changes, such as changing a headline".

Focus your test budget on meaningful changes that can deliver measurable results. Once you’ve identified what resonates with your audience, you can scale up with confidence and refine your budget allocation based on real performance data.

Measuring Results and Improving Future Campaigns

Once your campaign is live, it’s time to monitor its impact and ensure your budget was well spent. Start by tracking key metrics like the Response Rate, which shows the percentage of recipients who engage with your campaign – whether that’s scanning a QR code, visiting a personalized URL, or calling a dedicated number. You can calculate this by dividing the number of responses by the number of delivered mail pieces. Another critical metric is the Conversion Rate, which measures how many of those responders take the final action you’re aiming for, like making a purchase or signing up for a service.

Return on Investment (ROI) is the ultimate measure of success. Calculate it using the formula: ((Total Revenue – Total Campaign Cost) / Total Campaign Cost) × 100. To assess how efficiently your campaign brings in customers, track Cost Per Acquisition (CPA), which is the total campaign cost divided by the number of new customers. Additionally, the Average Order Value (AOV) can reveal how much each customer spends per transaction, with direct mail often increasing AOV by building trust.

Metrics to Track

Beyond basic engagement, other metrics can provide deeper insights. For example, Customer Lifetime Value (CLV) estimates the total revenue a customer will generate over their relationship with your business, which can help justify a higher initial CPA. Another useful measure is Revenue Per Mailpiece, calculated by dividing total revenue by the number of delivered mailers. This gives a quick snapshot of your campaign’s overall effectiveness.

To directly attribute sales to specific mailers, use trackable elements like unique coupon codes, QR codes, or dedicated phone numbers. For purchases that don’t use these tracking methods, match-back analysis can compare your mailing list with transaction records to identify sales driven by your campaign.

Metric Formula Purpose
Response Rate (Responses ÷ Delivered Pieces) × 100 Measures initial engagement and interest
Conversion Rate (Conversions ÷ Responses) × 100 Evaluates how effectively responders complete your goal
CPA Total Campaign Cost ÷ New Customers Assesses cost efficiency of acquiring customers
ROI ((Revenue – Cost) ÷ Cost) × 100 Shows overall profitability of the campaign

These metrics aren’t just numbers – they’re tools to refine your strategy and make smarter budget decisions for future campaigns.

Working with Professional Print Services

Your campaign’s performance data can also guide how you choose partners for future projects. For example, Miro Printing & Graphics Inc. offers mailing and fulfillment services that include automated inserting, addressing, and CASS certification. This certification ensures addresses are accurate, reduces undeliverable mail, and helps you qualify for USPS automation discounts. Their Every Door Direct Mail (EDDM) service is another powerful tool, allowing you to target specific geographic areas without needing to buy mailing lists.

Miro Printing & Graphics Inc. also provides an in-house bindery, offering services like UV coating, die cuts, folding, and assembly – all handled in one location. This streamlined approach eliminates delays and reduces the hassle of managing multiple vendors. When you consider the "soft costs" – like the time your staff spends coordinating with various providers – working with a full-service print shop that handles everything from design to mailing can save both time and money.

Conclusion

The strategies for cost management, precise targeting, and continuous testing all come together to create a powerful framework for direct mail success.

Think of every dollar spent on direct mail as an investment in growth. With careful planning, you can estimate profitability and customer acquisition costs before even sending out your first piece. This mindset transforms direct mail from being just another expense into a scalable channel for driving revenue. Studies consistently show that well-executed direct mail campaigns turn costs into measurable profits.

The secret lies in balancing thorough preparation with ongoing adjustments. Start by conducting a break-even analysis to determine the minimum response rate you need. Then, allocate part of your budget to test different creative approaches, offers, and audience segments. As Mike Gunderson, Founder and President of Gundir, wisely notes:

"We test because we can’t know for sure until we do. Calculators are no substitute for being in-market".

This philosophy is the backbone of any effective direct mail strategy. It ensures you avoid scaling campaigns that don’t perform while identifying the audience segments worth investing in more heavily.

Don’t overlook hidden costs like undeliverable mail or added administrative tasks. Keep your mailing lists accurate with tools like CASS certification and NCOA updates to ensure your materials reach the right people. Partnering with a full-service provider, such as Miro Printing & Graphics Inc., can also streamline production and reduce overhead costs. Over time, these efficiencies add up, and as your campaign scales, the cost per piece typically decreases.

Finally, track your campaign’s performance using tools like unique promo codes, QR codes, or personalized URLs. These tools bridge your offline efforts with online conversions, helping you measure both immediate returns and long-term customer value. By taking a long-term perspective, you can justify higher initial spending on prospects who are likely to become loyal, repeat customers. With detailed planning, consistent testing, and precise measurement, direct mail can evolve into a reliable and scalable engine for business growth.

FAQs

How can I allocate my direct mail budget to maximize ROI?

To get the most out of your direct mail campaign, it’s crucial to allocate your budget wisely across key areas: postage, printing, and design. A typical breakdown might look like this: 30% for postage, 45% for printing, and 25% for design and creative work. This balance ensures you’re investing in quality materials and effective messaging without overspending.

Looking to save on postage? Options like presorted mail or lighter formats, such as postcards, can help cut costs. For printing, opt for materials that are both affordable and durable. If you’re using variable data printing, focus it on elements that drive engagement, like personalized offers. When it comes to design, make sure your materials feature bold headlines, clear calls-to-action, and visuals that align with your brand identity. Companies like Miro Printing & Graphics Inc. offer professional printing and in-house design services to help you achieve both quality and cost efficiency.

To keep track of your spending, calculate the cost per piece by dividing your total budget by the number of mailers. Use this data to fine-tune your allocations. After your campaign wraps up, analyze the results to optimize your budget for future mailings.

What are the best ways to target the right audience for a successful direct mail campaign?

Targeting the right audience is the foundation of any successful direct mail campaign. Start by building a clear and detailed profile of your ideal customer. Combine demographics – like age, income, and marital status – with psychographics, which include interests, lifestyle choices, and purchasing motivations. You can also fine-tune your targeting by looking at recent behaviors, such as past purchases or activity on your website.

Once you’ve defined your audience, focus on using a high-quality mailing list that matches your customer profile. Whether you choose a professional list provider or opt for USPS Every Door Direct Mail (EDDM) to target specific geographic areas, having an accurate and up-to-date list is critical. A clean list ensures your mail reaches the right people and minimizes wasted time and resources.

Don’t forget to personalize and segment your mailings. Craft messages that resonate by tailoring them to factors like purchase history, individual preferences, or even local events. Personalization helps create a stronger connection with your audience, boosting response rates and delivering better returns on your investment.

Miro Printing & Graphics Inc. offers support at every stage of the process – from acquiring the right mailing list to designing, printing, and mailing your materials. They make it easy to ensure your campaign reaches the right people effectively and efficiently.

How do I track the success of my direct mail campaign to ensure a strong ROI?

To gauge how well your direct mail campaign is working, focus on tracking a few key metrics. Start with the response rate (responses divided by the number of mailers sent) and the conversion rate (conversions divided by responses). Then, look at cost per acquisition to see how much you’re spending to gain each customer, and measure the revenue generated per mailer to understand the financial impact of your efforts.

Once you’ve gathered these numbers, calculate your ROI with this formula: (Revenue – Cost) ÷ Cost × 100%. This will show you if your campaign is delivering a worthwhile return on your investment. By regularly reviewing these metrics, you can fine-tune your approach and improve the performance of future campaigns.

Related Blog Posts

https://app.seobotai.com/banner/banner.js?id=697019680a871bef4add889f

A/B Testing for Direct Mail Campaigns

Run disciplined A/B tests for direct mail—set clear goals, test one variable at a time, track with QR codes/PURLs/promo codes, analyze conversions and scale winners.

A/B testing for direct mail campaigns helps you make better decisions by comparing two mailer versions to see which performs best. It replaces guesswork with data, showing what drives results. Start with a control version, tweak one element, and test it on random audience segments. Track metrics like response rate, conversions, and ROI using tools like QR codes, promo codes, and personalized URLs.

Key takeaways:

  • Test one variable at a time (e.g., headline, offer, design).
  • Define clear goals (e.g., increase response rate by 3.5%).
  • Use reliable tracking methods (e.g., match-back analysis or unique phone numbers).
  • Analyze results carefully to identify what works.
  • Iterate continuously to refine and improve over time.

How 50+ A/B Tests Led iExit From Postcards to a High-Converting Letter

iExit

Setting Goals and Choosing Metrics for Success

Direct Mail A/B Testing Tracking Methods Comparison

Direct Mail A/B Testing Tracking Methods Comparison

Before sending out your campaign, it’s crucial to define what success looks like. Start by reviewing data from previous campaigns to pinpoint areas needing improvement. For instance, maybe your last mailer had a strong response rate but fell short on conversions, or perhaps the overall ROI didn’t meet expectations. This kind of analysis provides a baseline to help you focus on where changes are necessary.

With this baseline in mind, you can set clear, focused goals for your campaign.

Defining Your Campaign Goals

Establish specific, measurable objectives before launching your campaign. Instead of vague targets like "boost sales", aim for numbers you can track – such as 500 website visits, $25,000 in sales, or a 3.5% response rate. As Dawn Burke, Marketing Manager at Suttle-Straus, explains:

Without having a goal in mind, it will be difficult to know which variables to test.

Your goals should guide your testing strategy. Use your CRM system – whether it’s Salesforce, Marketo, or another tool – to analyze customer data and make informed guesses about which segments will respond best. For example, if your data shows that a specific group reacts positively to certain types of offers, use that insight to create test variations tailored to them.

Key Metrics to Track for A/B Testing

The metrics you track should tie directly to your campaign goals. For starters, the response rate measures how many recipients took any action, giving you a sense of initial engagement. Conversion rate goes a step further, showing the percentage of recipients who completed your desired action, like making a purchase or signing up. To evaluate the campaign’s financial success, track revenue generated and ROI.

Accurate data collection is key, so set up tracking mechanisms from the beginning. Use tools like unique QR codes, personalized URLs (PURLs), promo codes, or dedicated phone numbers for each test variation. These tools help you identify which version prompted specific responses. Additionally, match-back processing can compare your mailing list to your customer database, confirming which recipients converted during the campaign.

Tracking Method Best For
QR Codes Mobile engagement and digital attribution
PURLs Tracking individual behavior and personalization
Promo Codes Measuring direct sales and offer effectiveness
Match-Back High-accuracy conversion tracking
Unique Phone Numbers Tracking offline responses and inquiries

Designing and Implementing Test Variations

Once you’ve set clear campaign goals, the next step is crafting test variations that provide meaningful insights. The trick lies in deciding which elements to test and organizing your test groups in a way that delivers reliable results.

What to Test in Direct Mail Campaigns

Nearly every aspect of your direct mail piece can be tested, but some components have a bigger influence than others. For example, testing copy and messaging can be as simple as tweaking headlines or adding personalization, such as the recipient’s name, location, or purchase history. You can also experiment with call-to-action (CTA) wording, length, and frequency – like comparing a single "Buy Now" button to multiple options.

Design elements often play a huge role in response rates. Try switching between custom images and stock photos, illustrations and photographs, or bold and muted color schemes. Similarly, format and packaging can make a difference. Oversized envelopes, for instance, often outperform standard letter-sized ones. You can also test different dimensions, such as 4" x 6" versus 6" x 9" postcards or #10 envelopes versus self-mailers.

Your offer structure is another area worth exploring. The way you present value matters – a 20% discount might resonate differently than a $5 off deal, even if the savings are identical. Additionally, testing response channels can be revealing. For instance, compare QR codes with promo codes or test Personalized URLs (PURLs) against a generic landing page.

Once you’ve decided what to test, the next step is structuring your test groups properly.

Creating Effective Test Groups

The cornerstone of A/B testing is straightforward: test only one variable at a time. As Mike Gunderson, Founder and President of Gundir, explains:

It’s only effective when isolating a single variable to test in the creative.

If you change multiple elements at once, it becomes impossible to pinpoint which adjustment caused the difference in response.

Start with a control (Version A), then create Version B by changing just one element while keeping everything else constant. Divide your audience into evenly sized, random segments to ensure the results are statistically valid. Keep in mind that larger test groups yield more reliable results – a group of 100,000 will produce more accurate insights than one with just 1,000 recipients.

Finally, ensure your test variations are printed with precision. For high-quality digital and offset printing, along with in-house design, bindery, and mailing services, you might want to explore working with Miro Printing & Graphics Inc., a full-service print shop based in Hackensack, NJ.

Collecting and Analyzing Data

Once your goals and test designs are in place, the next step is diving into data analysis. This is where you fine-tune your direct mail strategy by turning raw data into actionable insights. After your test variations are delivered, it’s all about gathering accurate information to see what works – and what doesn’t.

Tracking Responses and Engagement

Start by assigning unique identifiers to each test variation. This allows you to trace exactly which version led to each response. For example, Personalized URLs (PURLs) can include the recipient’s name or reference a specific product, making it easy to track individual behavior and guide users to tailored landing pages. Similarly, QR codes can track website visits, scan times, and even location data – offering a detailed view of engagement.

If conversions are your primary focus, unique promo codes are a great way to measure redemption rates and figure out which offers struck a chord with your audience. For campaigns targeting audiences less inclined toward online interactions, consider using dedicated phone numbers for each variation. This lets you track call volume and duration, providing another layer of insight. Ultimately, your tracking methods should align with your campaign goals, whether that’s driving website visits, boosting sales, or increasing overall conversions.

To get the full picture, integrate your tracking data with platforms like Salesforce or Marketo. This integration connects offline direct mail efforts with digital engagement, giving you a comprehensive understanding of customer behavior and how they interact post-mail.

Once your tracking system is in place, you can move on to evaluating the results and identifying performance trends.

Analyzing Test Results

After collecting your data, focus on the quality of conversions rather than just the sheer volume of responses. A high response rate might look impressive, but it doesn’t mean much if it doesn’t lead to actual sales. For instance, offering a gift card might generate more responses initially, but a white paper offer could lead to better conversion-to-sale rates by attracting more qualified leads.

To get meaningful insights, compare your test variations against a proven control to establish a baseline for performance. Make sure your sample size is large enough to minimize variability. For example, in a campaign with a 2% response rate, mailing 10,000 pieces gives you a confidence range of 1.73% to 2.27%. However, mailing only 2,000 pieces increases the variability, with a range of 1.38% to 2.62%. To ensure your results are statistically sound, use online tools to calculate whether differences in performance are due to your test variable or just random chance. If the differences are too small to draw conclusions, it’s worth retesting the same element before making any final decisions.

Mike Gunderson, Founder and President of Gundir, puts it best:

Testing is an ongoing process that continuously refines marketing initiatives.

When you identify a winning variation, it becomes your new control. This sets the foundation for future tests and keeps your strategy evolving through small, steady improvements.

Scaling and Optimizing Your Campaigns

Scaling Successful Variations

When you’ve pinpointed a winning variation, the next step is to scale it carefully to a larger audience. Start by designating this winning piece as your new control, which will serve as the benchmark for all future tests. This ensures you have a reliable foundation for measuring performance as you continue to refine your campaigns.

Before you roll it out on a broader scale, take the time to backtest your winning variation and conduct a matchback analysis. This step will help confirm that your results are statistically sound and not just a fluke.

As you scale, focus on growing your mailing list and reaching new audience segments, but make sure to retain the elements that made the original variation successful. Keep in mind that direct mail has a typical read period of 60 to 90 days, so allow enough time to collect meaningful data before making further adjustments.

This process of scaling and validating your success sets the stage for continuous improvement, creating a feedback loop that drives better results over time.

Iterative Testing for Long-Term Success

Testing isn’t a one-and-done task – it’s an ongoing process. As David Ogilvy wisely said:

Never stop testing, and your advertising will never stop improving.

Consumer behavior is always evolving, which means your approach needs to evolve too. That’s why systematic, iterative testing is key to staying ahead.

Develop a testing roadmap to guide your efforts. This roadmap should outline the specific elements you plan to test, the order in which you’ll test them, and the scale of each test. Generally, it’s best to prioritize testing in this sequence: mailing list, offer, and then creative elements. For example, once you’ve nailed down a winning headline, shift your focus to testing other variables like imagery or the call-to-action. This step-by-step approach will help you refine your mailers to near perfection.

Erik Koenig, President & Chief Strategist at SeQuel Response, puts it perfectly:

The end goal of a direct mail test is knowledge, not profit. Regardless of the outcome, there are no wasted results.

To strike the right balance, mix incremental A/B tests for gradual improvements with occasional “beat the control” tests to uncover bold new ideas. Additionally, amplify your successful mail variations by integrating them with digital channels like retargeting ads or Connected TV. This multi-channel approach can increase both frequency and reach.

By treating testing as a continuous cycle, you’ll ensure your campaigns remain relevant, engaging, and effective over time.

For expert execution of your scaled direct mail campaigns, check out the comprehensive printing and mailing services offered by Miro Printing & Graphics Inc..

Conclusion

A/B testing takes the guesswork out of direct mail campaigns, replacing it with clear, data-backed insights. Instead of relying on intuition, you gain solid evidence about what truly connects with your audience.

However, it’s crucial to approach testing with discipline and focus. Karen Loggia emphasizes this by warning that skipping proper testing can lead to repeated mistakes and limit your return on investment (ROI). To avoid this, keep your testing process simple and targeted. Focus on one variable at a time – whether it’s the offer, headline, or format – so you can clearly identify what’s driving the results. Reliable tracking methods are essential to gather precise data and make informed decisions.

Also, testing isn’t something you do once and forget. It’s a continuous process of refining and improving. Regular testing helps combat audience fatigue and ensures your campaigns stay effective over time.

FAQs

What should I test first in my direct mail campaign?

To pick the right variable to test first in your direct mail campaign, start by setting a clear, measurable goal. This could be anything from boosting website traffic to increasing phone inquiries or driving sales. A well-defined objective helps you gauge the success of your efforts. Then, take a close look at past campaign data to pinpoint elements that had the most noticeable impact – things like specific offers or audience segments. From there, zero in on one high-impact variable that’s easy to tweak and likely to influence results, such as the offer itself or the mailing list segment.

Partner with a reliable printer, like Miro Printing & Graphics Inc., to ensure your test materials are produced accurately and on time. Keep all other parts of the mailer consistent so you can clearly see how the tested variable affects outcomes. When your materials are ready, use tools like unique URLs, QR codes, or coupon codes to track responses. Make sure to send your test mailers to a randomly selected, evenly split sample of your audience for accurate and reliable data. Following these steps will help you run a focused and cost-efficient test, providing actionable insights for your campaign.

What are the best ways to track responses in A/B testing for direct mail campaigns?

Tracking responses in A/B testing for direct mail campaigns is crucial to understanding what works and what doesn’t. Here are some practical ways to monitor engagement effectively:

  • Personalized URLs (PURLs): Assign a unique web address to each recipient. This allows you to see exactly who visited and interacted with your campaign online.
  • QR Codes: Include scannable codes that direct recipients to specific landing pages. They’re quick, user-friendly, and great for tracking responses.
  • Unique Discount Codes: Use custom promo codes for each campaign version. Tracking redemption rates will give you valuable insights into which version performed better.
  • Dedicated Phone Numbers: Set up separate phone numbers for different test versions. This makes it easy to measure call responses tied to each variation.

These methods provide clear data, helping you analyze campaign results and refine your strategy for future mailings.

How can I make sure my A/B test results are reliable and meaningful?

To make sure your A/B test delivers trustworthy results, begin with a randomly divided sample group that’s big enough to yield meaningful data. Set a clear, measurable goal upfront – whether that’s tracking the response rate, conversion rate, or ROI – so you know exactly what you’re evaluating. Let the test run long enough to gather enough data, avoiding the temptation to jump to conclusions too early. Lastly, aim for a confidence level of 95% or higher to ensure that any differences you see are statistically valid and not just random noise.

Related Blog Posts

https://app.seobotai.com/banner/banner.js?id=694b2f1c12e0ddc125f2167d

A/B Testing for Direct Mail Campaigns

Run disciplined A/B tests for direct mail—set clear goals, test one variable at a time, track with QR codes/PURLs/promo codes, analyze conversions and scale winners.

A/B testing for direct mail campaigns helps you make better decisions by comparing two mailer versions to see which performs best. It replaces guesswork with data, showing what drives results. Start with a control version, tweak one element, and test it on random audience segments. Track metrics like response rate, conversions, and ROI using tools like QR codes, promo codes, and personalized URLs.

Key takeaways:

  • Test one variable at a time (e.g., headline, offer, design).
  • Define clear goals (e.g., increase response rate by 3.5%).
  • Use reliable tracking methods (e.g., match-back analysis or unique phone numbers).
  • Analyze results carefully to identify what works.
  • Iterate continuously to refine and improve over time.

How 50+ A/B Tests Led iExit From Postcards to a High-Converting Letter

iExit

Setting Goals and Choosing Metrics for Success

Direct Mail A/B Testing Tracking Methods Comparison

Direct Mail A/B Testing Tracking Methods Comparison

Before sending out your campaign, it’s crucial to define what success looks like. Start by reviewing data from previous campaigns to pinpoint areas needing improvement. For instance, maybe your last mailer had a strong response rate but fell short on conversions, or perhaps the overall ROI didn’t meet expectations. This kind of analysis provides a baseline to help you focus on where changes are necessary.

With this baseline in mind, you can set clear, focused goals for your campaign.

Defining Your Campaign Goals

Establish specific, measurable objectives before launching your campaign. Instead of vague targets like "boost sales", aim for numbers you can track – such as 500 website visits, $25,000 in sales, or a 3.5% response rate. As Dawn Burke, Marketing Manager at Suttle-Straus, explains:

Without having a goal in mind, it will be difficult to know which variables to test.

Your goals should guide your testing strategy. Use your CRM system – whether it’s Salesforce, Marketo, or another tool – to analyze customer data and make informed guesses about which segments will respond best. For example, if your data shows that a specific group reacts positively to certain types of offers, use that insight to create test variations tailored to them.

Key Metrics to Track for A/B Testing

The metrics you track should tie directly to your campaign goals. For starters, the response rate measures how many recipients took any action, giving you a sense of initial engagement. Conversion rate goes a step further, showing the percentage of recipients who completed your desired action, like making a purchase or signing up. To evaluate the campaign’s financial success, track revenue generated and ROI.

Accurate data collection is key, so set up tracking mechanisms from the beginning. Use tools like unique QR codes, personalized URLs (PURLs), promo codes, or dedicated phone numbers for each test variation. These tools help you identify which version prompted specific responses. Additionally, match-back processing can compare your mailing list to your customer database, confirming which recipients converted during the campaign.

Tracking Method Best For
QR Codes Mobile engagement and digital attribution
PURLs Tracking individual behavior and personalization
Promo Codes Measuring direct sales and offer effectiveness
Match-Back High-accuracy conversion tracking
Unique Phone Numbers Tracking offline responses and inquiries

Designing and Implementing Test Variations

Once you’ve set clear campaign goals, the next step is crafting test variations that provide meaningful insights. The trick lies in deciding which elements to test and organizing your test groups in a way that delivers reliable results.

What to Test in Direct Mail Campaigns

Nearly every aspect of your direct mail piece can be tested, but some components have a bigger influence than others. For example, testing copy and messaging can be as simple as tweaking headlines or adding personalization, such as the recipient’s name, location, or purchase history. You can also experiment with call-to-action (CTA) wording, length, and frequency – like comparing a single "Buy Now" button to multiple options.

Design elements often play a huge role in response rates. Try switching between custom images and stock photos, illustrations and photographs, or bold and muted color schemes. Similarly, format and packaging can make a difference. Oversized envelopes, for instance, often outperform standard letter-sized ones. You can also test different dimensions, such as 4" x 6" versus 6" x 9" postcards or #10 envelopes versus self-mailers.

Your offer structure is another area worth exploring. The way you present value matters – a 20% discount might resonate differently than a $5 off deal, even if the savings are identical. Additionally, testing response channels can be revealing. For instance, compare QR codes with promo codes or test Personalized URLs (PURLs) against a generic landing page.

Once you’ve decided what to test, the next step is structuring your test groups properly.

Creating Effective Test Groups

The cornerstone of A/B testing is straightforward: test only one variable at a time. As Mike Gunderson, Founder and President of Gundir, explains:

It’s only effective when isolating a single variable to test in the creative.

If you change multiple elements at once, it becomes impossible to pinpoint which adjustment caused the difference in response.

Start with a control (Version A), then create Version B by changing just one element while keeping everything else constant. Divide your audience into evenly sized, random segments to ensure the results are statistically valid. Keep in mind that larger test groups yield more reliable results – a group of 100,000 will produce more accurate insights than one with just 1,000 recipients.

Finally, ensure your test variations are printed with precision. For high-quality digital and offset printing, along with in-house design, bindery, and mailing services, you might want to explore working with Miro Printing & Graphics Inc., a full-service print shop based in Hackensack, NJ.

Collecting and Analyzing Data

Once your goals and test designs are in place, the next step is diving into data analysis. This is where you fine-tune your direct mail strategy by turning raw data into actionable insights. After your test variations are delivered, it’s all about gathering accurate information to see what works – and what doesn’t.

Tracking Responses and Engagement

Start by assigning unique identifiers to each test variation. This allows you to trace exactly which version led to each response. For example, Personalized URLs (PURLs) can include the recipient’s name or reference a specific product, making it easy to track individual behavior and guide users to tailored landing pages. Similarly, QR codes can track website visits, scan times, and even location data – offering a detailed view of engagement.

If conversions are your primary focus, unique promo codes are a great way to measure redemption rates and figure out which offers struck a chord with your audience. For campaigns targeting audiences less inclined toward online interactions, consider using dedicated phone numbers for each variation. This lets you track call volume and duration, providing another layer of insight. Ultimately, your tracking methods should align with your campaign goals, whether that’s driving website visits, boosting sales, or increasing overall conversions.

To get the full picture, integrate your tracking data with platforms like Salesforce or Marketo. This integration connects offline direct mail efforts with digital engagement, giving you a comprehensive understanding of customer behavior and how they interact post-mail.

Once your tracking system is in place, you can move on to evaluating the results and identifying performance trends.

Analyzing Test Results

After collecting your data, focus on the quality of conversions rather than just the sheer volume of responses. A high response rate might look impressive, but it doesn’t mean much if it doesn’t lead to actual sales. For instance, offering a gift card might generate more responses initially, but a white paper offer could lead to better conversion-to-sale rates by attracting more qualified leads.

To get meaningful insights, compare your test variations against a proven control to establish a baseline for performance. Make sure your sample size is large enough to minimize variability. For example, in a campaign with a 2% response rate, mailing 10,000 pieces gives you a confidence range of 1.73% to 2.27%. However, mailing only 2,000 pieces increases the variability, with a range of 1.38% to 2.62%. To ensure your results are statistically sound, use online tools to calculate whether differences in performance are due to your test variable or just random chance. If the differences are too small to draw conclusions, it’s worth retesting the same element before making any final decisions.

Mike Gunderson, Founder and President of Gundir, puts it best:

Testing is an ongoing process that continuously refines marketing initiatives.

When you identify a winning variation, it becomes your new control. This sets the foundation for future tests and keeps your strategy evolving through small, steady improvements.

Scaling and Optimizing Your Campaigns

Scaling Successful Variations

When you’ve pinpointed a winning variation, the next step is to scale it carefully to a larger audience. Start by designating this winning piece as your new control, which will serve as the benchmark for all future tests. This ensures you have a reliable foundation for measuring performance as you continue to refine your campaigns.

Before you roll it out on a broader scale, take the time to backtest your winning variation and conduct a matchback analysis. This step will help confirm that your results are statistically sound and not just a fluke.

As you scale, focus on growing your mailing list and reaching new audience segments, but make sure to retain the elements that made the original variation successful. Keep in mind that direct mail has a typical read period of 60 to 90 days, so allow enough time to collect meaningful data before making further adjustments.

This process of scaling and validating your success sets the stage for continuous improvement, creating a feedback loop that drives better results over time.

Iterative Testing for Long-Term Success

Testing isn’t a one-and-done task – it’s an ongoing process. As David Ogilvy wisely said:

Never stop testing, and your advertising will never stop improving.

Consumer behavior is always evolving, which means your approach needs to evolve too. That’s why systematic, iterative testing is key to staying ahead.

Develop a testing roadmap to guide your efforts. This roadmap should outline the specific elements you plan to test, the order in which you’ll test them, and the scale of each test. Generally, it’s best to prioritize testing in this sequence: mailing list, offer, and then creative elements. For example, once you’ve nailed down a winning headline, shift your focus to testing other variables like imagery or the call-to-action. This step-by-step approach will help you refine your mailers to near perfection.

Erik Koenig, President & Chief Strategist at SeQuel Response, puts it perfectly:

The end goal of a direct mail test is knowledge, not profit. Regardless of the outcome, there are no wasted results.

To strike the right balance, mix incremental A/B tests for gradual improvements with occasional “beat the control” tests to uncover bold new ideas. Additionally, amplify your successful mail variations by integrating them with digital channels like retargeting ads or Connected TV. This multi-channel approach can increase both frequency and reach.

By treating testing as a continuous cycle, you’ll ensure your campaigns remain relevant, engaging, and effective over time.

For expert execution of your scaled direct mail campaigns, check out the comprehensive printing and mailing services offered by Miro Printing & Graphics Inc..

Conclusion

A/B testing takes the guesswork out of direct mail campaigns, replacing it with clear, data-backed insights. Instead of relying on intuition, you gain solid evidence about what truly connects with your audience.

However, it’s crucial to approach testing with discipline and focus. Karen Loggia emphasizes this by warning that skipping proper testing can lead to repeated mistakes and limit your return on investment (ROI). To avoid this, keep your testing process simple and targeted. Focus on one variable at a time – whether it’s the offer, headline, or format – so you can clearly identify what’s driving the results. Reliable tracking methods are essential to gather precise data and make informed decisions.

Also, testing isn’t something you do once and forget. It’s a continuous process of refining and improving. Regular testing helps combat audience fatigue and ensures your campaigns stay effective over time.

FAQs

What should I test first in my direct mail campaign?

To pick the right variable to test first in your direct mail campaign, start by setting a clear, measurable goal. This could be anything from boosting website traffic to increasing phone inquiries or driving sales. A well-defined objective helps you gauge the success of your efforts. Then, take a close look at past campaign data to pinpoint elements that had the most noticeable impact – things like specific offers or audience segments. From there, zero in on one high-impact variable that’s easy to tweak and likely to influence results, such as the offer itself or the mailing list segment.

Partner with a reliable printer, like Miro Printing & Graphics Inc., to ensure your test materials are produced accurately and on time. Keep all other parts of the mailer consistent so you can clearly see how the tested variable affects outcomes. When your materials are ready, use tools like unique URLs, QR codes, or coupon codes to track responses. Make sure to send your test mailers to a randomly selected, evenly split sample of your audience for accurate and reliable data. Following these steps will help you run a focused and cost-efficient test, providing actionable insights for your campaign.

What are the best ways to track responses in A/B testing for direct mail campaigns?

Tracking responses in A/B testing for direct mail campaigns is crucial to understanding what works and what doesn’t. Here are some practical ways to monitor engagement effectively:

  • Personalized URLs (PURLs): Assign a unique web address to each recipient. This allows you to see exactly who visited and interacted with your campaign online.
  • QR Codes: Include scannable codes that direct recipients to specific landing pages. They’re quick, user-friendly, and great for tracking responses.
  • Unique Discount Codes: Use custom promo codes for each campaign version. Tracking redemption rates will give you valuable insights into which version performed better.
  • Dedicated Phone Numbers: Set up separate phone numbers for different test versions. This makes it easy to measure call responses tied to each variation.

These methods provide clear data, helping you analyze campaign results and refine your strategy for future mailings.

How can I make sure my A/B test results are reliable and meaningful?

To make sure your A/B test delivers trustworthy results, begin with a randomly divided sample group that’s big enough to yield meaningful data. Set a clear, measurable goal upfront – whether that’s tracking the response rate, conversion rate, or ROI – so you know exactly what you’re evaluating. Let the test run long enough to gather enough data, avoiding the temptation to jump to conclusions too early. Lastly, aim for a confidence level of 95% or higher to ensure that any differences you see are statistically valid and not just random noise.

Related Blog Posts

https://app.seobotai.com/banner/banner.js?id=694b2f1c12e0ddc125f2167d

Seaweed Paper vs. Recycled Paper

Compare seaweed and recycled paper on sourcing, emissions, compostability, cost, availability, and print performance to choose the best fit for your project.

Seaweed paper and recycled paper both aim to reduce environmental impact, but they differ in production, cost, and usability. Seaweed paper, made with 30% seaweed fibers, saves resources like land and water, decomposes quickly, and avoids synthetic chemicals. However, it’s costly and limited in availability. Recycled paper, made from post-consumer waste, is affordable, widely available, and efficient for large-scale printing, though it requires chemicals for processing.

Key Points:

  • Seaweed Paper: Uses ocean-farmed by-products, saves land and water, fully compostable, but 2–5x more expensive and less accessible.
  • Recycled Paper: Reduces landfill waste, affordable, widely used, but involves chemicals and relies on some virgin fibers.
  • Performance: Seaweed paper offers a textured, eco-conscious look but may not suit precise printing. Recycled paper is versatile and reliable for high-volume needs.

Quick Comparison:

Feature Seaweed Paper Recycled Paper
Material Source Seaweed by-products Post-consumer waste
Cost 2–5x higher Affordable
Compostability Fully compostable in 6 weeks Biodegradable, varies by type
Energy Use ~15% less than traditional paper Saves 40–60% vs virgin paper
Availability Limited, specialty markets Widely available
Best Use Premium packaging, stationery High-volume, everyday printing

Seaweed paper is ideal for premium, eco-focused projects, while recycled paper fits budget-friendly, large-scale printing. For a balanced approach, combine both based on your goals and budget.

Seaweed Paper vs Recycled Paper: Complete Environmental and Cost Comparison

Seaweed Paper vs Recycled Paper: Complete Environmental and Cost Comparison

Paper made from seaweed recycled from local beaches

How Each Paper Type Is Made

Seaweed paper combines seaweed by-products with wood pulp and recycled fibers, typically using around 30% seaweed content (as seen in Notpla Paper). On the other hand, recycled paper is crafted entirely from recovered post-consumer and post-industrial waste. The seaweed used in papermaking often comes from residual fibers left after hydrocolloid extraction, a process used in food, cosmetics, and pharmaceutical industries. Meanwhile, recycled paper relies on waste materials collected through curbside and commercial recycling programs. Depending on the grade, recycled paper can include anywhere from 10% to 100% post-consumer waste (PCW) fiber. These distinct methods highlight the unique origins of their materials.

Where the Materials Come From

Seaweed used for papermaking is sourced from farmed or harvested seaweed, cultivated primarily for other industries. After valuable compounds are extracted, the remaining fibrous by-products are repurposed for paper production. This approach minimizes waste, reduces strain on wild ecosystems, and avoids the need for additional land use. It’s a zero-waste system where every part of the resource is utilized. Recycled paper materials, on the other hand, are gathered through municipal recycling systems – like the paper you toss in your recycling bin at home or work. These materials are sorted at recovery facilities and then sent to paper mills for processing. The infrastructure for recycled paper is well-established across the United States, making it a widely available option.

Energy and Water Requirements

The way materials are sourced plays a big role in energy and water use during production. Seaweed paper production uses about 15% less energy than traditional papermaking, thanks to its reliance on seaweed and agricultural by-products. Seaweed farming doesn’t require land, freshwater, fertilizers, or pesticides, which also cuts water usage by about 15% compared to conventional methods. Recycled paper production, while also energy-efficient, can save up to 40–60% of the energy needed for virgin paper. However, seaweed paper has an advantage due to its renewable and non-land-based sourcing. Recycled paper processing, though effective, requires significant water for pulping and cleaning to remove inks and contaminants.

Chemicals Used in Production

The chemical processes for these two paper types differ significantly. Seaweed paper, such as Notpla‘s, is made without synthetic additives, including sizing agents like AKD or ASA, PFAs, or stabilizers. The natural qualities of seaweed fibers provide the necessary strength and printability, making the paper entirely biodegradable. Recycled paper, however, often involves chemicals for de-inking, bleaching, and strengthening the fibers. These include flotation agents, surfactants, and sometimes bleaching agents. Many mills now prioritize chlorine-free bleaching and closed-loop water systems to reduce environmental impact. Still, the chemical treatments required for recycled paper can slightly reduce its biodegradability compared to the natural, additive-free production of seaweed paper.

Environmental Effects of Each Paper

Carbon Emissions

Seaweed paper stands out for its lower carbon footprint compared to traditional papermaking. For instance, Notpla’s seaweed paperboard uses 30% less wood pulp than regular paper, cutting down emissions tied to forestry and pulp processing. Seaweed itself grows quickly in the ocean and doesn’t need land, freshwater, or fertilizers. Plus, its cultivation absorbs carbon and contributes to healthier coastal ecosystems . Life cycle studies suggest seaweed-based products can emit 40–60% less CO₂ compared to conventional plastics. On the other hand, recycled paper, especially when made entirely from post-consumer waste, helps cut emissions by reducing landfill contributions and the demand for fresh timber. However, the recycling process adds emissions from collecting, sorting, and re-pulping materials. Seaweed paper has a clear advantage here, thanks to its renewable marine source and carbon-absorbing properties. These emission differences also play a role in how the materials break down after use.

Decomposition and Marine Effects

When it comes to biodegradability, seaweed paper shines. Notpla’s seaweed-based paperboard is fully compostable within about six weeks under home composting conditions, as it doesn’t rely on synthetic additives like AKD, ASA, or PFAS. It naturally decomposes without leaving harmful residues behind. If seaweed paper ends up in the ocean, its organic ingredients break down much faster than synthetic-coated alternatives . Recycled paper is also biodegradable and recyclable, but its performance depends on the coatings, inks, and chemicals used during production. Papers treated with de-inking agents, bleaching chemicals, or plastic coatings may take longer to decompose and are often unsuitable for home composting. Additionally, both recycled and virgin papers disposed of in landfills can produce methane under anaerobic conditions. This underscores the importance of proper recycling and composting systems to manage their environmental impact.

Impact on Forests and Land

Looking beyond emissions and decomposition, the impact on land ecosystems is another key factor. Seaweed paper eliminates the need for land-based farming entirely, as seaweed grows in the ocean without requiring pesticides, irrigation, or land conversion . This ocean-based production method is particularly crucial given concerns about intensive forestry practices. Recycled paper reduces the strain on forests by using recovered fibers instead of relying solely on fresh timber. Depending on the type, recycled paper can include anywhere from 10% to 100% post-consumer material, with higher percentages offering greater environmental benefits. However, recycled paper still requires some land-based fibers, although it significantly lowers the need for virgin timber and diverts waste from landfills. Seaweed paper, by leveraging marine resources, further alleviates pressure on terrestrial ecosystems. Both materials play an important role in reducing deforestation and shrinking overall environmental footprints.

Price and Production Scale

Manufacturing Costs

Seaweed paper comes with a price tag that’s 2–5 times higher than recycled paper. This cost difference largely stems from the specialized processes required to combine seaweed by-products with recycled fibers, all while avoiding synthetic chemicals. While seaweed paper does save about 15% on energy and water usage, those savings don’t make up for the higher costs tied to production and scaling.

On the other hand, recycled paper benefits from a well-established and highly efficient supply chain. It uses post-consumer waste collected through municipal recycling programs, which keeps material costs low. Plus, streamlined processes – like de-inking, sorting, and pulping – further boost efficiency. This mature infrastructure makes recycled paper an economical choice, especially for large-scale commercial printing needs.

While sustainability fuels innovation, production costs and scalability are critical for market success. These cost differences highlight the challenges seaweed paper faces in competing with recycled paper.

Availability and Supply Chains

Economic factors also shape the accessibility of materials. Seaweed paper, for instance, is not widely available in commercial quantities. Companies like Notpla are focusing on niche uses, claiming to save up to 4 tons of trees for every ton of seaweed by-product used. However, its availability is still limited to specialty markets like packaging and labels. This is due to its reliance on marine farming by-products and the small number of processors equipped to handle these materials.

Recycled paper, by contrast, is readily accessible across the United States. A robust supply chain connects municipal recycling programs with mills capable of handling large volumes of post-consumer waste. This setup supports bulk orders with recycled content levels ranging from 10% to 100%. While some innovators are working to scale up seaweed paper production to achieve 100% wood-free alternatives, recycled paper continues to dominate the market due to its reliability and affordability.

Performance in Printing

Look and Feel

Seaweed paper stands out with its textured surface and natural flecks, giving it an earthy, organic appearance. This makes it a great fit for eco-conscious brands wanting to convey their commitment to sustainability right from the first interaction. On the other hand, recycled paper offers a more familiar and uniform look. Its finishes range from smooth, bright surfaces – perfect for corporate materials – to slightly rougher, grayish textures, depending on the level of post-consumer content and processing. This consistency makes recycled paper a reliable option, especially for projects where maintaining uniform color reproduction across large print runs is critical. Both materials pair their distinct aesthetics with essential performance features for printing and handling.

Strength and Durability

Seaweed paper uses 30% less wood pulp while still maintaining the strength needed for packaging applications. Its seaweed fibers add reinforcement, ensuring the material remains stiff and tear-resistant, making it suitable for products like boxes, sleeves, and envelopes. Recycled paper, benefiting from years of development, provides dependable tear strength and fold durability, making it ideal for items like manuals, pocket folders, and marketing materials. For projects requiring heavy handling or intricate folds, recycled paper’s established guidelines for scoring and creasing make it a safer, more predictable choice.

How Well They Print

Seaweed paper’s lack of synthetic additives makes it more absorbent, which results in softer details and muted colors compared to coated recycled stocks. Its off-white, speckled base can subtly shift printed colors, giving designs a natural, minimalist aesthetic – though it may not be the best choice for precise, color-critical images like photography. Recycled paper, available in both uncoated and coated varieties, offers more flexibility. Coated recycled paper delivers sharp images and vibrant colors, rivaling virgin coated stocks. For offset and digital printing, recycled paper is widely trusted, with well-documented profiles for ink behavior and toner adhesion. Seaweed paper, however, may require test runs to fine-tune press settings and drying times.

Both materials support sustainable printing practices and bring unique visual and technical benefits to the table. A full-service print shop like Miro Printing & Graphics Inc. in Hackensack, NJ, can help you determine which substrate aligns best with your project’s technical needs and design vision. These printing characteristics play a key role in selecting the right material for projects that demand specific standards.

When to Use Each Paper Type

Building on production insights and performance details, here’s how to make the most of each type of paper.

Best Uses for Seaweed Paper

Seaweed paper is perfect for specialty projects where a distinctive look and eco-conscious branding take precedence over cost or large-scale production. This paper is a standout choice for premium packaging – think natural beauty products, wellness brands, artisan foods, or eco-luxury goods. Its ocean-inspired, speckled texture tells a story of sustainability. For instance, using one tonne of seaweed by-product in Notpla Paper can save up to four tonnes of trees from being cut down.

In premium stationery, seaweed paper truly shines. Whether it’s wedding invitations, boutique business cards, artisanal letterhead, or notecards, its soft texture and natural fibers give an elevated, high-end feel. It’s best suited for low-to-medium volume projects where the higher cost is justified by the quality and uniqueness.

Best Uses for Recycled Paper

Recycled paper is the go-to choice for high-volume, budget-conscious printing. With its variety of weights and finishes and a well-established supply chain, it’s ideal for everyday needs like office printing, brochures, catalogs, manuals, direct mail, and standard business stationery. In U.S. commercial print shops, stocks containing 30–100% post-consumer recycled content are commonly used for large-scale jobs.

This paper type works especially well for projects with tight deadlines and broad distribution. Whether it’s training materials, forms, catalogs, or mass mailings, recycled paper delivers dependability. A smart approach is to save seaweed paper for standout pieces – like a hero package, VIP mailer, or limited-edition insert – while relying on recycled paper for the bulk of your materials. This strategy helps balance sustainability with budget considerations.

For a seamless integration of both paper types into a cohesive, eco-friendly print plan, full-service providers like Miro Printing & Graphics Inc. in Hackensack, NJ, can help bring your vision to life.

Which Paper Should You Choose?

Selecting the right paper depends on three main factors: environmental impact, budget, and the specific needs of your project.

Seaweed paper stands out for its minimal environmental footprint. It’s made from rapidly growing seaweed that doesn’t require land or freshwater to cultivate and breaks down completely in just six weeks under home composting conditions. However, this eco-friendly option comes at a premium – it costs 2–5 times more than traditional paper and is currently harder to source.

On the other hand, recycled paper is a budget-friendly alternative with an established supply chain across the U.S. Opting for recycled paper with 50–100% post-consumer waste content helps divert waste from landfills and lowers the need for virgin fibers, all at a fraction of the cost of seaweed paper. It’s also reliable for printing and works well for high-volume projects. That said, it doesn’t share seaweed paper’s zero-land-use benefits.

For those prioritizing bold sustainability and willing to invest more, seaweed paper is a fantastic option. Its naturally speckled texture and eco-conscious story make it perfect for branded packaging, luxury stationery, or limited-edition designs. Meanwhile, recycled paper is ideal for everyday printing needs like brochures, catalogs, direct mail, and office materials, offering both affordability and consistent quality.

Many businesses find value in using a mix of both. Seaweed paper can make a statement for high-impact, eco-forward pieces, while recycled paper handles cost-effective, large-scale projects. This balanced approach helps meet sustainability goals without straining budgets. If you’re unsure how to incorporate either type into your printing, full-service providers like Miro Printing & Graphics Inc. in Hackensack, NJ, can guide you in finding the right solution to align with your goals.

FAQs

How does seaweed paper compare to recycled paper in terms of environmental impact?

Seaweed paper offers a greener option compared to recycled paper, thanks to its environmentally friendly production process. It requires less water, produces fewer carbon emissions, and skips chemical bleaching altogether, resulting in a cleaner manufacturing approach.

What’s more, seaweed paper is biodegradable and made from renewable resources, tapping into marine materials that can also play a role in combating ocean plastic pollution. These qualities make it a compelling choice for anyone looking to adopt more eco-conscious printing practices.

Why is seaweed paper more expensive and harder to find than recycled paper?

Seaweed paper typically comes with a higher price tag and is harder to find compared to recycled paper, and there are a few reasons for this. For starters, the process of making seaweed paper is still in its early stages and isn’t as well-developed, which drives up production costs. On top of that, the raw material – seaweed – has a limited supply and must be harvested carefully to avoid overuse, adding another layer of expense.

On the other hand, recycled paper benefits from well-established production methods and a broad supply chain, making it both more affordable and easier to source. While seaweed paper does bring some distinct environmental perks, its higher cost and limited availability highlight the hurdles in expanding this newer material to a larger scale.

How does seaweed paper perform compared to recycled paper for large print runs?

Seaweed paper provides print quality comparable to recycled paper, especially for large-scale print jobs. That said, the final outcome can depend on the nature of the project and the printing technology employed.

For most high-volume printing tasks, both seaweed and recycled paper perform reliably. However, it’s wise to discuss your options with your printer to ensure the paper meets your project’s needs. Elements like texture, ink absorption, and finish might show subtle differences between the two materials.

Related Blog Posts

https://app.seobotai.com/banner/banner.js?id=6941f6c089a9fb16dc707528

5 Ways to Cut Direct Mail Printing Costs

Learn how to significantly reduce direct mail printing costs with effective strategies that enhance budget efficiency without compromising quality.

Direct mail is powerful but often expensive, with printing and postage eating up over half the budget. The good news? You can lower these costs significantly without sacrificing quality. Here are five proven ways to save money on direct mail campaigns:

  • Bulk Printing: Printing in larger quantities can reduce per-piece costs by 50–70%.
  • Choose Cost-Effective Materials: Use standard paper sizes and lighter paper stocks to cut costs by up to 20%.
  • Simplify Design: Opt for straightforward formats like postcards or self-mailers to save on production and postage.
  • Clean Your Mailing List: Remove duplicates and undeliverable addresses to avoid wasting money – up to 20% of mailings can be invalid.
  • Leverage Discounts: Take advantage of USPS bulk mail discounts and production savings to lower expenses by 5–10% or more.

How Much Does Direct Mail Marketing Cost? – BusinessGuide360.com

BusinessGuide360.com

1. Use Bulk Printing to Lower Per-Unit Costs

Bulk printing is a smart way to cut down on direct mail expenses by spreading setup costs over a larger quantity of printed materials. When you produce higher volumes in a single run, costs like plate preparation, machine calibration, and material handling are distributed across thousands of pieces instead of just a few hundred. This method significantly reduces the per-unit cost, making your campaign more cost-effective.

For example, printing 25,000 pieces in one run can slash per-piece costs by 50%–70%. Combining color offset shells with black toner personalization can lead to savings of up to 42% per piece. On top of that, sticking to standard sizes and materials can help you save even more.

Cost Savings Potential

The benefits of bulk printing grow as your order size increases. Print shops often offer better rates for larger jobs because it allows them to maximize press time and material usage. Instead of starting and stopping for smaller orders, they can run one continuous job, which is much more efficient.

Using standard sizes like 8.5" x 11" or 6" x 9" postcards can also help you avoid extra charges. Custom dimensions often come with additional setup fees and material surcharges, so sticking to common sizes ensures you’re getting the most out of your budget. This approach is especially effective for recurring campaigns, such as monthly newsletters or seasonal promotions. The key is to forecast accurately – print enough to take advantage of bulk savings without creating unnecessary waste.

Ease of Implementation

Adopting bulk printing doesn’t require a complete overhaul of your current process. Most businesses can implement this strategy by working with a full-service print provider that handles everything from consultation to fulfillment. Companies like Miro Printing & Graphics Inc. simplify the process by offering design, printing, and mailing services all in one place.

The process usually starts with forecasting your needs for the next 6 to 12 months and consolidating those into larger print runs. Your printer can help determine the ideal quantities based on your mailing schedule and storage capabilities. Some providers even offer warehousing services, so you don’t have to worry about finding space to store large orders.

Additionally, hybrid printing methods can make bulk printing even more efficient. This approach involves printing static elements in bulk using offset printing and adding personalized details later with digital printing. It’s a great way to combine cost savings with customization.

Impact on Overall Campaign ROI

Reducing printing costs has a direct impact on your campaign’s ROI. The money saved can be reinvested into areas like enhanced targeting, creative design, or follow-up campaigns to boost engagement and response rates.

These savings become even more powerful when paired with postal discounts. For instance, USPS offers bulk mail discounts of 5% to 10% for mailings that meet automation requirements, such as having proper barcoding and address placement. When combined with the cost reductions from bulk printing, these discounts can significantly lower your overall campaign expenses.

Savvy businesses use these savings to scale their efforts without increasing their budgets. Instead of cutting back on marketing spend, they use the extra funds to reach more people or mail more frequently, allowing successful campaigns to grow while keeping costs under control.

2. Select Budget-Friendly Paper and Printing Options

Cutting costs on paper and printing doesn’t mean compromising your brand’s professionalism. By making smart choices, you can save significantly while maintaining a polished image.

House stock papers are a great way to reduce expenses. These are standard paper options that print shops buy in bulk, passing the savings on to you. For instance, swapping premium glossy paper for standard matte or uncoated options can lower costs by 10–20% per thousand pieces, depending on your order size and the current market. Companies like Miro Printing & Graphics Inc. offer these economical choices to help trim expenses.

Paper weight is another cost factor to consider. Opting for 80 lb. text stock instead of 100 lb. cover stock can save several cents per piece – a small change that makes a big difference in larger mail campaigns. Plus, lighter paper reduces both production and mailing costs, doubling your savings. Just ensure your paper meets USPS machinability standards to avoid extra fees. Beyond the paper itself, your choice of printing methods can unlock even more savings.

Cost Savings Potential

The printing method you select can have a major impact on your budget. Digital printing is ideal for short runs or projects requiring variable data, while offset printing offers lower per-unit costs for larger volumes.

For smaller jobs, gang run printing is a smart option. This process combines multiple print jobs into one run, sharing setup costs among different customers. It’s especially useful when you’re not under a tight deadline and can wait for your project to align with others.

Sticking to standard sizes – like 4" x 6" postcards or #10 envelopes – also helps control costs. These dimensions maximize paper usage and minimize waste, keeping production expenses low. In contrast, custom sizes often require special setups and result in more paper waste, which can increase costs by 10–25%. Standard formats also speed up production since printers don’t need to reconfigure their equipment.

Ease of Implementation

Partnering with an experienced print provider simplifies the process of adopting these cost-saving strategies. Providers like Miro Printing & Graphics Inc. offer in-house design and bindery services, helping you choose affordable options without sacrificing quality.

For example, your printer might suggest switching from letters to postcards – an adjustment that can cut costs by 20–30%. These conversations are most effective when they happen early in the planning stages. Once you’ve finalized a design or format, your ability to make cost-efficient changes becomes limited. Starting with cost-conscious parameters gives you the flexibility to optimize your spending.

Impact on Overall Campaign ROI

Lowering printing and material costs directly improves your campaign’s ROI by reducing the break-even point for response rates. These savings complement bulk printing strategies, offering multiple ways to stretch your budget.

The best part? You can often use less expensive materials without hurting your results. Testing different paper stocks and printing methods helps you find the perfect balance between cost and performance. Many businesses discover they can downgrade paper quality slightly while maintaining strong response rates.

With the money saved, you can reallocate your budget to other impactful areas. For example, you could mail more frequently, expand your audience, or invest in better data and personalization. These strategies not only enhance your campaign’s effectiveness but also keep overall costs manageable.

3. Simplify Mail Piece Design and Format

Keeping your mail piece design simple can make a big difference in both costs and clarity. Avoiding extras like multiple folds, inserts, or custom shapes can significantly cut printing and postage expenses. Plus, streamlined formats like postcards and self-mailers are great choices for cost-effective campaigns.

Postcards are one of the most affordable options. They eliminate the need for envelopes and use less postage compared to traditional letters. For example, a standard 4″ x 6″ postcard costs far less to produce and mail than a multi-page letter in an envelope. Their straightforward design also ensures your message is immediately visible to recipients.

Self-mailers are another practical choice. They don’t require envelopes and offer more space for your message. These work especially well for promotional campaigns where you want to highlight several products or services in one piece.

Cost Savings Potential

Simpler designs don’t just streamline production – they also deliver real savings. For instance, a direct mail campaign targeting 25,000 recipients used pre-printed color shells with black toner personalization, cutting form costs by 42% compared to full digital color printing. Another example comes from a nonprofit that replaced three photocard inserts with photos and captions printed directly on a letter. This change saved them a significant amount over a year without affecting response rates or revenue.

Standard sizing is another key factor in controlling costs. Oversized mail pieces that exceed USPS size and weight limits can incur extra charges. For example, sending more than seven sheets of paper in an envelope qualifies as an oversized letter, leading to higher postage fees. Double-sided printing is another smart way to fit more content into a standard #10 envelope, helping you avoid these added expenses.

Ease of Implementation

Simplifying your design doesn’t have to be complicated, especially with the right print partner. Companies like Miro Printing & Graphics Inc. offer Computer Layout & Design services, helping you create professional, USPS-compliant mail pieces. Starting the design process early allows your printer to recommend cost-effective formats that align with your goals and ensure your mail meets USPS requirements for size, thickness, and aspect ratio. This collaborative approach ensures every stage of your direct mail campaign is optimized for maximum return on investment (ROI).

Impact on Overall Campaign ROI

Streamlined designs don’t just save money – they can also improve your campaign’s ROI. With over half the cost of direct mail tied up in printing and postage, optimizing your design can free up funds for other campaign elements. Simple, clear formats like postcards not only reduce costs but often achieve better engagement. Recipients are more likely to read and respond to concise mail pieces compared to more complex, multi-page designs. By making your message easy to understand at a glance, you can enjoy both cost savings and improved campaign results.

4. Clean and Target Your Mailing Lists

Once you’ve fine-tuned your design, the next crucial step is refining your mailing list. A well-maintained mailing list can significantly cut down on unnecessary costs. Did you know undeliverable mail can account for up to 20% of your total mailings? That’s a lot of wasted printing and postage.

Data hygiene is key to running an efficient and cost-effective direct mail campaign. This involves removing duplicates, outdated addresses, and inactive contacts from your list. Skipping this step means paying for mail that never reaches its destination.

Services like the National Change of Address (NCOA) can help by cross-referencing your mailing list with postal databases. These services identify people who have moved or addresses that are no longer valid, ensuring your mail gets where it needs to go.

On top of that, targeted segmentation can make your campaigns even more effective. By applying demographic and behavioral data, you can focus your efforts on the audience most likely to respond. This strategy not only reduces the number of pieces you need to print but also boosts response rates, turning precision into measurable savings.

Cost Savings Potential

The financial benefits of maintaining a clean mailing list are substantial. For example, a direct mail campaign targeting 25,000 records saw significant savings after cleaning its list. By ensuring every mail piece reached a valid address, the campaign minimized wasted postage and printing costs.

Let’s break it down: If 20% of your addresses are undeliverable, you’re essentially throwing away 20% of your printing and postage budget. For a campaign aimed at 10,000 recipients, eliminating 2,000 bad addresses could save you a considerable amount on those expenses.

Using demographic and behavioral data for targeted acquisition further amplifies these savings. When your mail reaches individuals genuinely interested in your offer, you need fewer pieces to achieve the same results. This reduces your cost per response while increasing the efficiency of your campaign.

Ease of Implementation

Cleaning and targeting your mailing list doesn’t have to be complicated. By partnering with experienced professionals, you can streamline the process. Miro Printing & Graphics Inc. offers mailing and fulfillment services, including list management and address verification. This makes it easy for businesses without in-house expertise to improve their mailing lists.

The process itself is straightforward. Typically, you upload your list, run it through a verification service, and receive a cleaned version in return. Most providers can complete this within a few business days, ensuring your campaign stays on schedule.

Professional services take care of the technical details, allowing you to focus on crafting your message and strategy. This approach ensures your campaigns are handled expertly, without requiring you to learn the ins and outs of postal regulations or data management. It’s a smart complement to the cost-saving steps you’ve already implemented in printing and design.

Impact on Overall Campaign ROI

A clean, targeted mailing list doesn’t just save money – it also drives better results. When your mail reaches people who are genuinely interested, they’re more likely to engage and respond. This means your marketing dollars go further, maximizing the impact of your campaign.

The ROI boost comes from two angles: you save money by avoiding irrelevant or unreachable addresses, and you generate more responses from the recipients who actually receive your mail. This dual benefit ensures your marketing budget is used efficiently, directly improving campaign profitability.

Plus, the benefits of good list management extend beyond a single campaign. Once you establish solid data hygiene practices, every future mailing becomes more cost-effective. Instead of wasting resources on bad addresses, you can focus your efforts – and your budget – on reaching the prospects most likely to convert into customers.

5. Use Postal and Production Discounts

A key part of trimming campaign costs lies in leveraging postal and production discounts. When used effectively, these options can significantly lower your overall expenses.

The United States Postal Service (USPS) offers various discount programs, such as bulk mail, presort, and automation discounts, which can cut postage costs by 5–10% or more based on your mailing volume and preparation level.

Production discounts complement postal savings perfectly. By using bulk printing or gang printing – where multiple mail pieces or campaigns are printed together – you can take advantage of economies of scale. This method can reduce your cost per piece by 50–70% compared to smaller print runs or single mailings.

To qualify for postal discounts, you need to meet specific USPS requirements. This includes reaching minimum volume thresholds, presorting mail by ZIP code, and adhering to automation standards like barcoding and proper address placement. Additionally, sticking to standard mail sizes and formats helps you avoid extra fees and ensures eligibility for the best rates. When combined with bulk printing and streamlined designs, these discounts can maximize your savings even further.

Cost Savings Potential

The financial benefits of combining postal and production discounts are impressive. For example, printing materials for multiple mailings at once can cut costs by 50–70% compared to single-run mailings. Gang printing – where similar campaigns, like dual renewal mailings, are combined – also lowers costs without sacrificing response rates. This approach is especially effective for businesses running multiple campaigns throughout the year or organizations with regular mailing needs across different departments.

Ease of Implementation

Experienced print and mail service providers can simplify the process by handling presorting, barcoding, and ensuring compliance with USPS requirements. They also provide guidance on print run sizes, material choices, and campaign schedules to maximize production efficiency.

Miro Printing & Graphics Inc. is one example of a provider offering comprehensive mailing and fulfillment services. Their expertise ensures that your campaign runs smoothly while staying cost-effective.

"The end result is a finished piece that exceeds your highest expectations but never your budget!" – Miro Printing & Graphics Inc.

All you need to do is share your campaign details, optimize your print runs with your provider, and let them manage compliance. Many providers can synchronize production and mailing schedules to ensure you qualify for maximum discounts without delaying your campaign.

Impact on Overall Campaign ROI

Reducing printing and postage costs directly boosts your return on investment (ROI). Lower expenses mean you can allocate more of your budget toward creative development, audience targeting, or follow-up strategies. Alternatively, you can reach a larger audience or run more frequent campaigns without overspending.

The benefits are twofold: production discounts lower your upfront printing costs, while postal discounts reduce your per-piece mailing expenses. Together with a well-maintained and targeted mailing list, these savings ensure every dollar contributes more effectively to generating responses and conversions.

Since printing and postage typically account for over half the cost of a direct mail campaign, optimizing these areas delivers the greatest impact on your bottom line. Businesses that partner with full-service providers often enjoy consistent savings across multiple campaigns, as these providers can plan bulk opportunities and ideal mailing schedules in advance.

The advantages extend beyond individual campaigns. Once you’ve streamlined your production and mailing processes, future campaigns become more cost-efficient. By planning strategically, you can avoid paying premium rates for last-minute jobs or small print quantities, ensuring your campaigns remain effective without breaking the bank.

Cost Comparison Table

Understanding the cost differences between formats and methods can help you make smarter budget decisions. Below is a table outlining pricing for popular direct mail options based on a bulk quantity of 10,000 pieces:

Format/Method Cost Per Piece Paper Type Best For Notes
Standard Postcard (4" x 6") $0.25–$0.50 Standard house stock High-volume campaigns No envelope needed; qualifies for reduced postage
Premium Postcard (4" x 6") $0.35–$0.55 Premium stock Brand-focused campaigns Higher perceived value but increased costs
Letter in Envelope $0.50–$0.90 Standard 80 lb paper Detailed messaging Higher postage and envelope costs
Tri-fold Brochure $0.60–$1.00+ Standard 100 lb paper Product showcases Heavier weight increases postage
Digital Printing (small runs) $0.30–$0.60 Various options Under 2,000–5,000 pieces Faster turnaround but higher per-unit cost
Offset Printing (large runs) $0.15–$0.25 Various options Over 5,000 pieces Lower per-unit cost but requires setup work
Color Shell + Black Variable Up to 42% savings Standard stock Recurring campaigns Savings compared to full digital color printing

Paper selection plays a big role in budgeting. Standard house stock paper typically costs $15–$25 per thousand sheets, while premium specialty stocks can cost over $35 per thousand. Even small adjustments, like switching from 100 lb to 80 lb paper, can reduce costs without significantly impacting quality.

Printing methods also influence costs. Digital printing is ideal for smaller runs (fewer than 5,000 pieces) due to minimal setup costs, with prices ranging from $0.30–$0.60 per piece. For larger runs, offset printing becomes more economical, with per-piece costs dropping as low as $0.15–$0.25.

Format choice creates noticeable cost differences. Postcards are typically the most affordable option since they use less paper, don’t require envelopes, and qualify for reduced postage. For instance, a standard postcard in bulk may cost around $0.25 per piece, while a folded brochure could cost $0.50 or more due to additional materials and postage.

Bulk printing is another way to cut costs, as shown in the table above.

Companies like Miro Printing & Graphics Inc. offer a range of services to help businesses save money. Their expertise spans both digital and offset printing, and their in-house bindery and fulfillment services can secure bundling discounts, typically saving an additional $0.05–$0.10 per piece on average.

The main takeaway? Your choice of format has the largest impact on costs, but refining your paper and printing method can further optimize your budget. Postcards – especially when printed in bulk using standard materials – remain the most cost-effective option for most direct mail campaigns, making them a smart choice for budget-conscious marketers.

Conclusion

Using strategies like bulk printing, cost-effective materials, simplified designs, accurate mailing lists, and postal discounts can lead to significant savings – up to 42% overall and a reduction of 50–70% in per-piece costs. However, these savings hinge on executing each phase of your campaign with precision.

The key to success lies in careful implementation. By monitoring response rates, ROI, and deliverability, you can ensure your cost-saving measures enhance campaign performance without sacrificing quality. These strategies work best when paired with a strong commitment to maintaining high standards, turning budget efficiency into better outcomes.

Partnering with a full-service print shop like Miro Printing & Graphics Inc. can simplify the entire process. Their services – ranging from digital and offset printing to in-house bindery, design, and mailing fulfillment – offer a streamlined approach that can reduce costs through bundled efficiencies.

"Mike and his team completed a complex job in record time for a very reasonable price." – Julia I., Customer

With expertise in postal regulations, production techniques, and advanced tools like variable data printing, Miro Printing & Graphics Inc. helps businesses navigate the challenges of direct mail campaigns while staying on budget. Their dedication to exceeding expectations aligns seamlessly with cost-saving strategies.

Since printing and postage account for more than half of direct mail expenses, auditing your spending, refining your mailing tactics, and leveraging expert services are essential. By focusing on strategic cost management, you can trim your budget while boosting your campaign’s overall impact.

FAQs

How do I choose the right print quantity for bulk orders to save money without wasting materials?

When planning bulk print orders, it’s crucial to assess your campaign’s requirements and the size of your target audience. While printing in bulk usually reduces the cost per item, producing too many can lead to extra costs and wasted materials.

Collaborate with your printer to identify price breaks at various quantities – larger runs often come with lower costs per unit. If you’re uncertain about the exact number needed, it’s often smarter to order a bit less than your estimate to prevent excess inventory.

How do I choose between digital and offset printing for my direct mail campaign?

When choosing between digital printing and offset printing for your direct mail campaign, it’s important to weigh a few factors: how many pieces you need, your budget, and whether customization is a priority.

Digital printing works best for smaller quantities or campaigns that require personalized content, as it’s a more affordable choice for these specific needs. Meanwhile, offset printing shines when you’re producing large volumes, offering a lower cost per piece and consistently high-quality output.

At Miro Printing & Graphics Inc., both options are available, making it easy to match your campaign’s goals and budget with the right printing method.

What are the best ways to clean and maintain my mailing list to improve deliverability and reduce costs?

To keep your mailing list accurate and save money, start by eliminating duplicate or invalid addresses. Use tools or services to routinely check for outdated or incorrect information. This simple step can significantly cut down on returned mail and avoid wasting resources.

Another smart move is to segment your list. By grouping your audience into specific categories, you can tailor your campaigns to reach the right people. This approach not only cuts unnecessary printing and mailing costs but also boosts engagement by delivering more relevant messages.

Related Blog Posts

https://app.seobotai.com/banner/banner.js?id=69266174df12e5e3fe79d7ce